
Documentation
Newsletter Add-on
Version 1.0.0 · updated November 18, 2026
Overview
The Newsletter Add-on turns the Email Template Builder into a newsletter tool. You create campaigns in the Shopware Administration under Marketing › Newsletter, design them in the builder you already know and send them to your shop’s confirmed newsletter recipients – without an external tool and without handing data to third parties. Afterwards you see opens, clicks, unsubscribes and the revenue the newsletter brought in.
A newsletter goes through five tabs: Settings (subject, channel, language, A/B test) › Audience (target group) › Design (Mail Builder) › Review & Send (checklist, test mail, sending or scheduling) › Statistics (appears after sending).
Requirement: The add-on is an extension of the Email Template Builder and doesn’t work on its own. You need the Email Template Builder version 1.3.2 or later and Shopware 6.7.3 or newer. Everything you know about the builder – blocks, brand kit, preview, QA – also applies to newsletters; how to use it is explained in the Email Template Builder documentation.
Setup
- First install and activate the Email Template Builder, then the Newsletter Add-on (Extensions › My extensions). Shopware refuses to install the add-on as long as the builder is missing.
- Add your logo and colors in the builder’s brand kit (Settings › Mail Builder brand kit). The newsletter templates pick them up automatically; without a brand kit they fall back to your theme’s logo.
- Check the extension configuration (see Settings): sender, your mail provider’s rate limit and which kinds of tracking you want to use.
- Make sure your shop’s message queue and scheduled tasks are running (worker or cron). Sending, scheduled newsletters and the A/B decision all run through them.
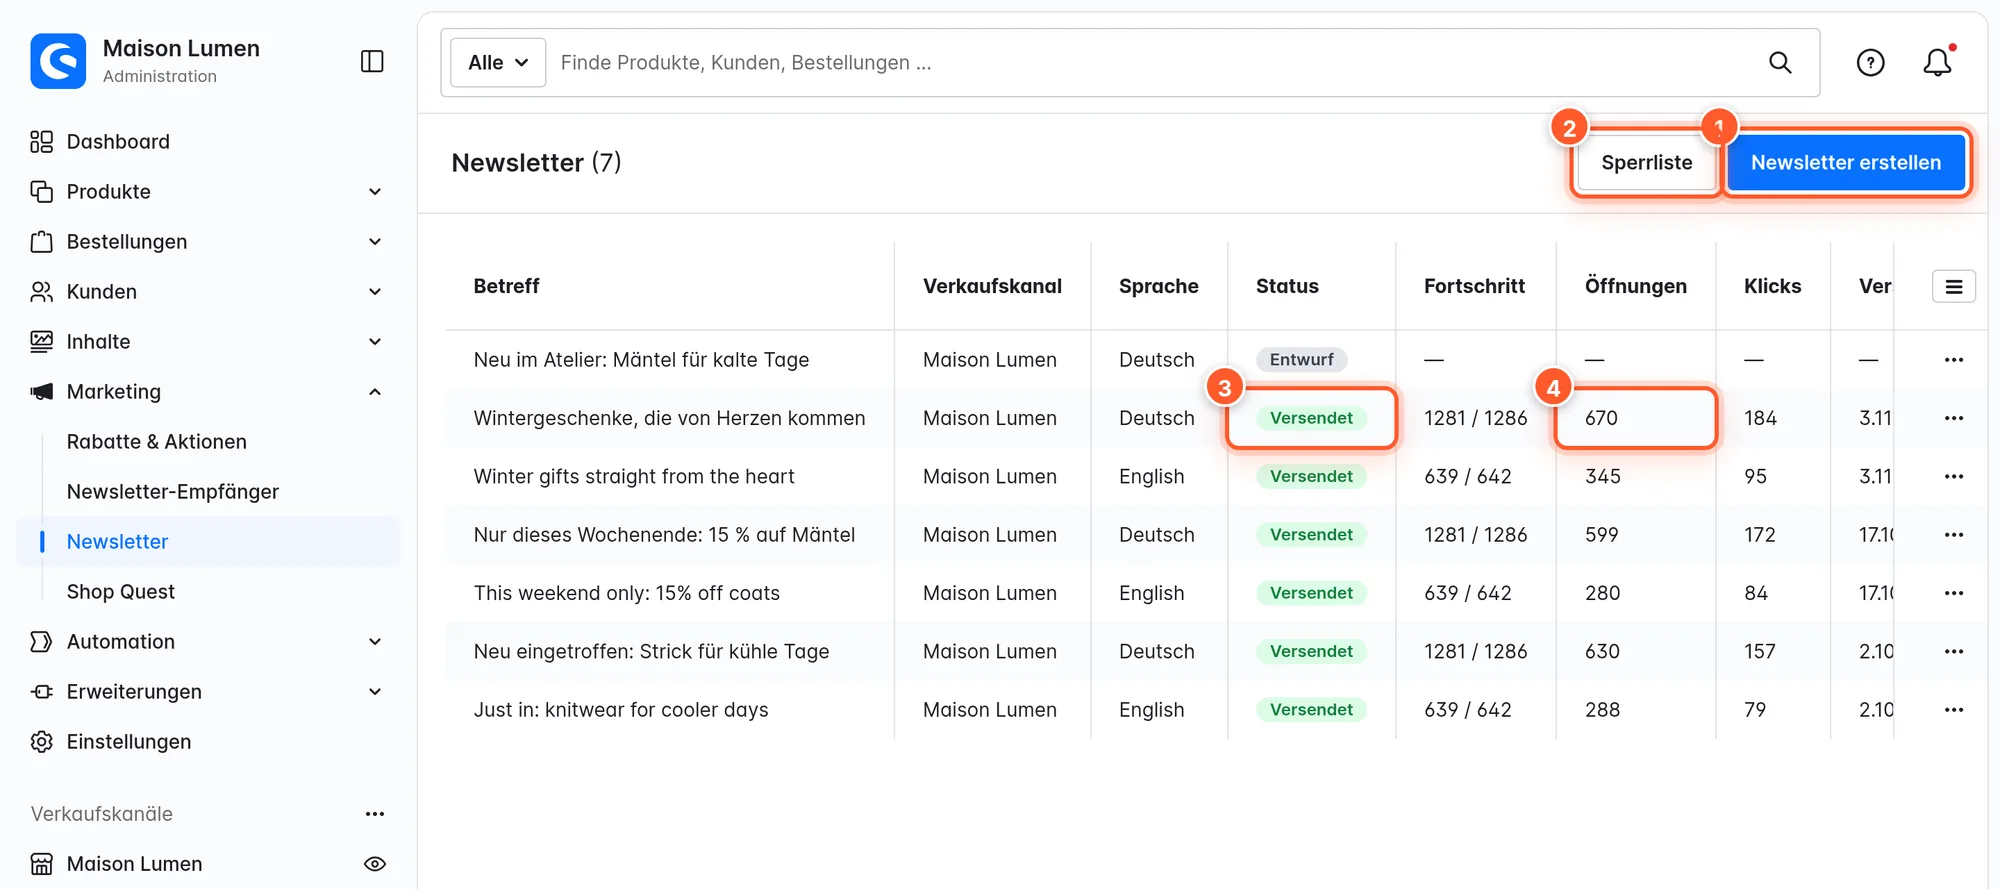
- Open Marketing › Newsletter and click Create newsletter 1.
Newsletter settings
In the first tab you define what appears in the inbox and who the newsletter goes to.
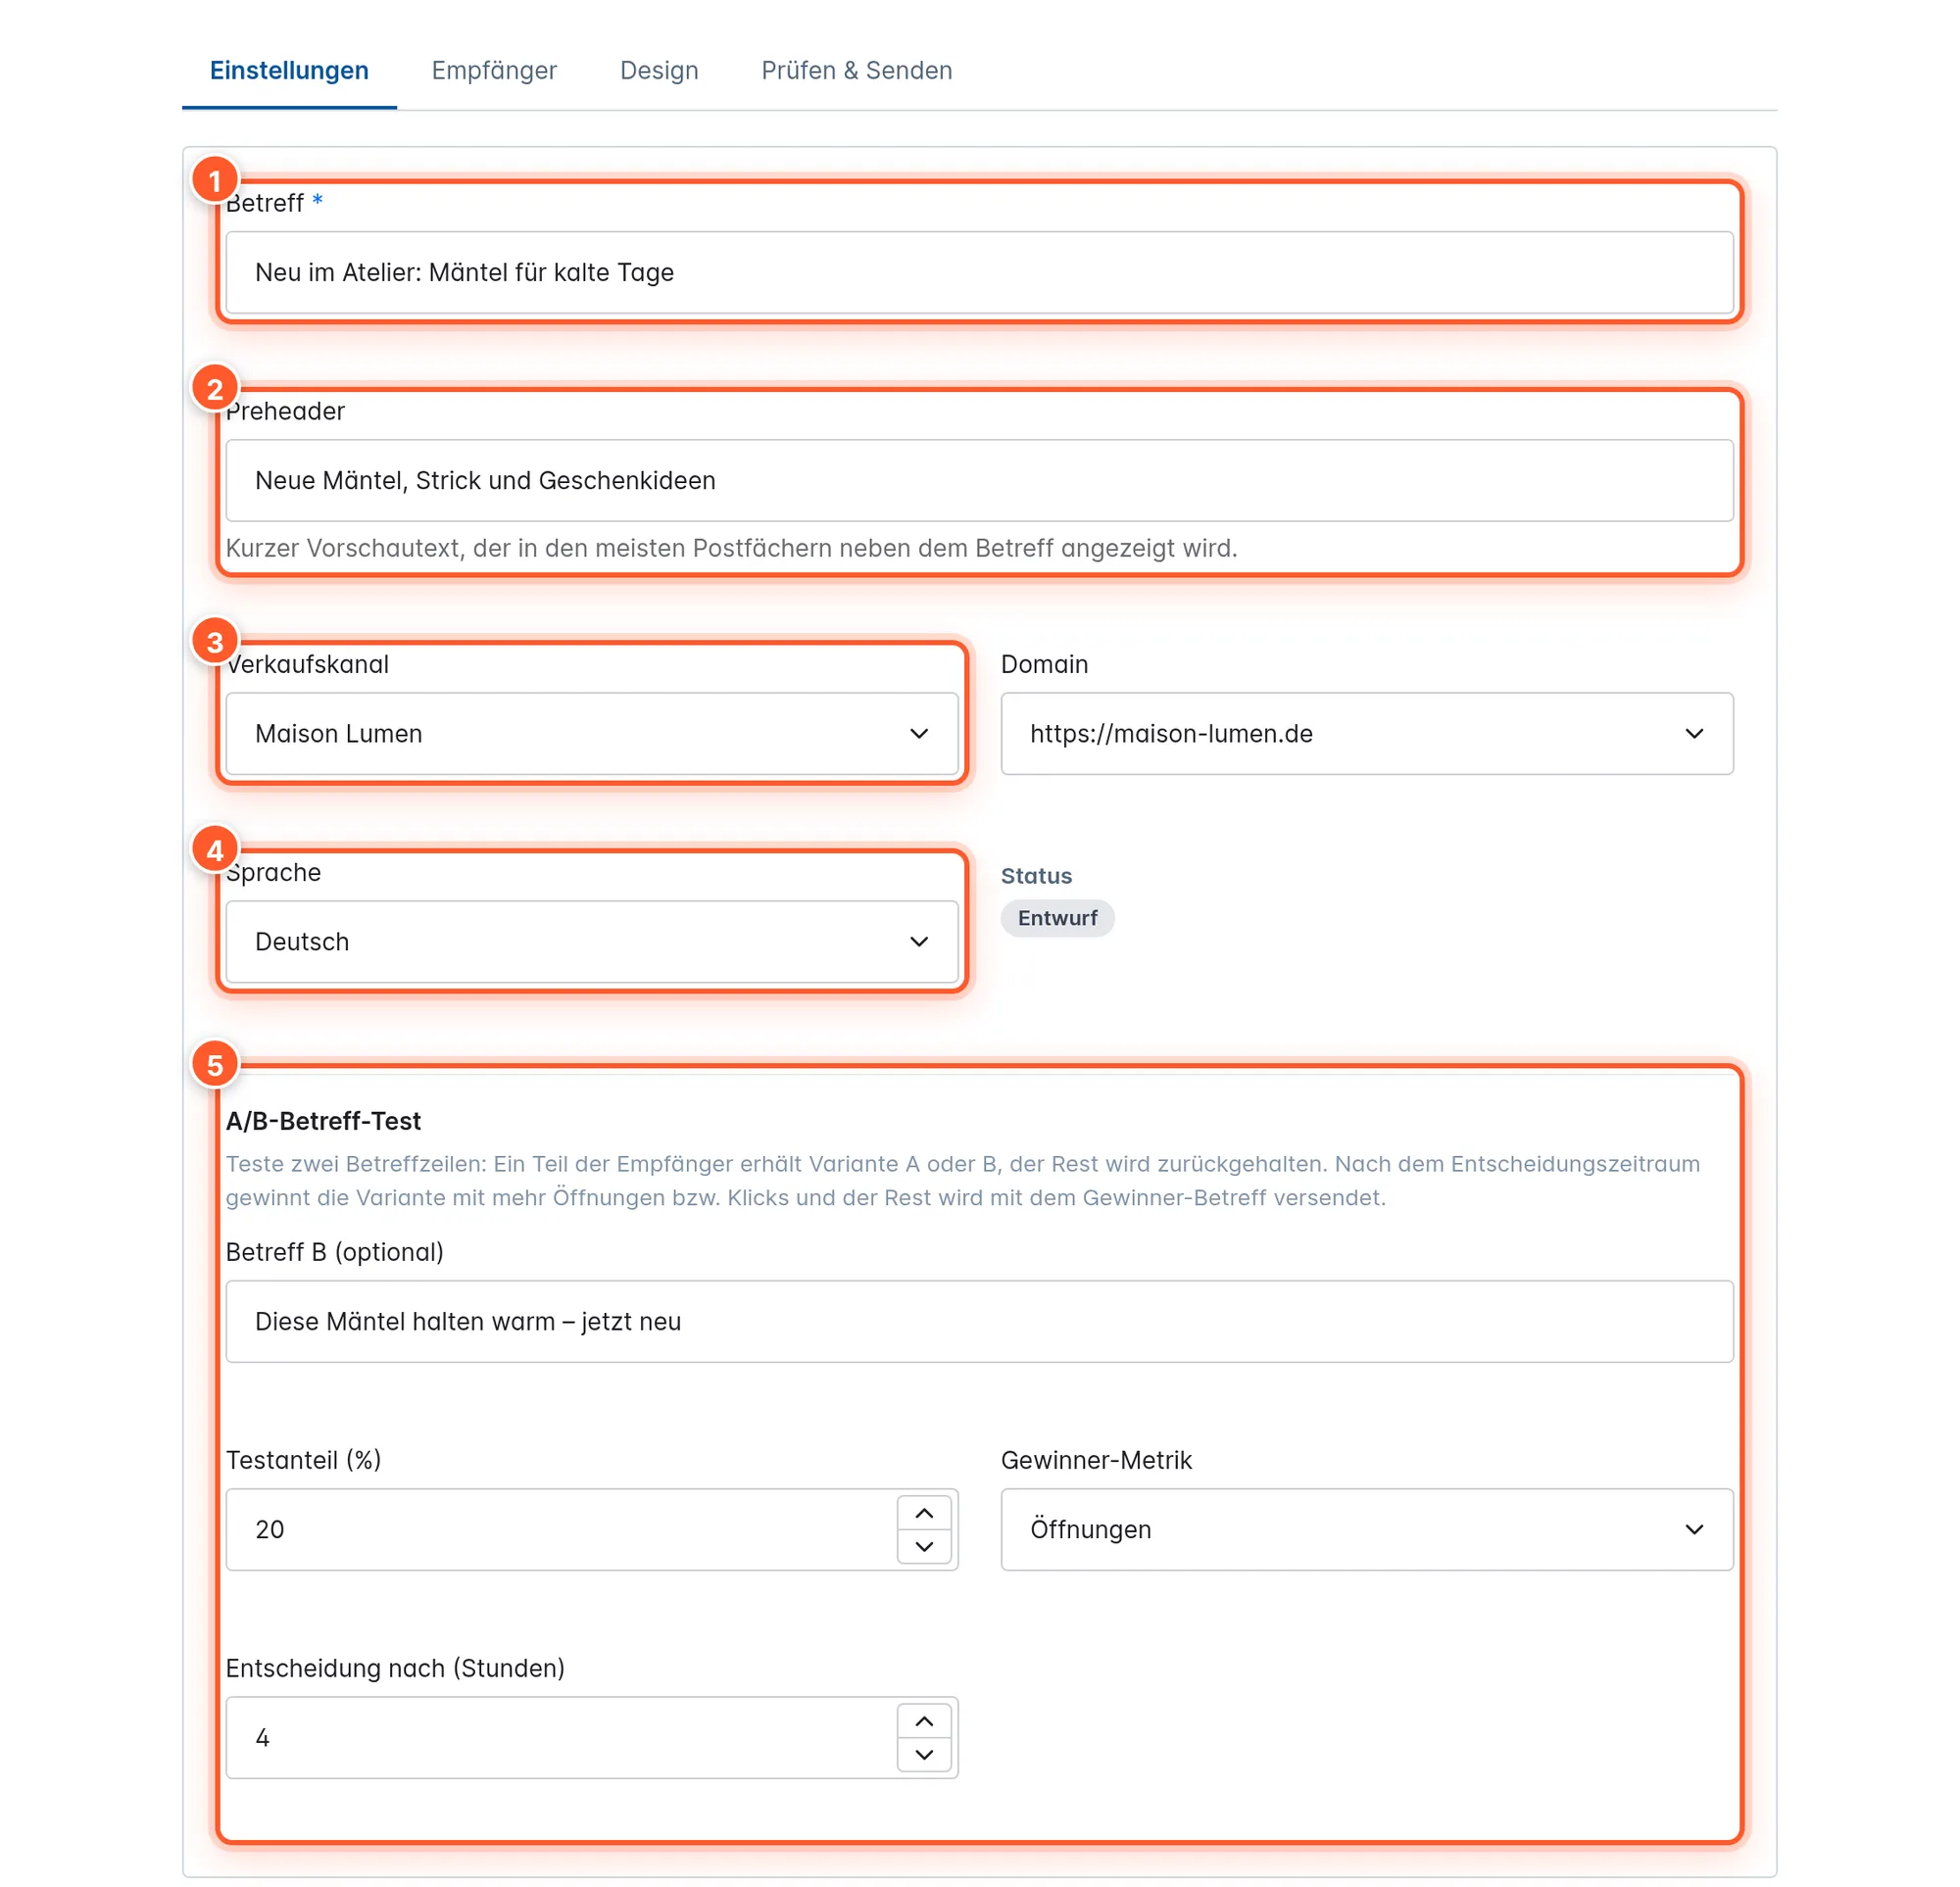
- Subject 1 is required; without it, the newsletter can’t be saved.
- Preheader 2 is the short preview text most inboxes show next to the subject.
- Sales Channel and Domain 3 determine whose subscribers receive the newsletter and which storefront domain the unsubscribe and shop links point to. The builder also uses this channel’s shop name, colors and links.
- Language 4: a newsletter always goes to the subscribers of one language. For a bilingual mailing, create a separate newsletter with its own design for each language.
- A/B subject test 5: if you enter a Subject B, the test share, winner metric and decision window appear – see A/B test and resending.
Click Save. Only a saved newsletter has a preview, checklist and test mail.
Designing
In the Design tab, click Create design. The Email Template Builder opens with an empty newsletter design. In the Templates tab you’ll find six newsletter templates: Botanical, Bold & dark, Editorial, Soft pastel, Corporate and Product focus – already in the logo and colors of your brand kit or sales channel.
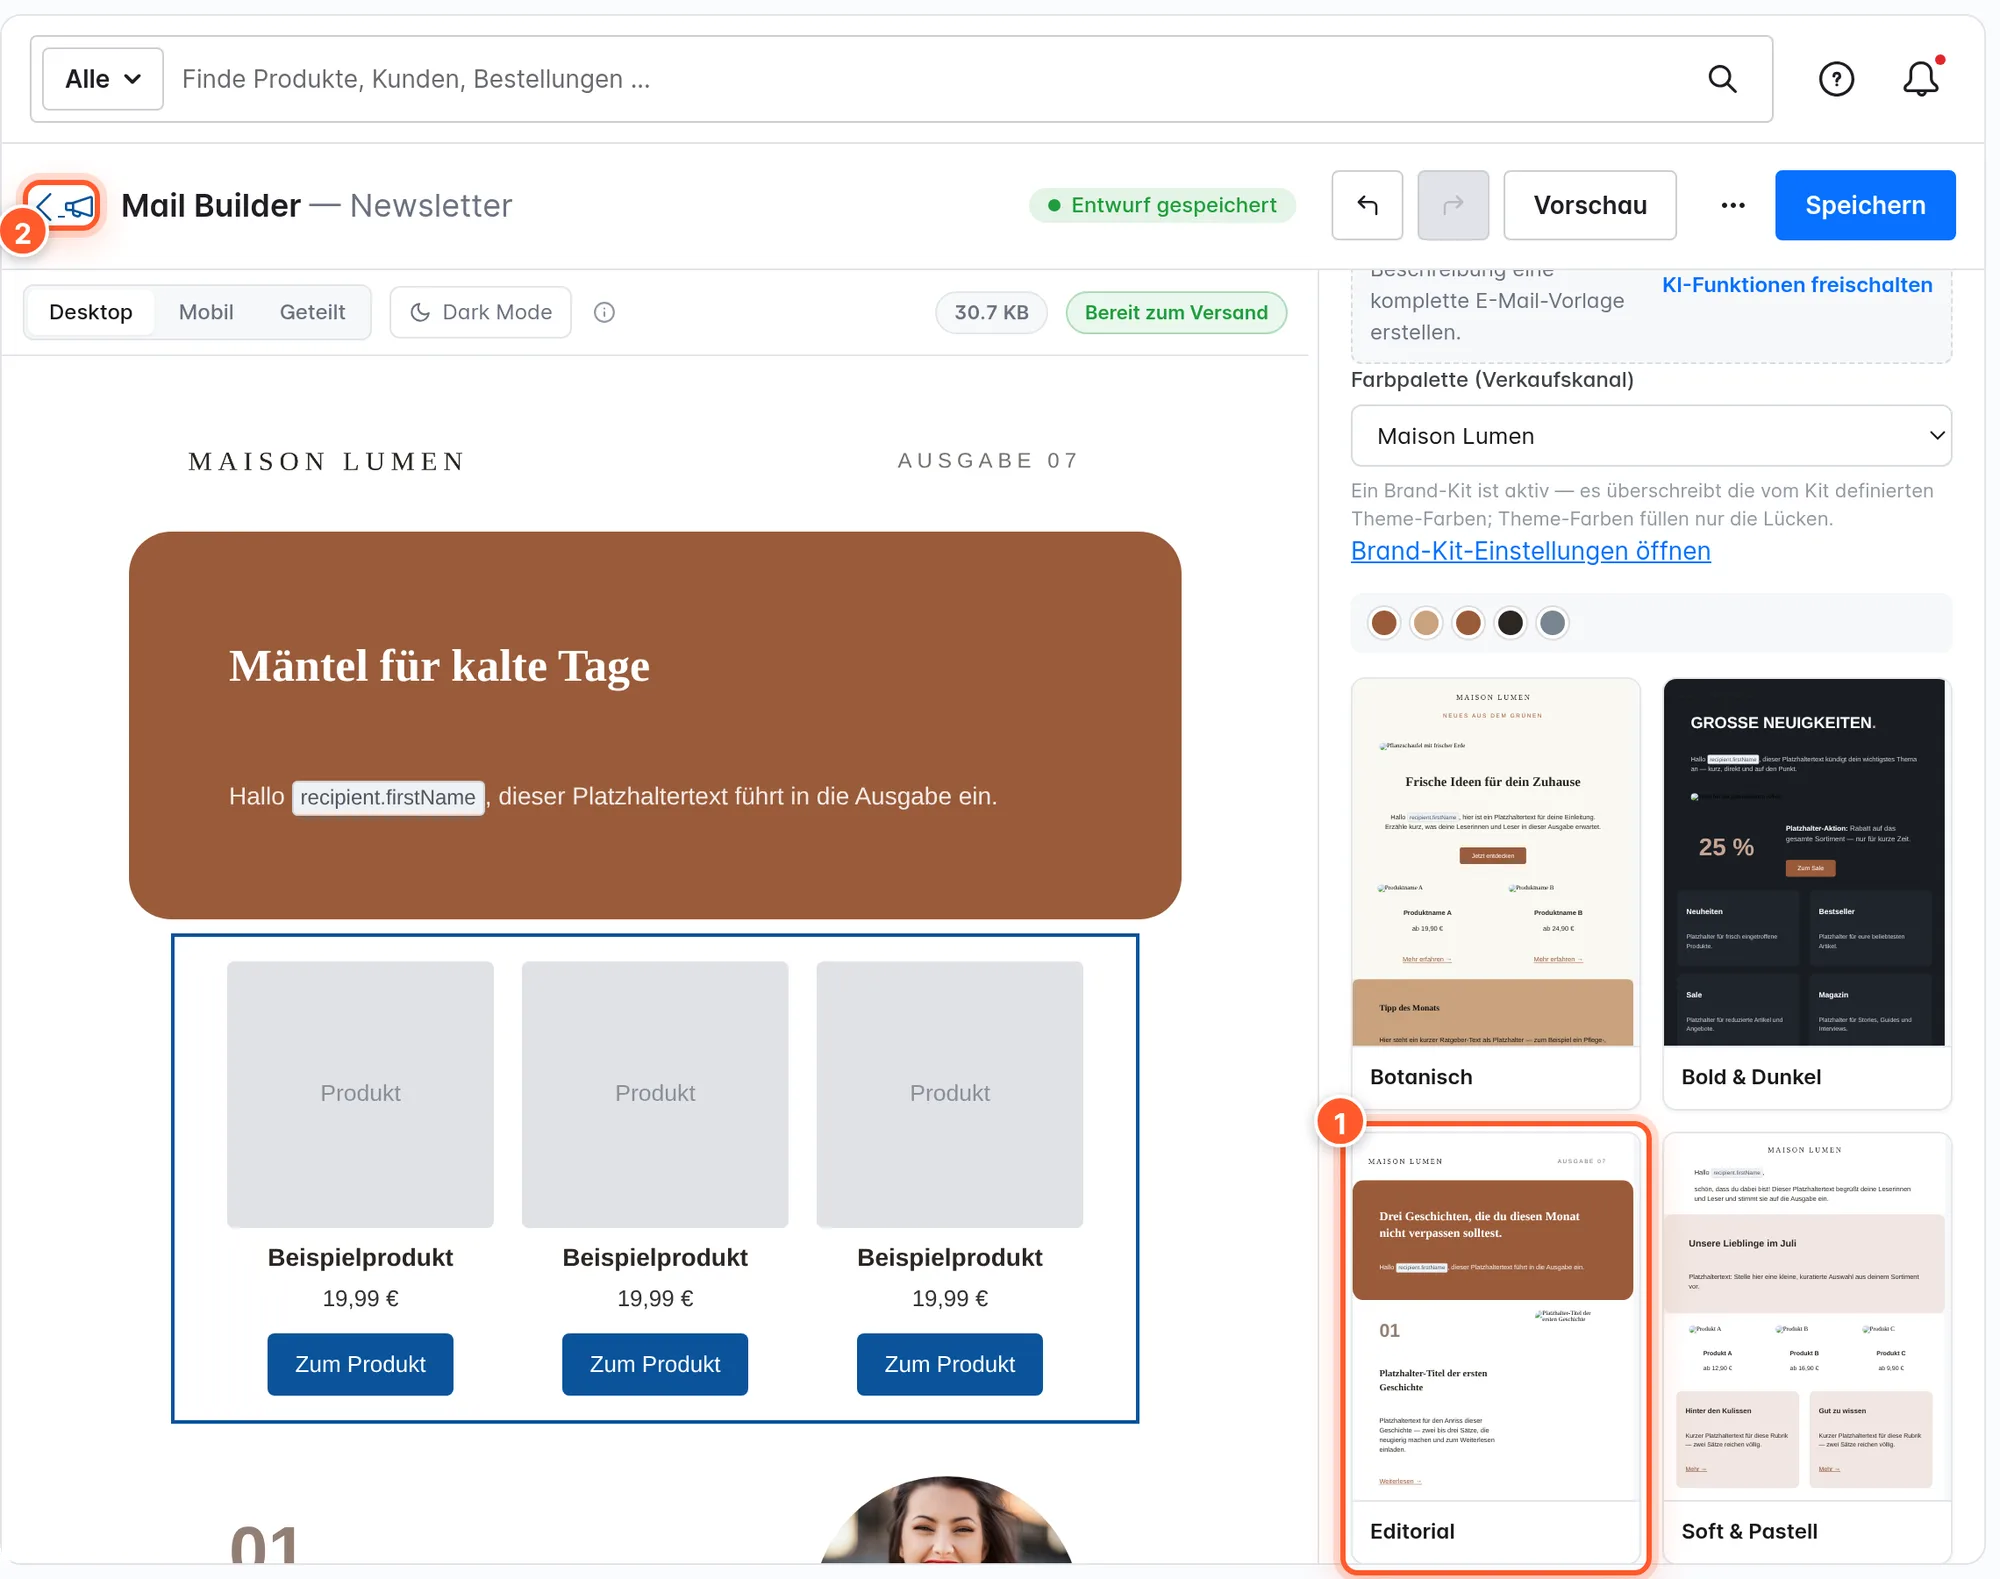
After applying it, edit texts, images and buttons as in any other mail. Especially useful for newsletters is the Product list block (Blocks › Products): it shows best-sellers, new arrivals, a product stream or hand-picked products as cards.
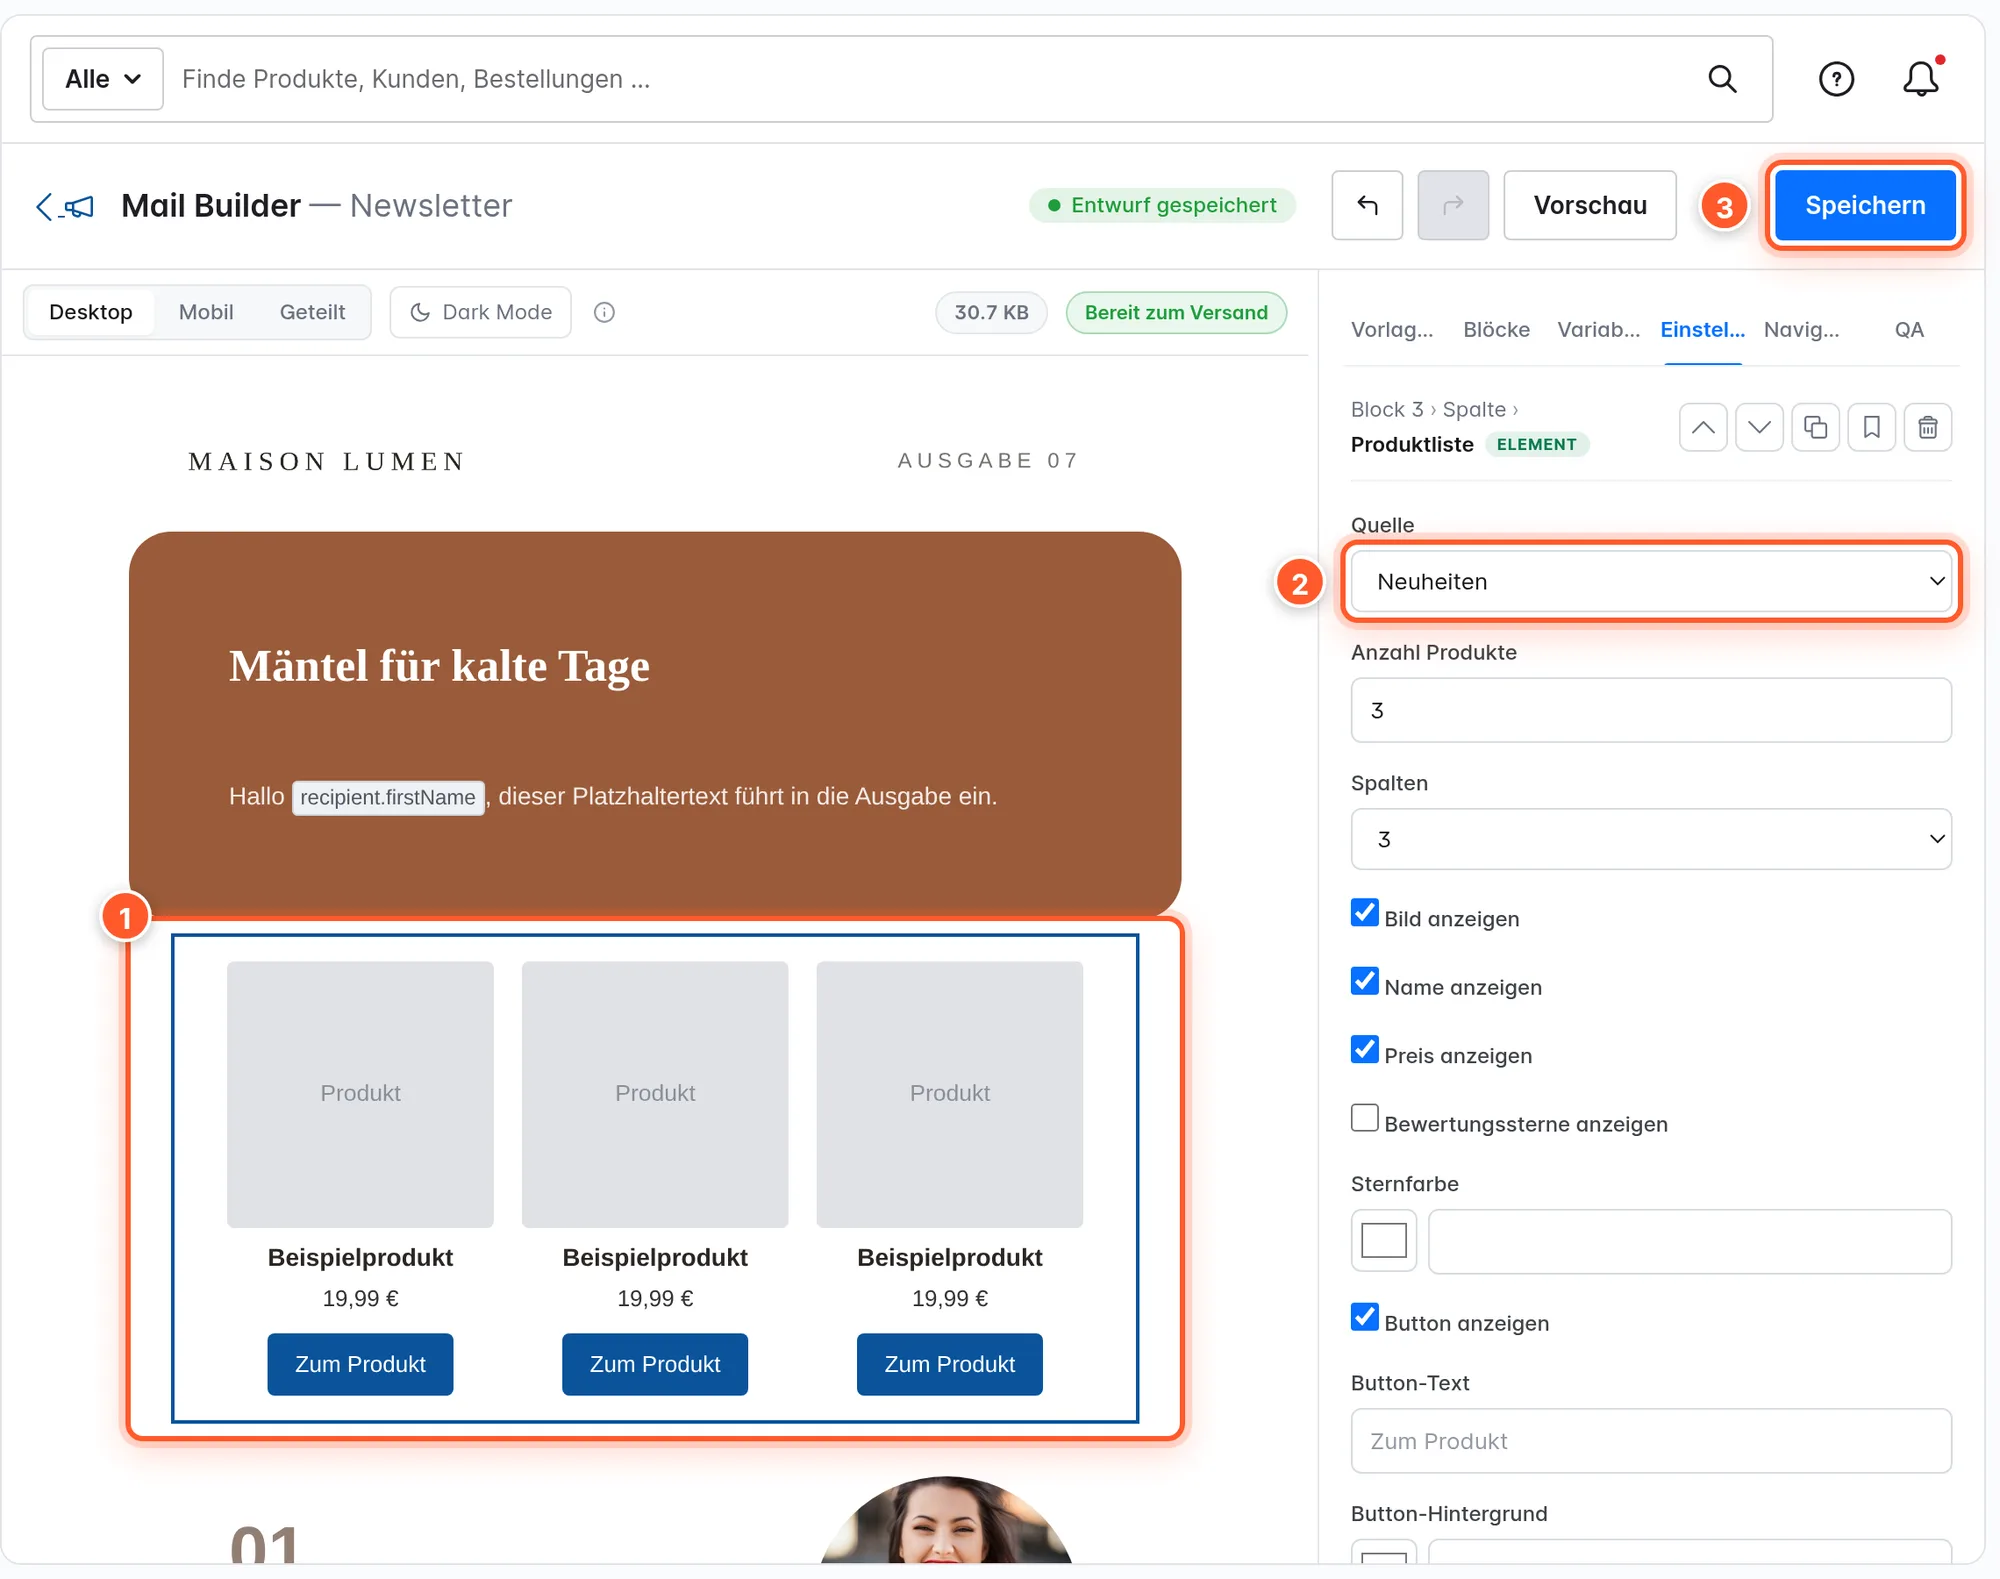
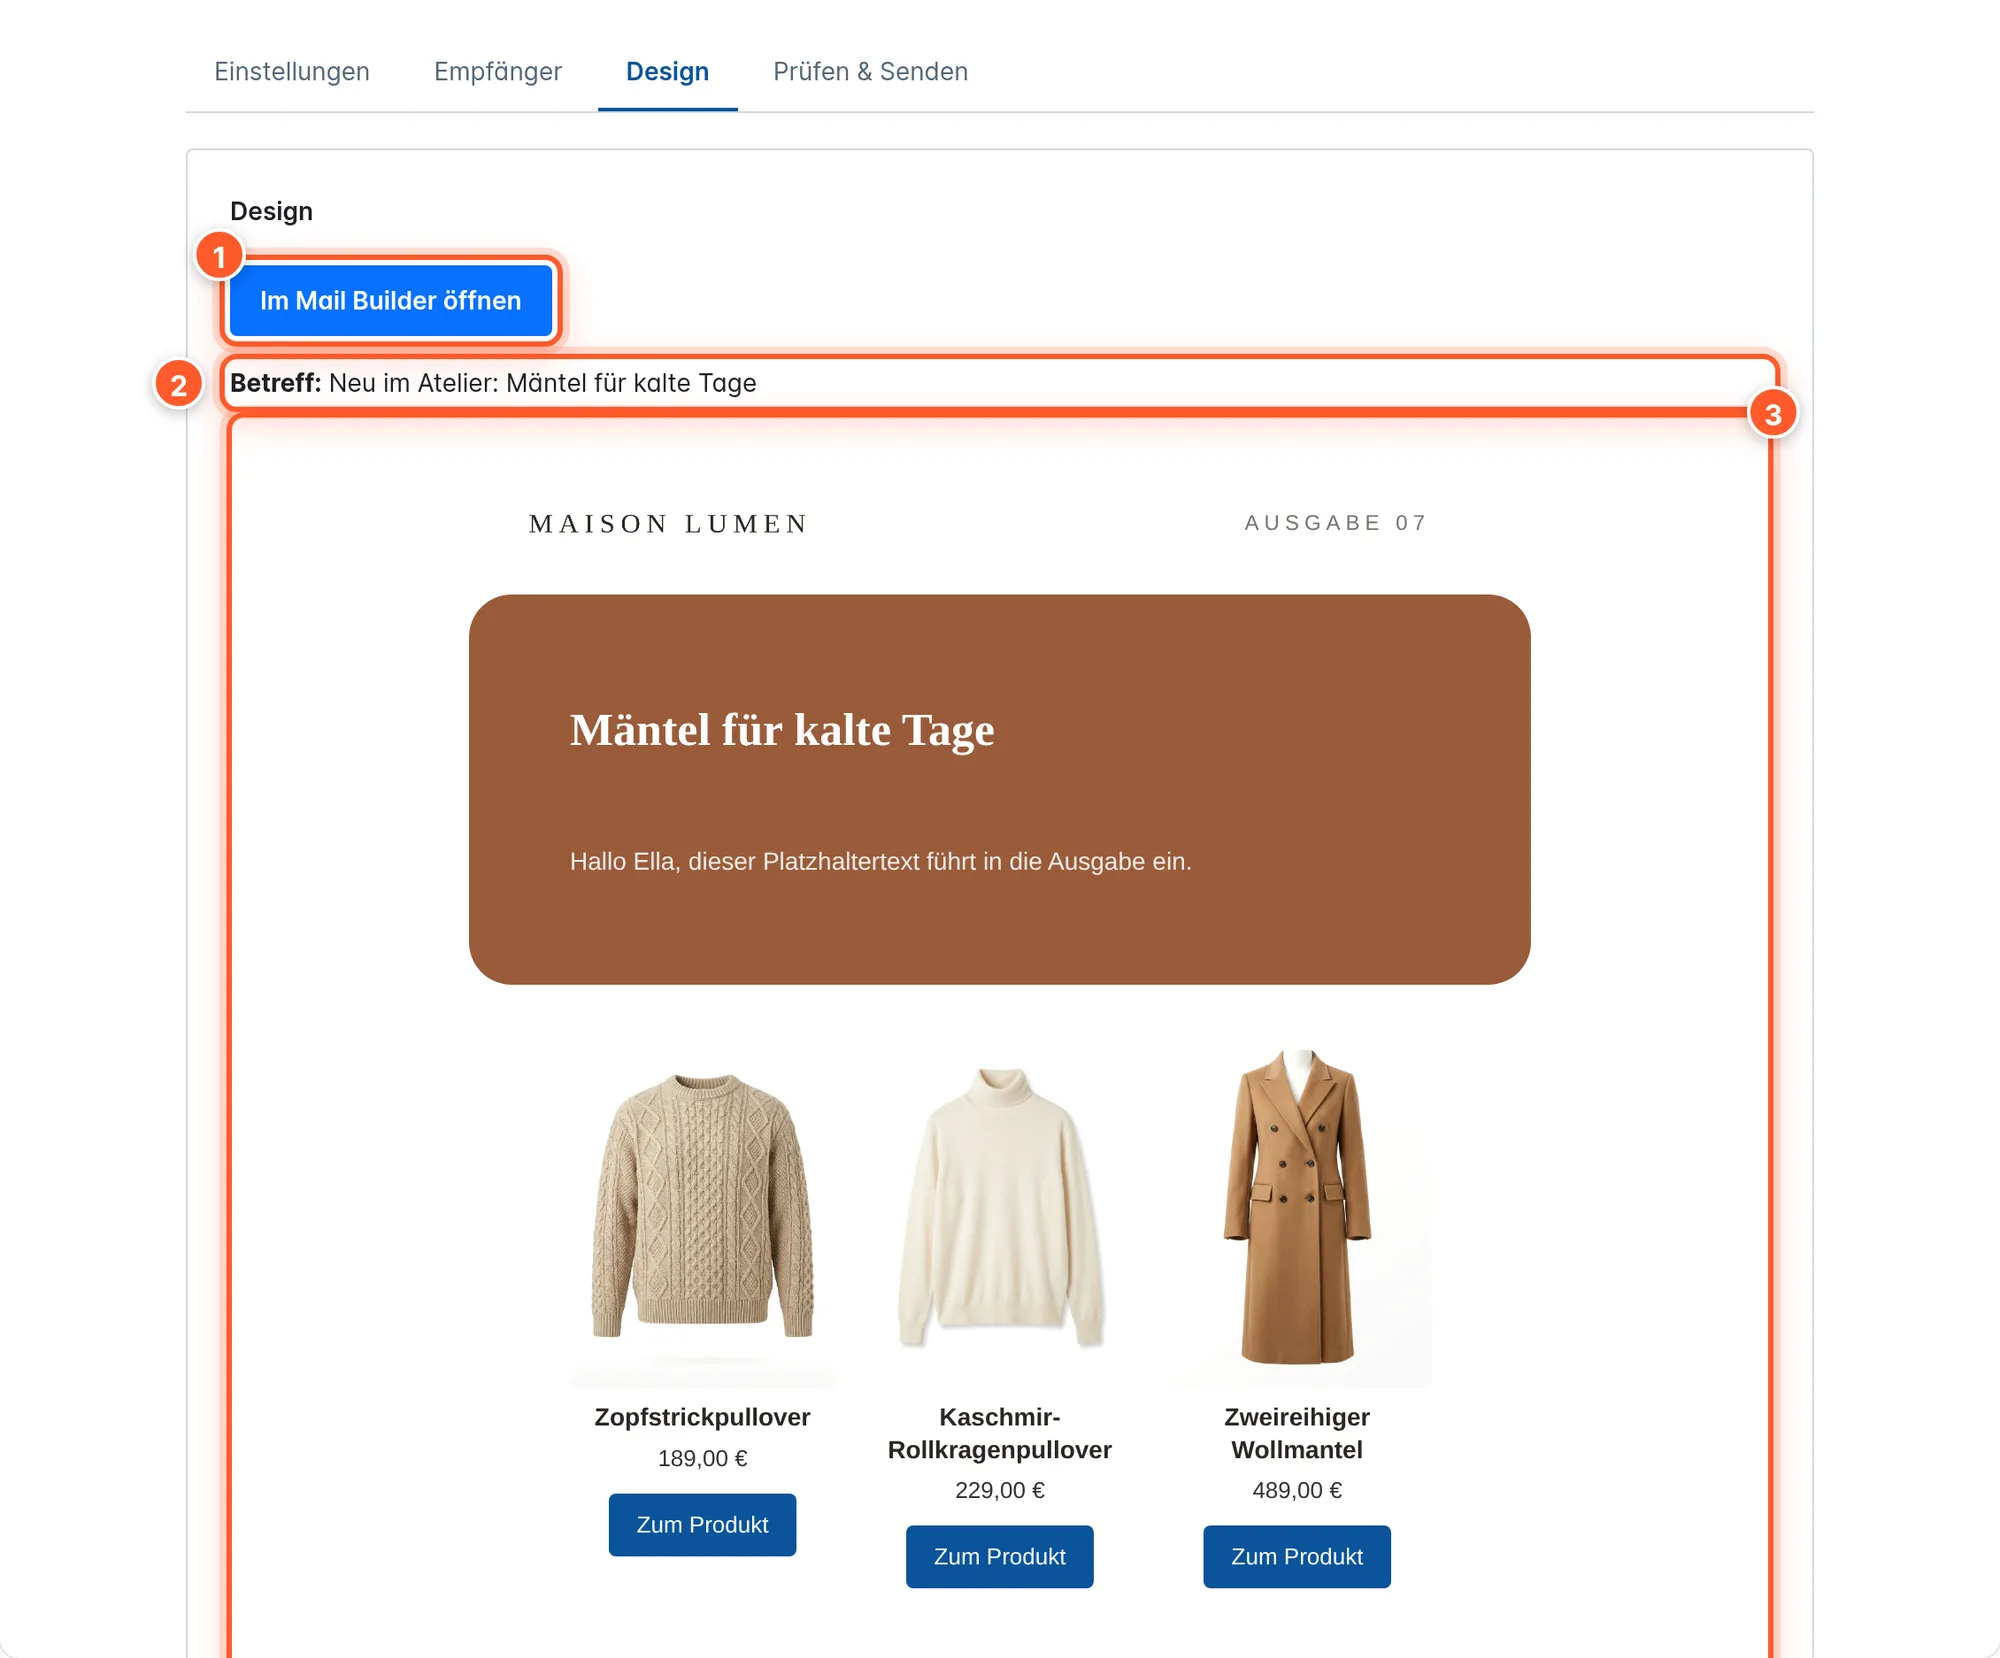
On the canvas, the product list always shows sample products. You see the real products with images and prices in the builder’s Preview and in the newsletter’s Design tab 3 – they’re loaded from the current catalog when sending.
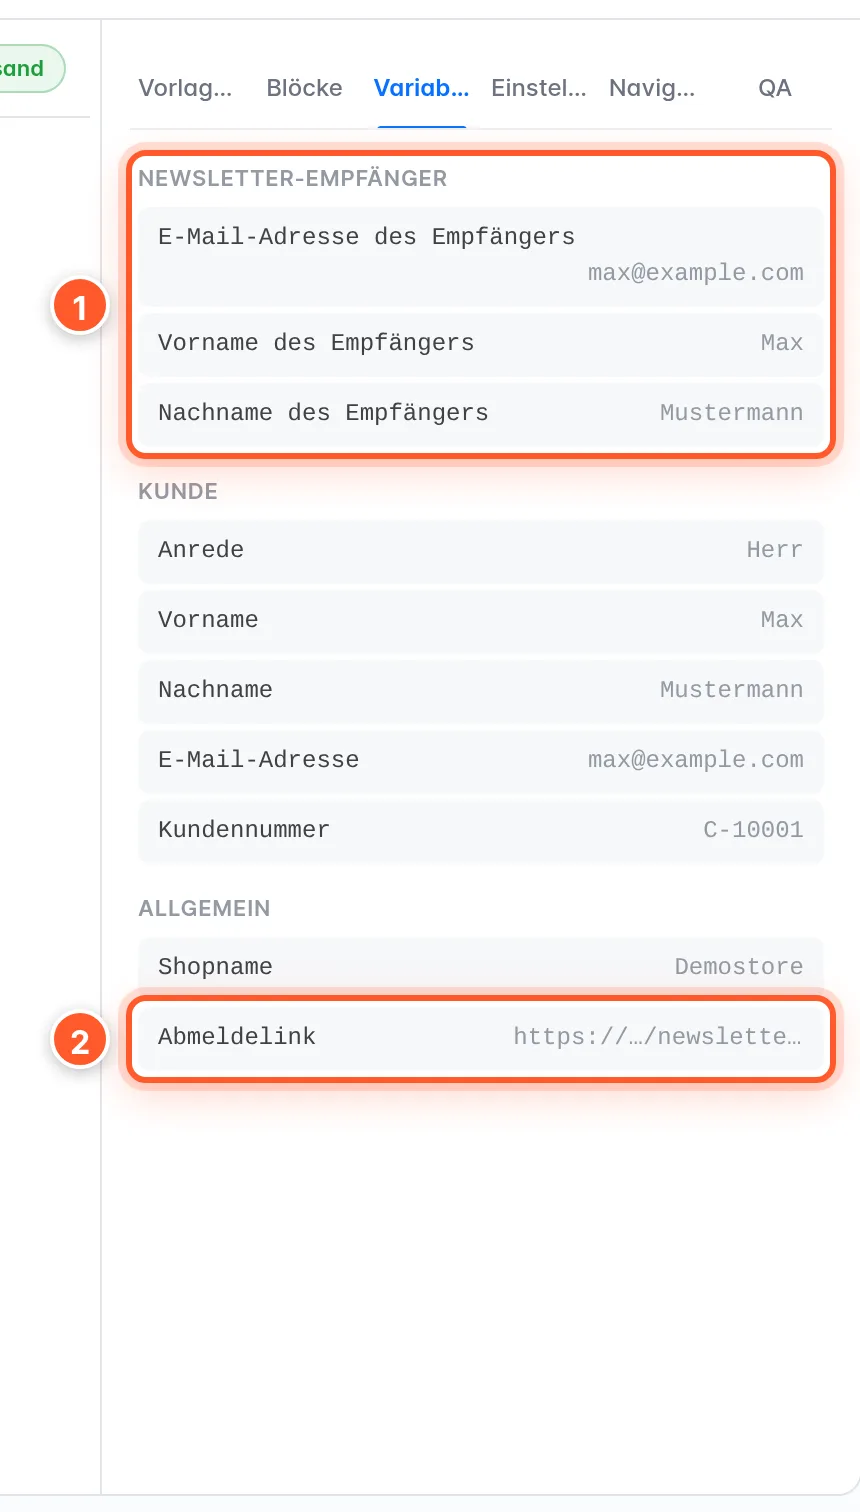
In the builder’s Variables tab, newsletters get their own placeholders: the recipient’s first name, last name and email address, data from a linked customer account, and the unsubscribe link {{ unsubscribeUrl }}. The templates already contain the unsubscribe link in the footer; if you build a design from scratch, add it yourself – without it, the checklist blocks sending.
Click Save in the builder. In the newsletter context the button isn’t called “Save & apply”: it saves the layout and publishes the version used for sending at the same time. The arrow with the megaphone at the top left takes you back to the newsletter.
Choosing recipients
The Audience tab shows live how many addresses will receive the newsletter. The basis is always the confirmed newsletter recipients (double opt-in or direct) of the selected sales channel and language. Unsubscribed addresses and addresses on the suppression list are excluded automatically.
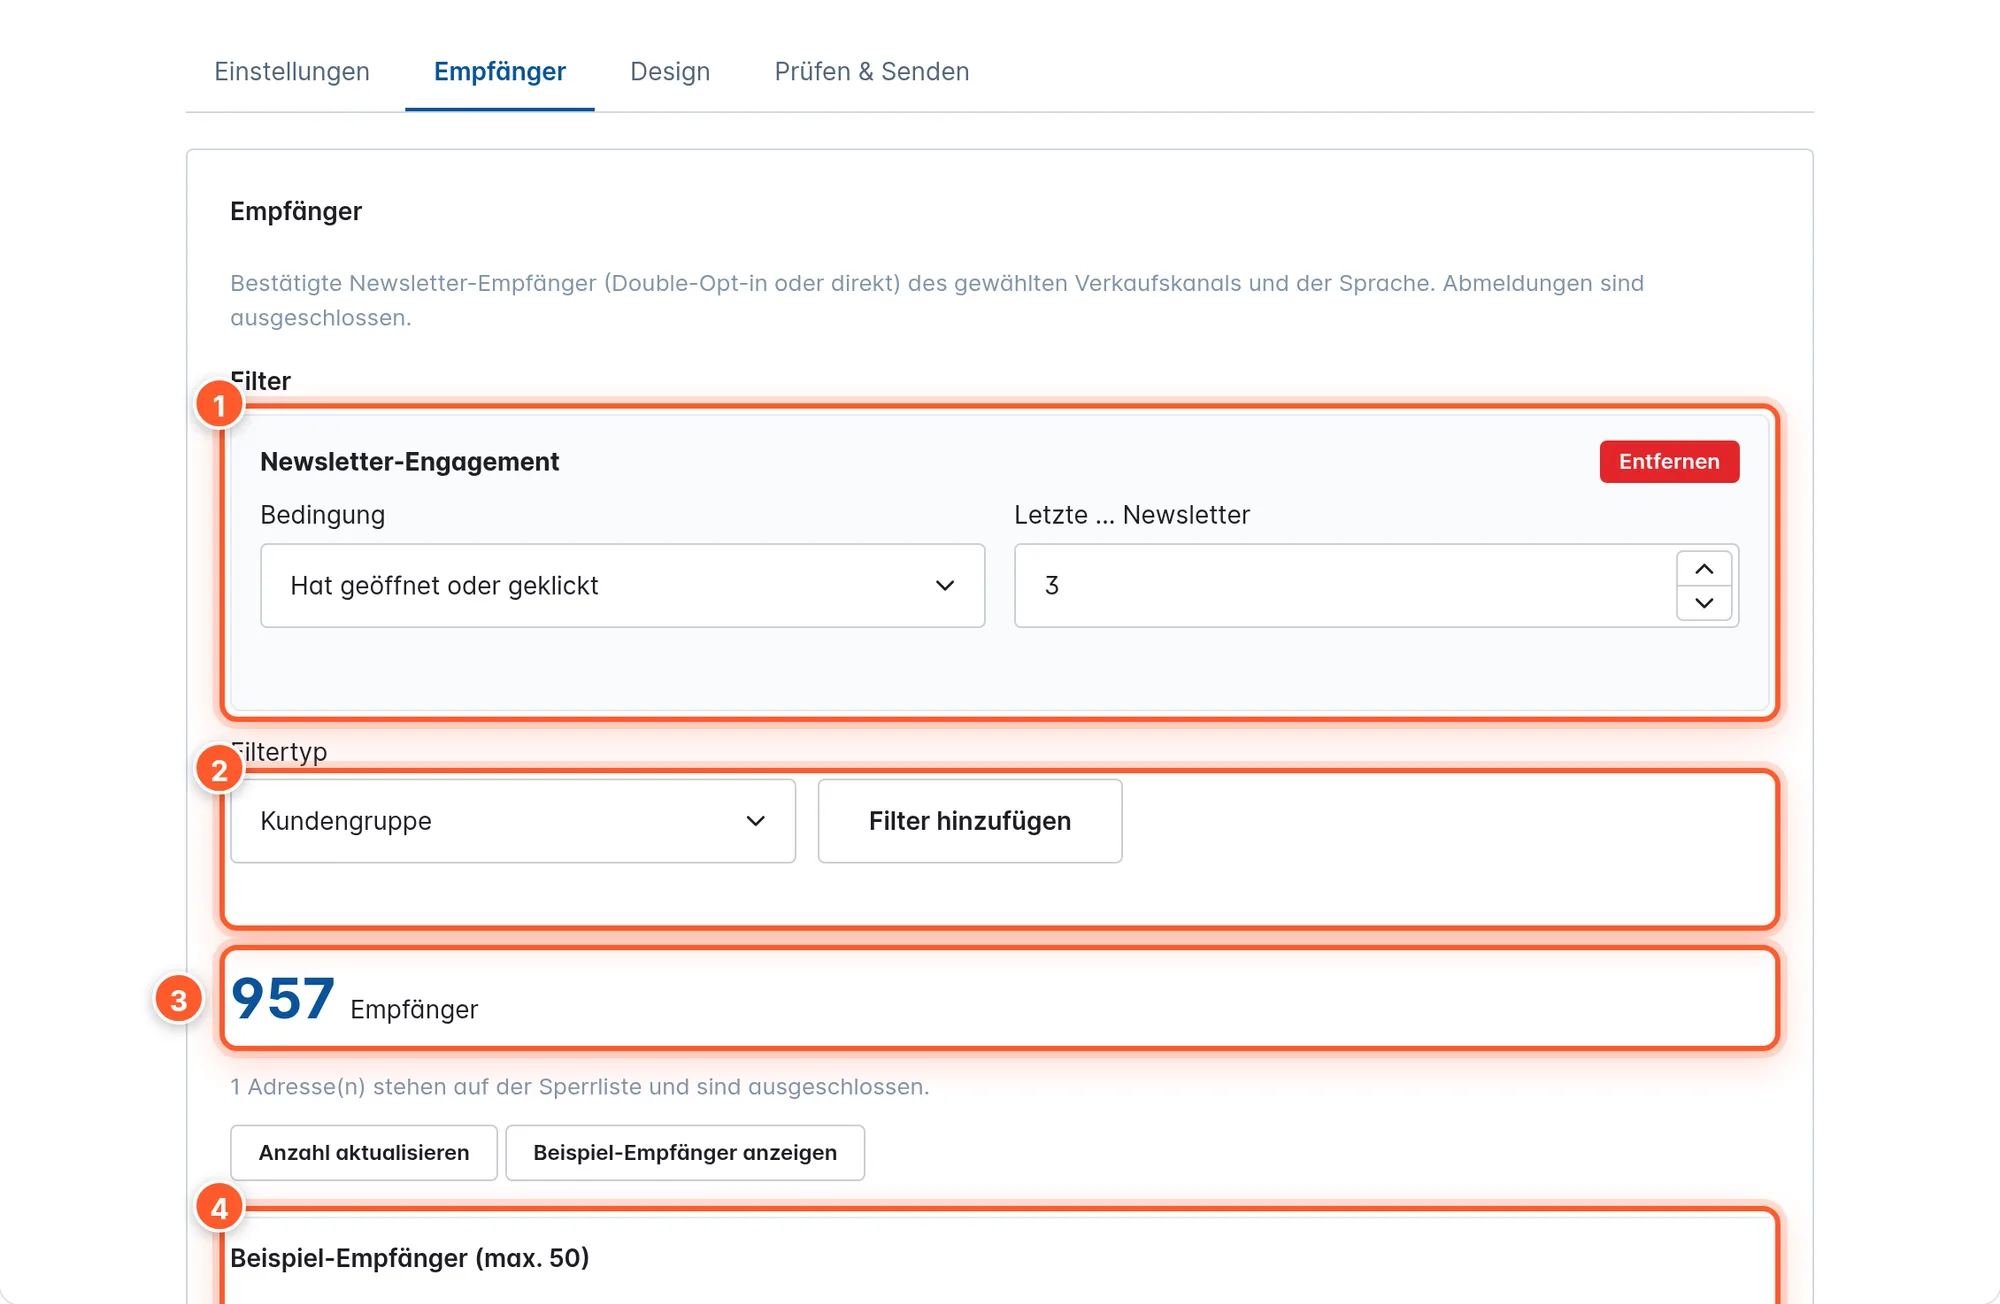
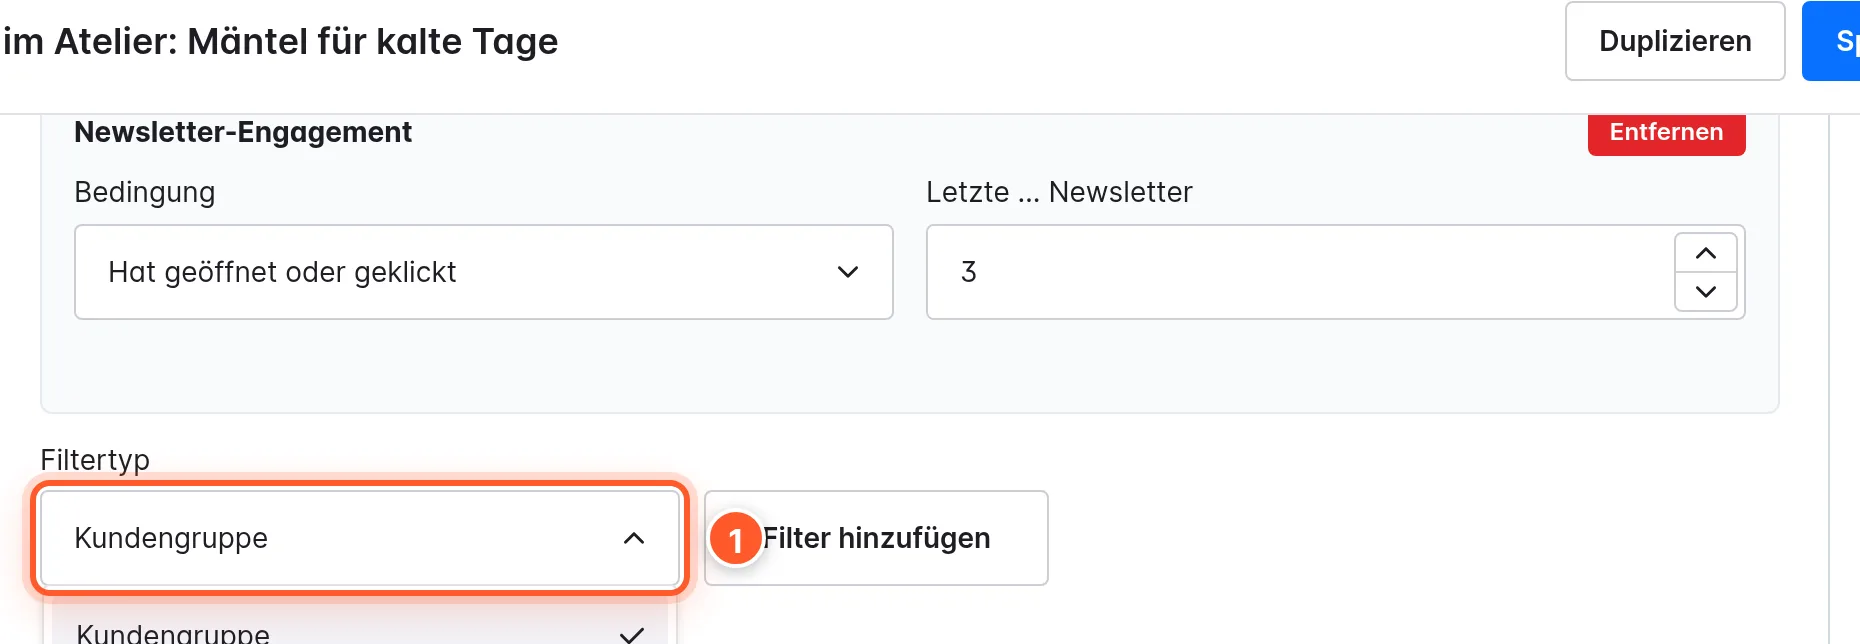
Without filters, the newsletter goes to everyone. Use Filter type 2 and Add filter to narrow it down; multiple filters apply together (AND).
| Filter | Settings | Effect |
|---|---|---|
| Customer group | Customer groups, toggle Also include recipients without a customer account | Only subscribers whose customer account is in one of the groups – optionally plus subscribers without an account. |
| Customer tag | Tags | Only subscribers whose customer account has one of the tags. |
| Order activity | Condition (Has ordered / Has not ordered), Time frame (days) | E.g. everyone who hasn’t ordered in the last 90 days. |
| Newsletter engagement | Condition (Opened or clicked / Neither opened nor clicked), Last … newsletters | Reward active readers or specifically reactivate inactive ones – based on the most recently sent newsletters. |
Refresh count recounts, Show sample recipients lists up to 50 addresses from the audience. If addresses are on the suppression list, a note below the number says how many are excluded. The number shown is exactly the audience used for sending.
Review and send
In the Review & Send tab, the Pre-send checklist checks everything that would prevent sending. Only when no item fails are Send newsletter and Schedule active.
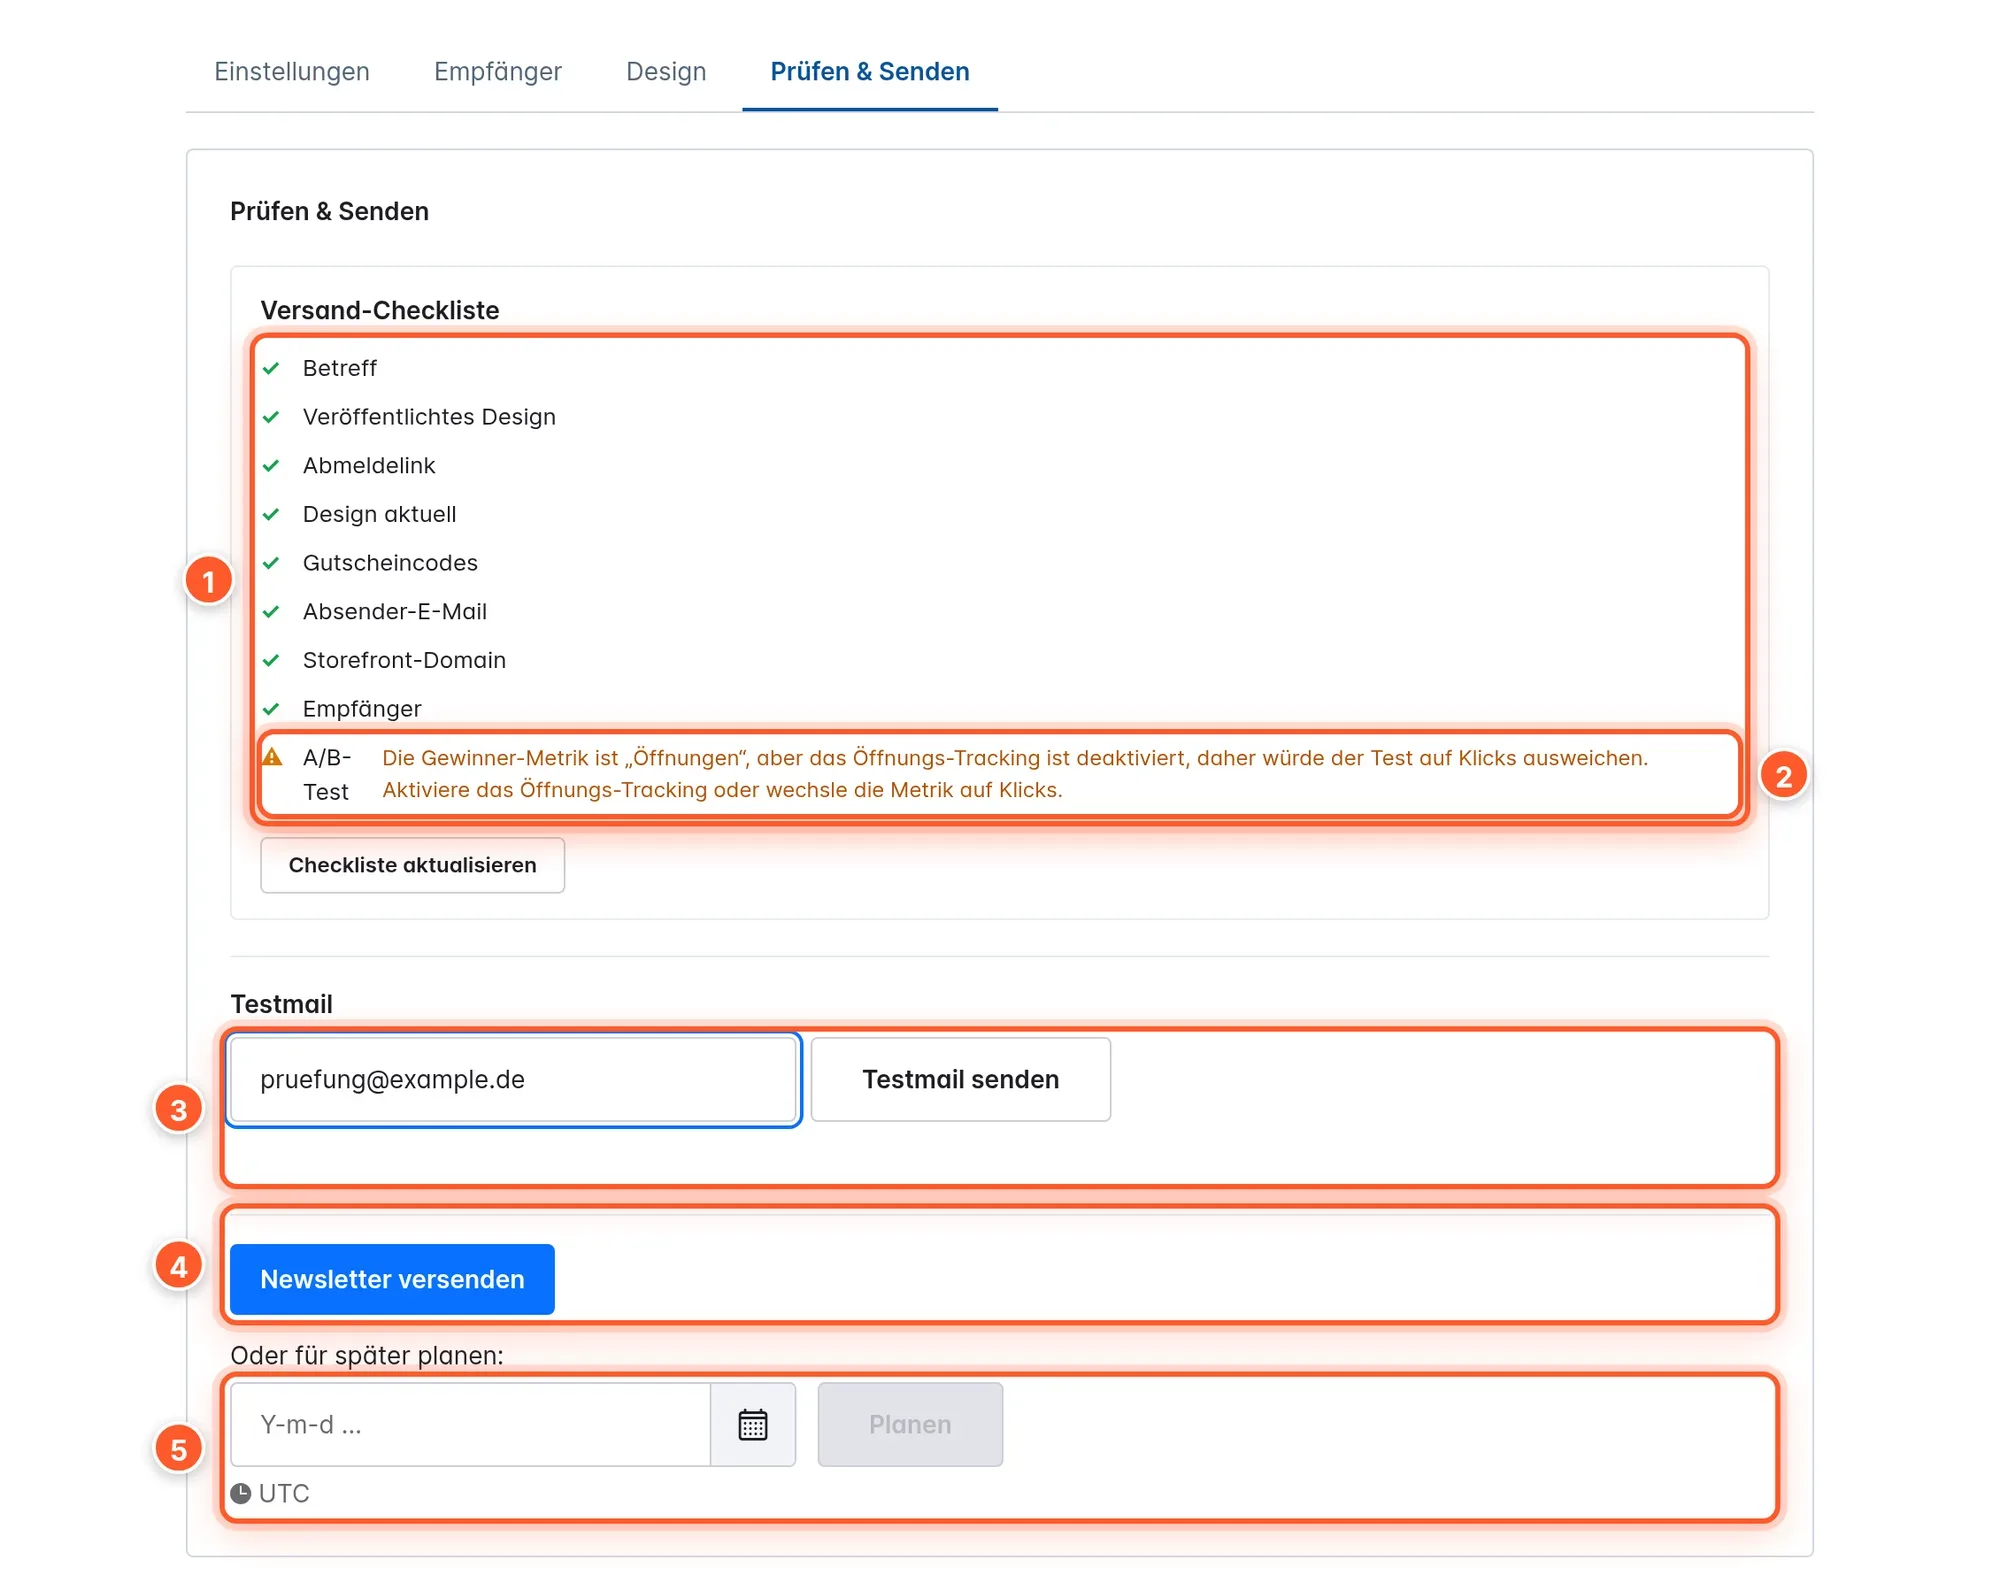
The checklist 1 checks:
- Subject present
- Published design linked and Design up to date (the saved design matches the last publish – otherwise save again in the builder)
- Unsubscribe link
{{ unsubscribeUrl }}in the design - Coupon codes: coupon blocks point to a valid promotion with a code
- Sender email and Storefront domain present
- Audience: not empty, all filters complete
- for a resend, a new subject; for an A/B test, two different subject lines
Items marked yellow 2 are warnings that don’t block sending – for example, when the winner metric is Opens but open tracking is switched off (the test then decides by clicks).
Use Send test mail 3 to send yourself a test mail to any address. It uses real shop data, but no real coupon codes. Send newsletter 4 asks once more with the recipient count before sending starts. Alternatively, choose a date and time under Or schedule for later 5 and click Schedule; Cancel schedule turns the newsletter back into a draft.
Sending runs in the background via the message queue, in batches and with the configured rate limit. You see the progress (“… of … sent, … failed”) in the tab and in the list’s Progress column. After sending, the newsletter is read-only.
Statistics
After sending, the Statistics tab appears.
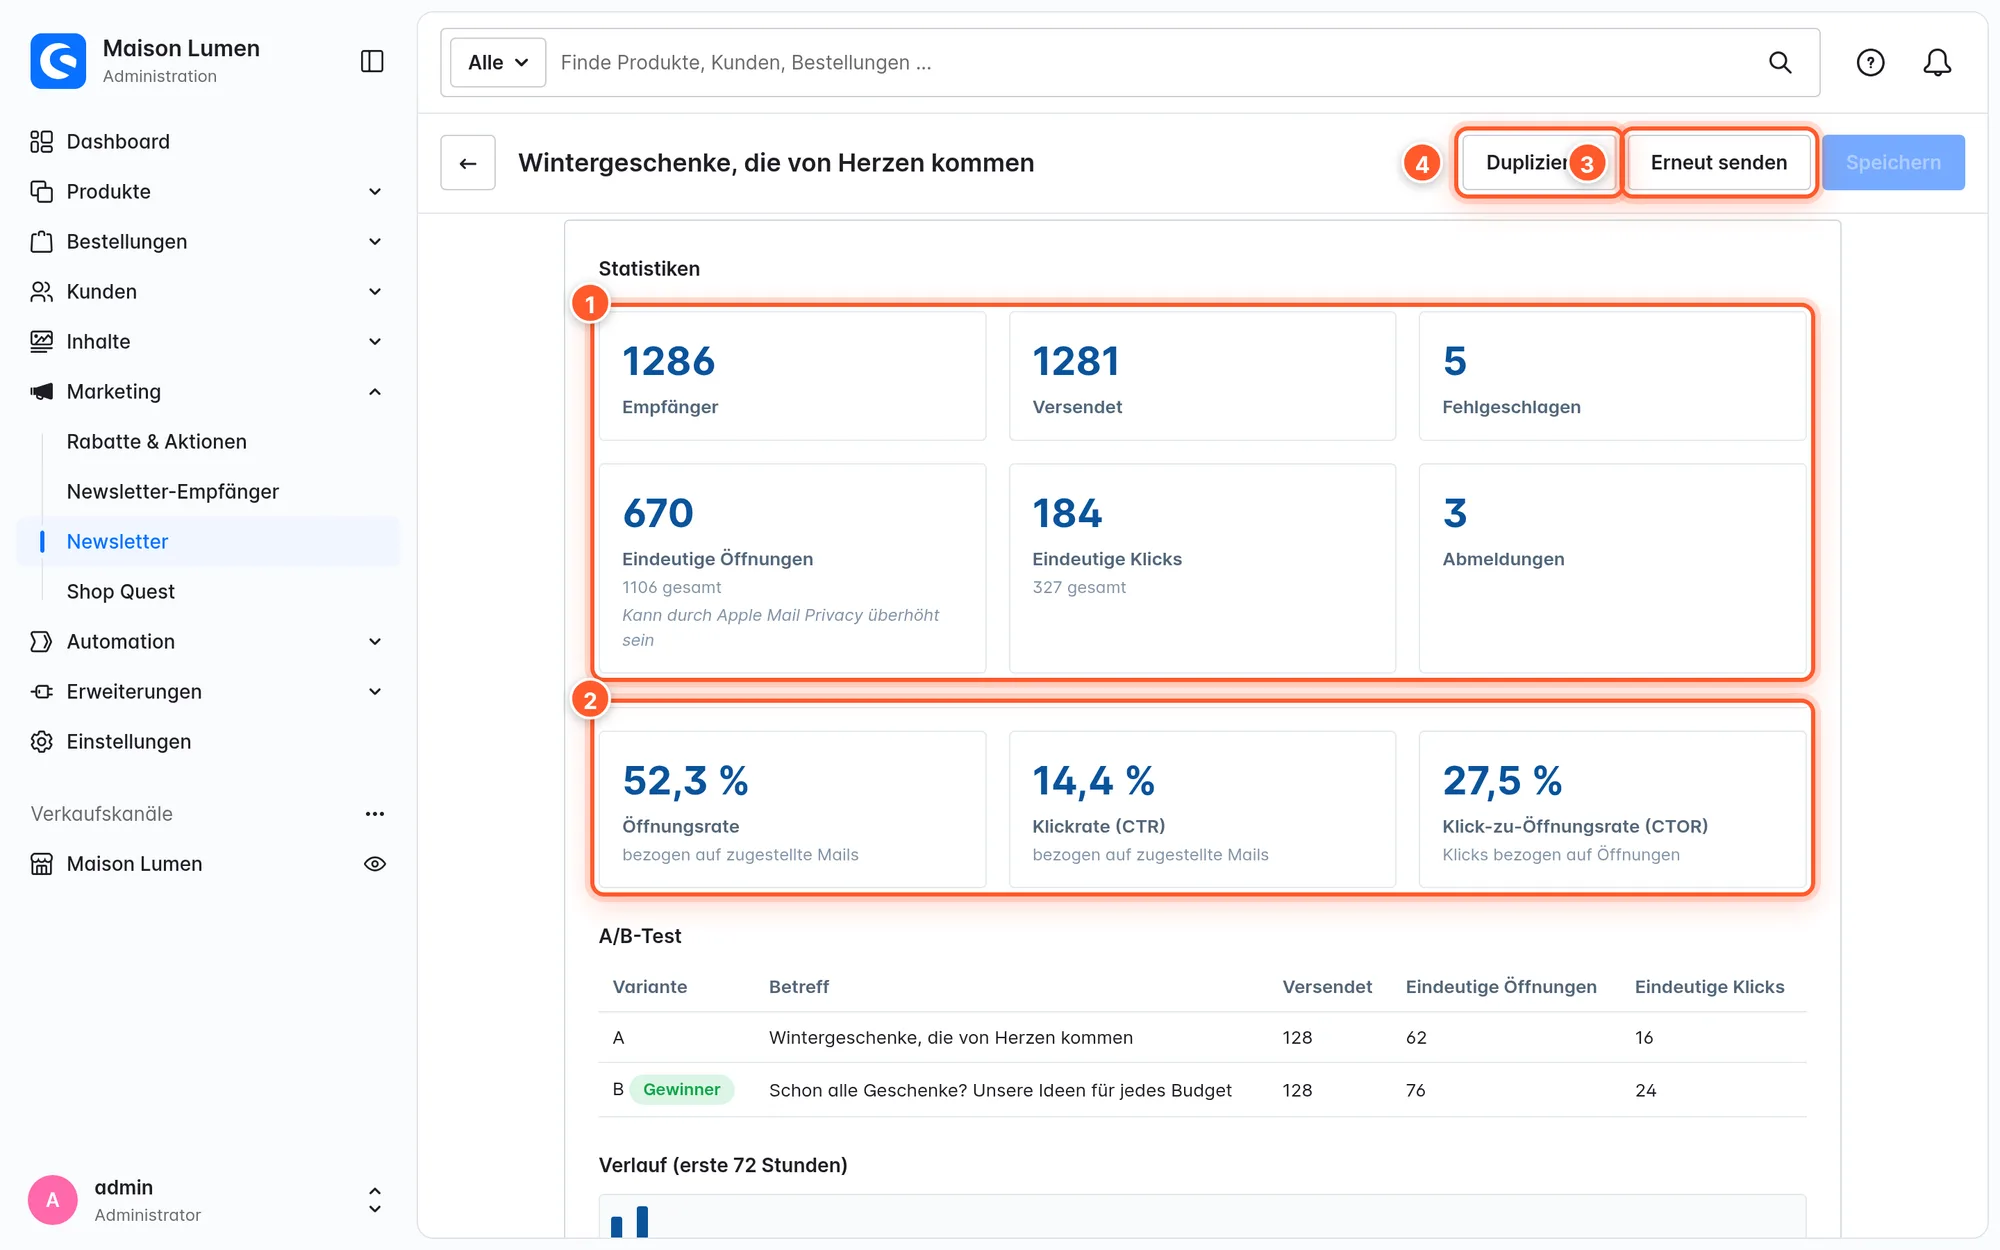
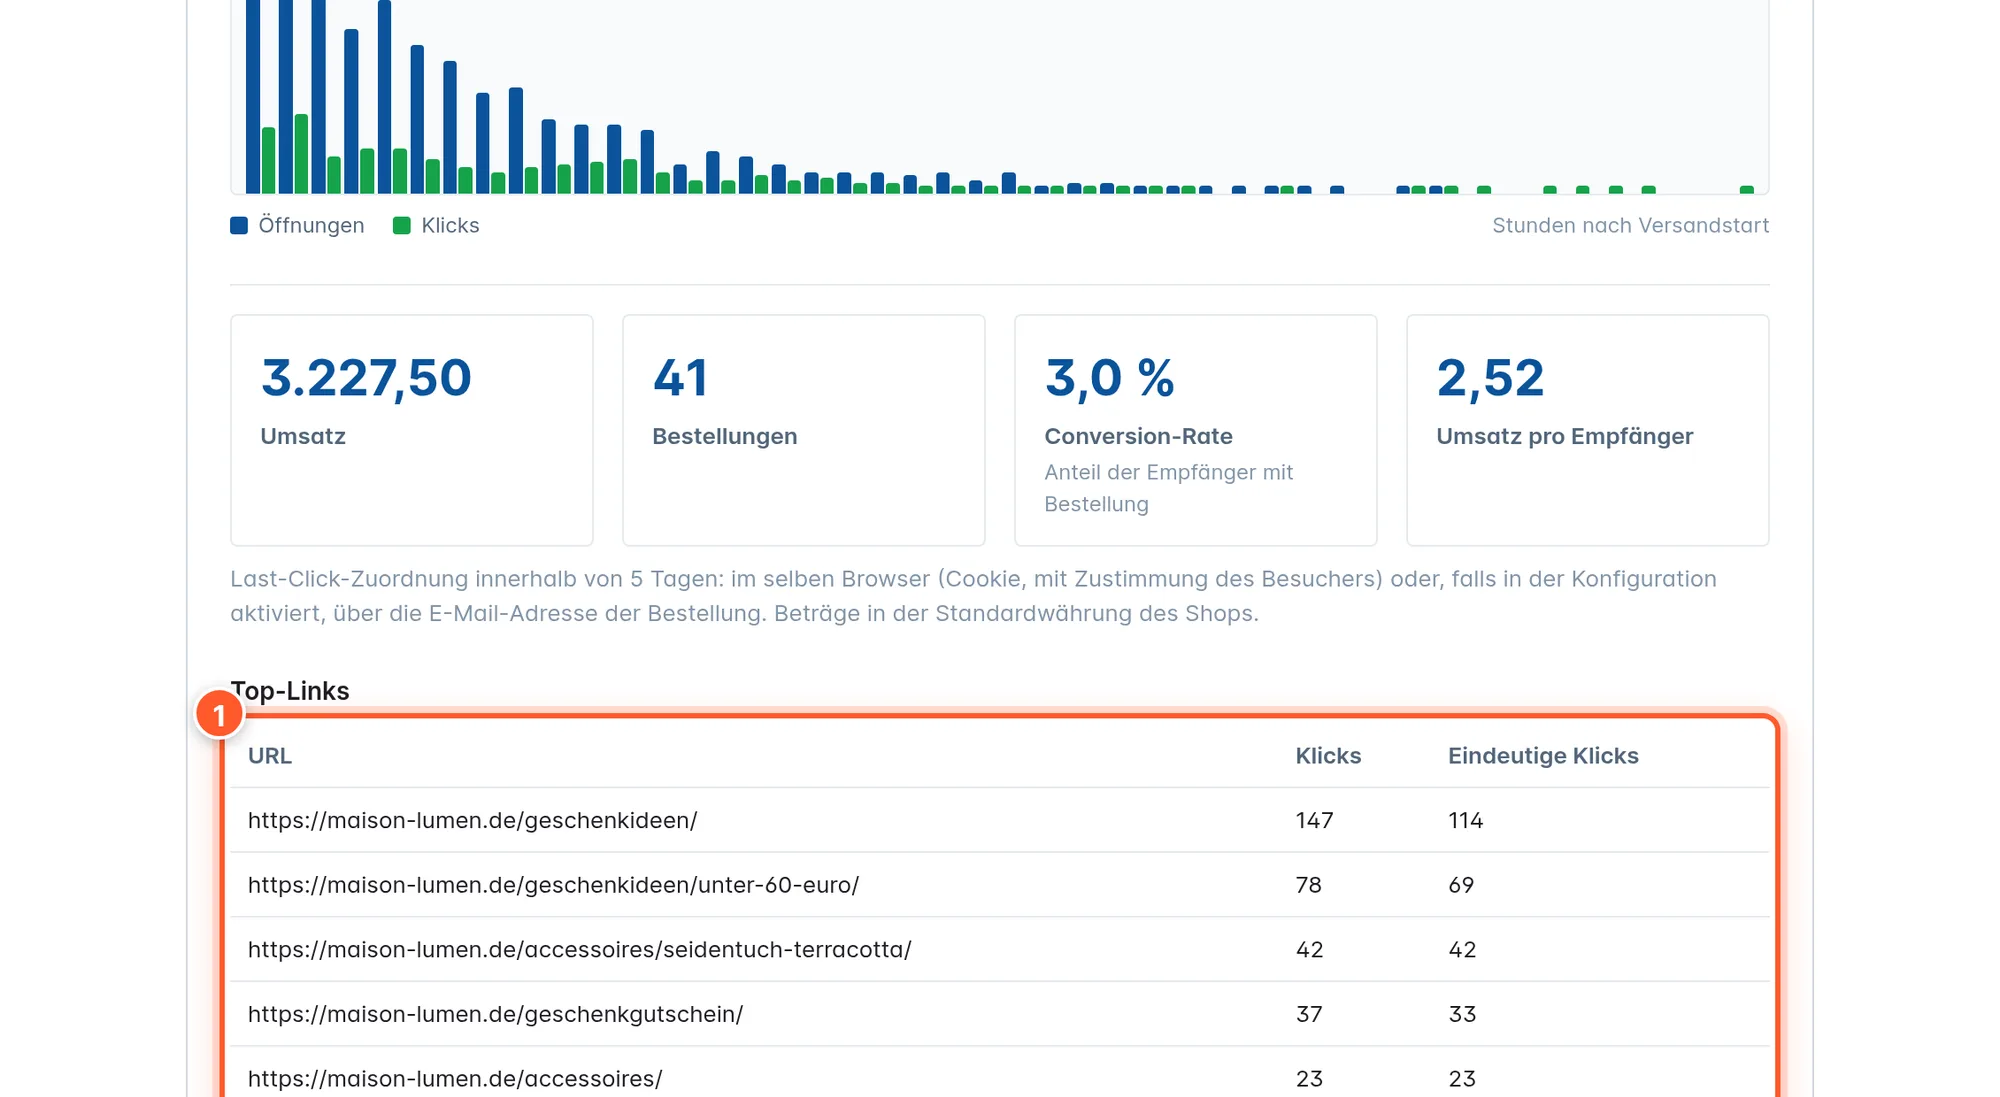
- Unique opens / clicks count each recipient once; the total is shown below. Opens may be inflated by Apple Mail Privacy.
- The rates refer to delivered mails, CTOR to opens.
- Timeline (first 72 hours) shows opens and clicks per hour after the dispatch start.
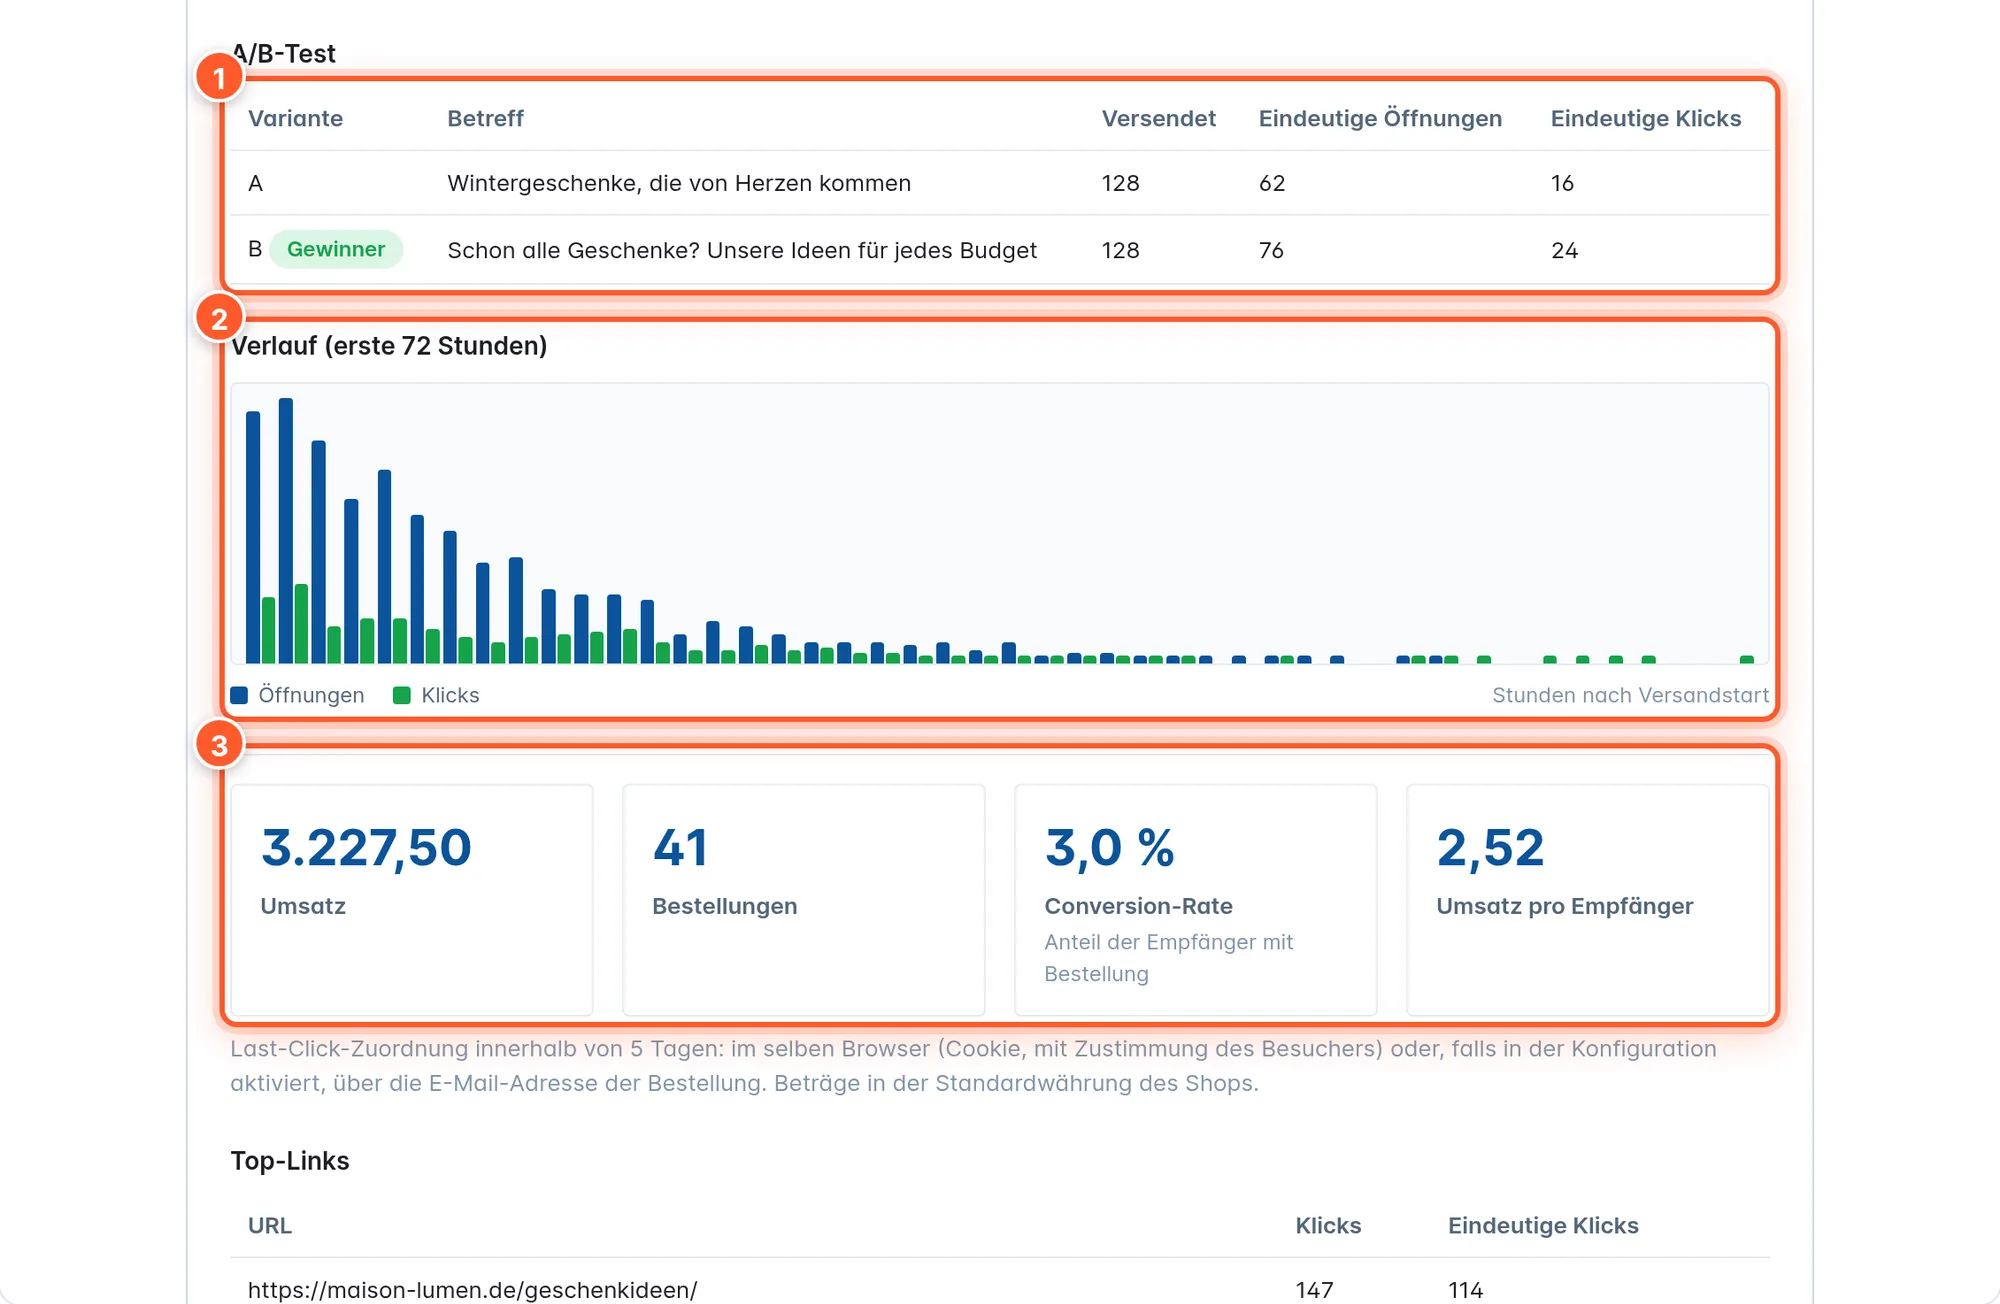
The Revenue area 3 shows orders attributed to the newsletter (last click within 5 days, amounts in the default currency). How attribution works is explained under Tracking & privacy.
A/B test and resending
A/B subject test: With a Subject B, part of the audience (Test share (%), 1–50, default 20) receives variant A or B, half and half. The rest is held back. After Decide after (hours) (1–72, default 4), the variant with more opens or clicks (Winner metric) wins, and all held-back recipients automatically get the winning subject. Until then, the statistics show how many recipients are still waiting.
Resend: On a sent newsletter, Resend appears at the top. It creates a new draft that only goes to recipients of the original who neither opened nor clicked it (if open tracking is off: who didn’t click). Give the draft a new subject – the checklist insists. Resending is only possible after the minimum delay from the configuration (default 3 days) and only once per newsletter.
Suppression list
Via Suppression list in the newsletter overview, you manage addresses that never receive a newsletter – regardless of their subscription status.
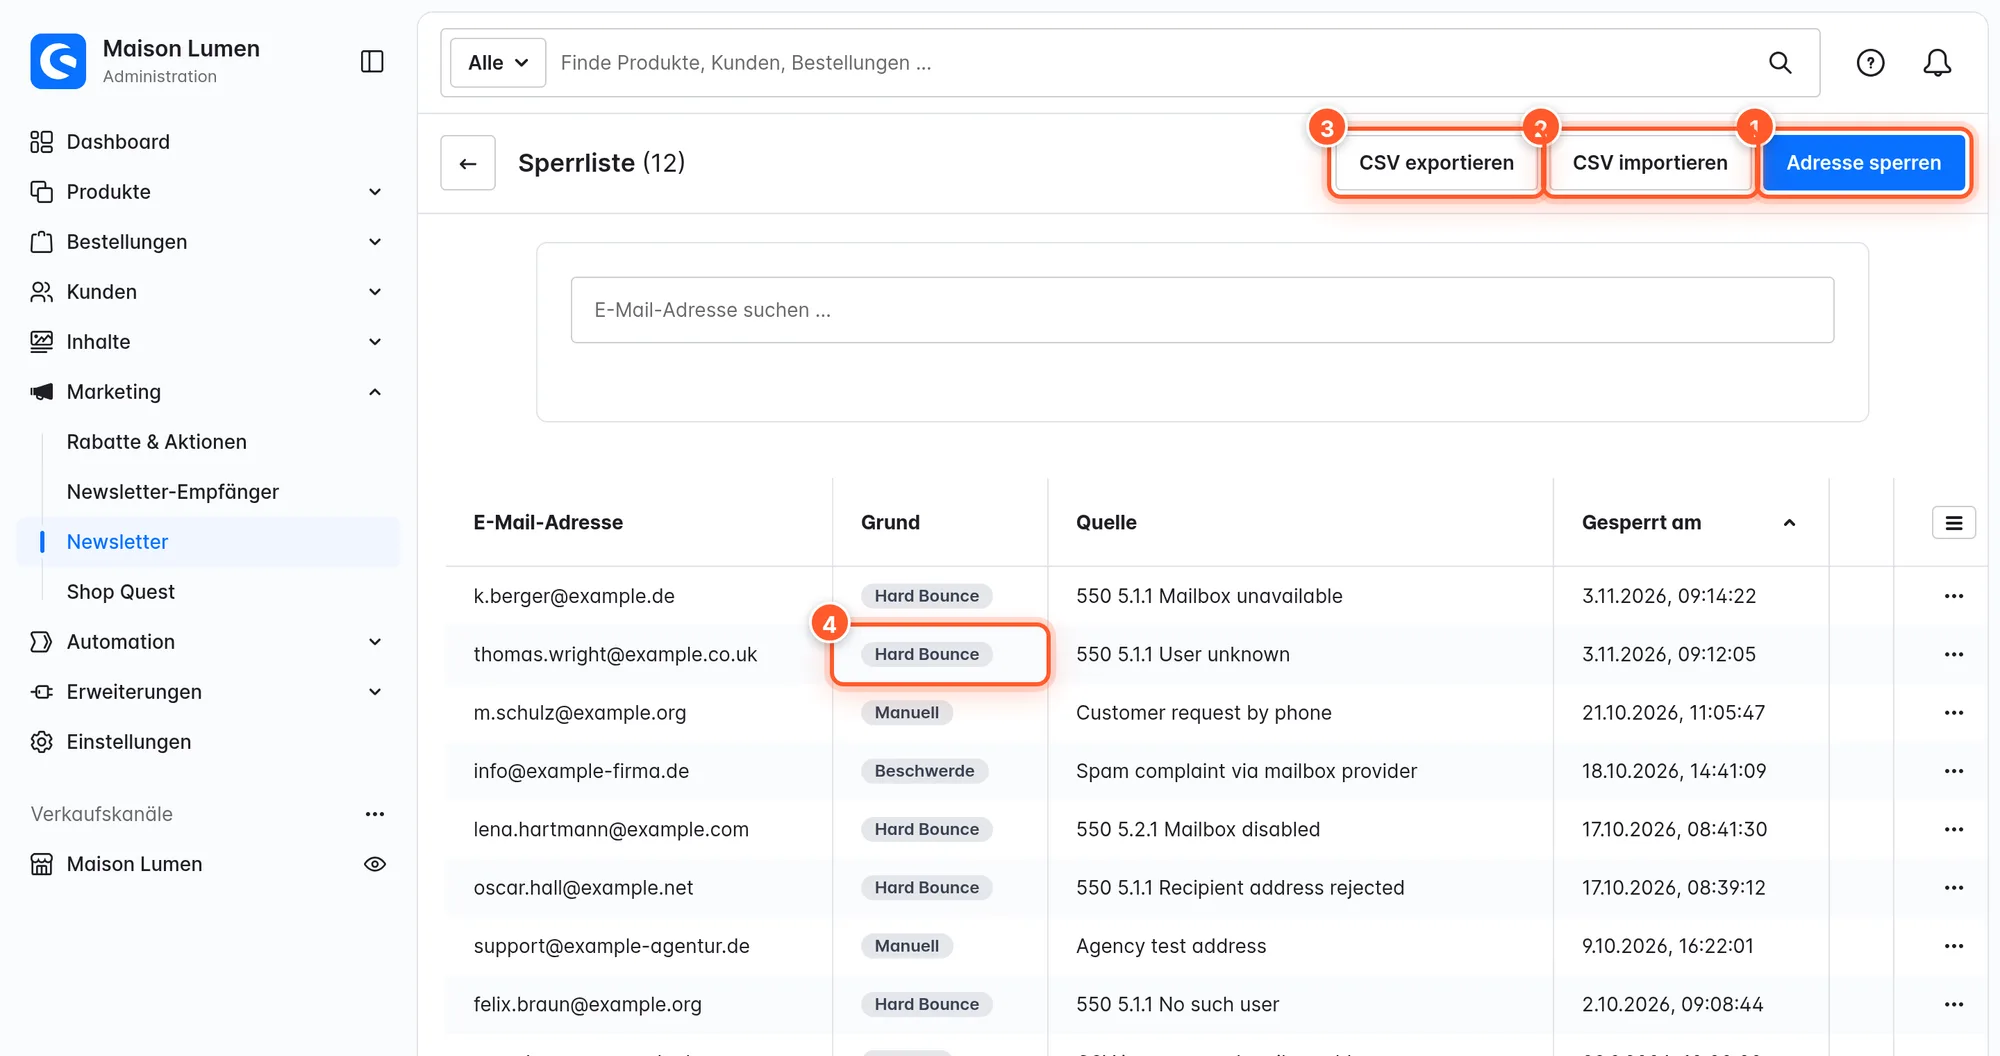
- Hard bounces land here automatically: immediately for clearly permanent delivery errors, after three failed deliveries for unclear errors.
- Import CSV reads all email addresses from the file, whether separated by commas, semicolons, tabs or lines – ideal for taking over unsubscribes from an old system. The result shows how many were added, already listed or invalid.
- Remove addresses via the row’s context menu; search finds addresses by substring.
Unsubscribing
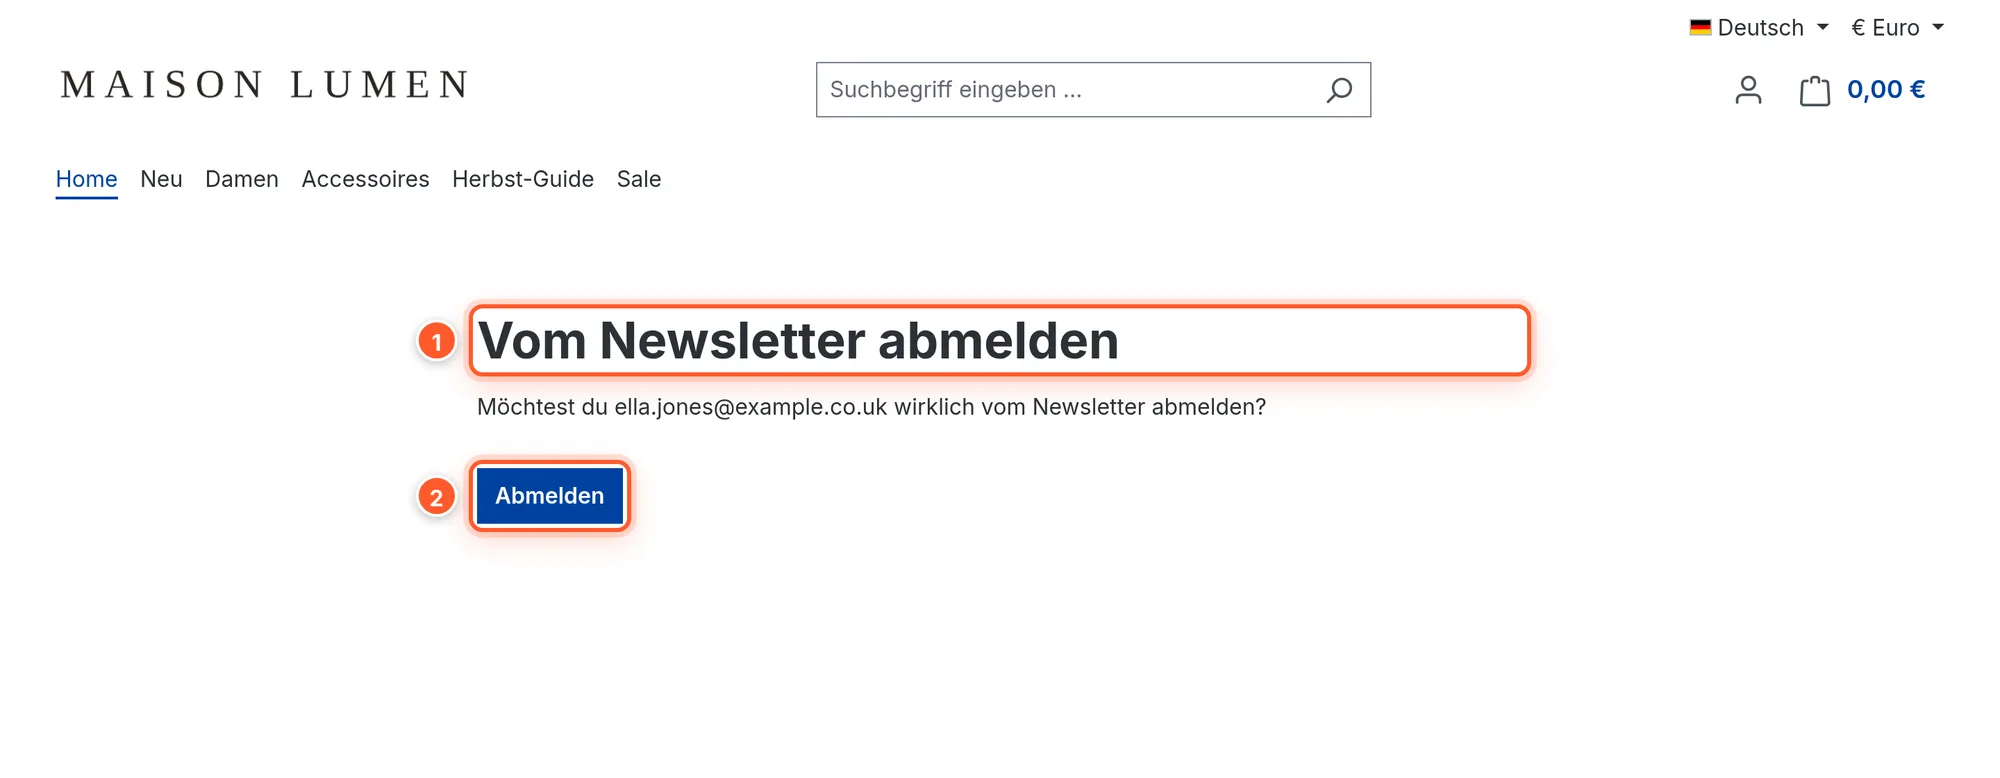
Every newsletter contains a personal, signed unsubscribe link. It opens a confirmation page in your storefront; a click on Unsubscribe sets the recipient to unsubscribed in Shopware. The add-on also sets the List-Unsubscribe and List-Unsubscribe-Post headers, so Gmail, Apple Mail and others offer their own one-click unsubscribe button.
Tracking & privacy
- Clicks: links go through a signed redirect on your shop. Neither IP addresses nor user agents are stored.
- Opens: via an invisible tracking pixel – off by default, because pixel tracking usually requires consent under the GDPR and open rates are unreliable due to Apple Mail Privacy Protection.
- Revenue attribution: a click sets a signed first-party cookie (5 days, last click counts) that appears in the cookie consent manager under Marketing as “Newsletter success measurement” and is only set after consent. If someone clicks before consenting, the shop session remembers the click and counts it if the visitor consents before ordering.
- Optionally Match orders by email address: also across devices and without a cookie – this is a personal-data evaluation and belongs in your privacy policy and consent text.
All tracking toggles can be set per sales channel. Mention newsletter tracking in your privacy policy.
Settings
Extensions › My extensions › MAIL BUILDER | Newsletter Addon › Configure. At the top, choose whether the values apply to all sales channels or just one.
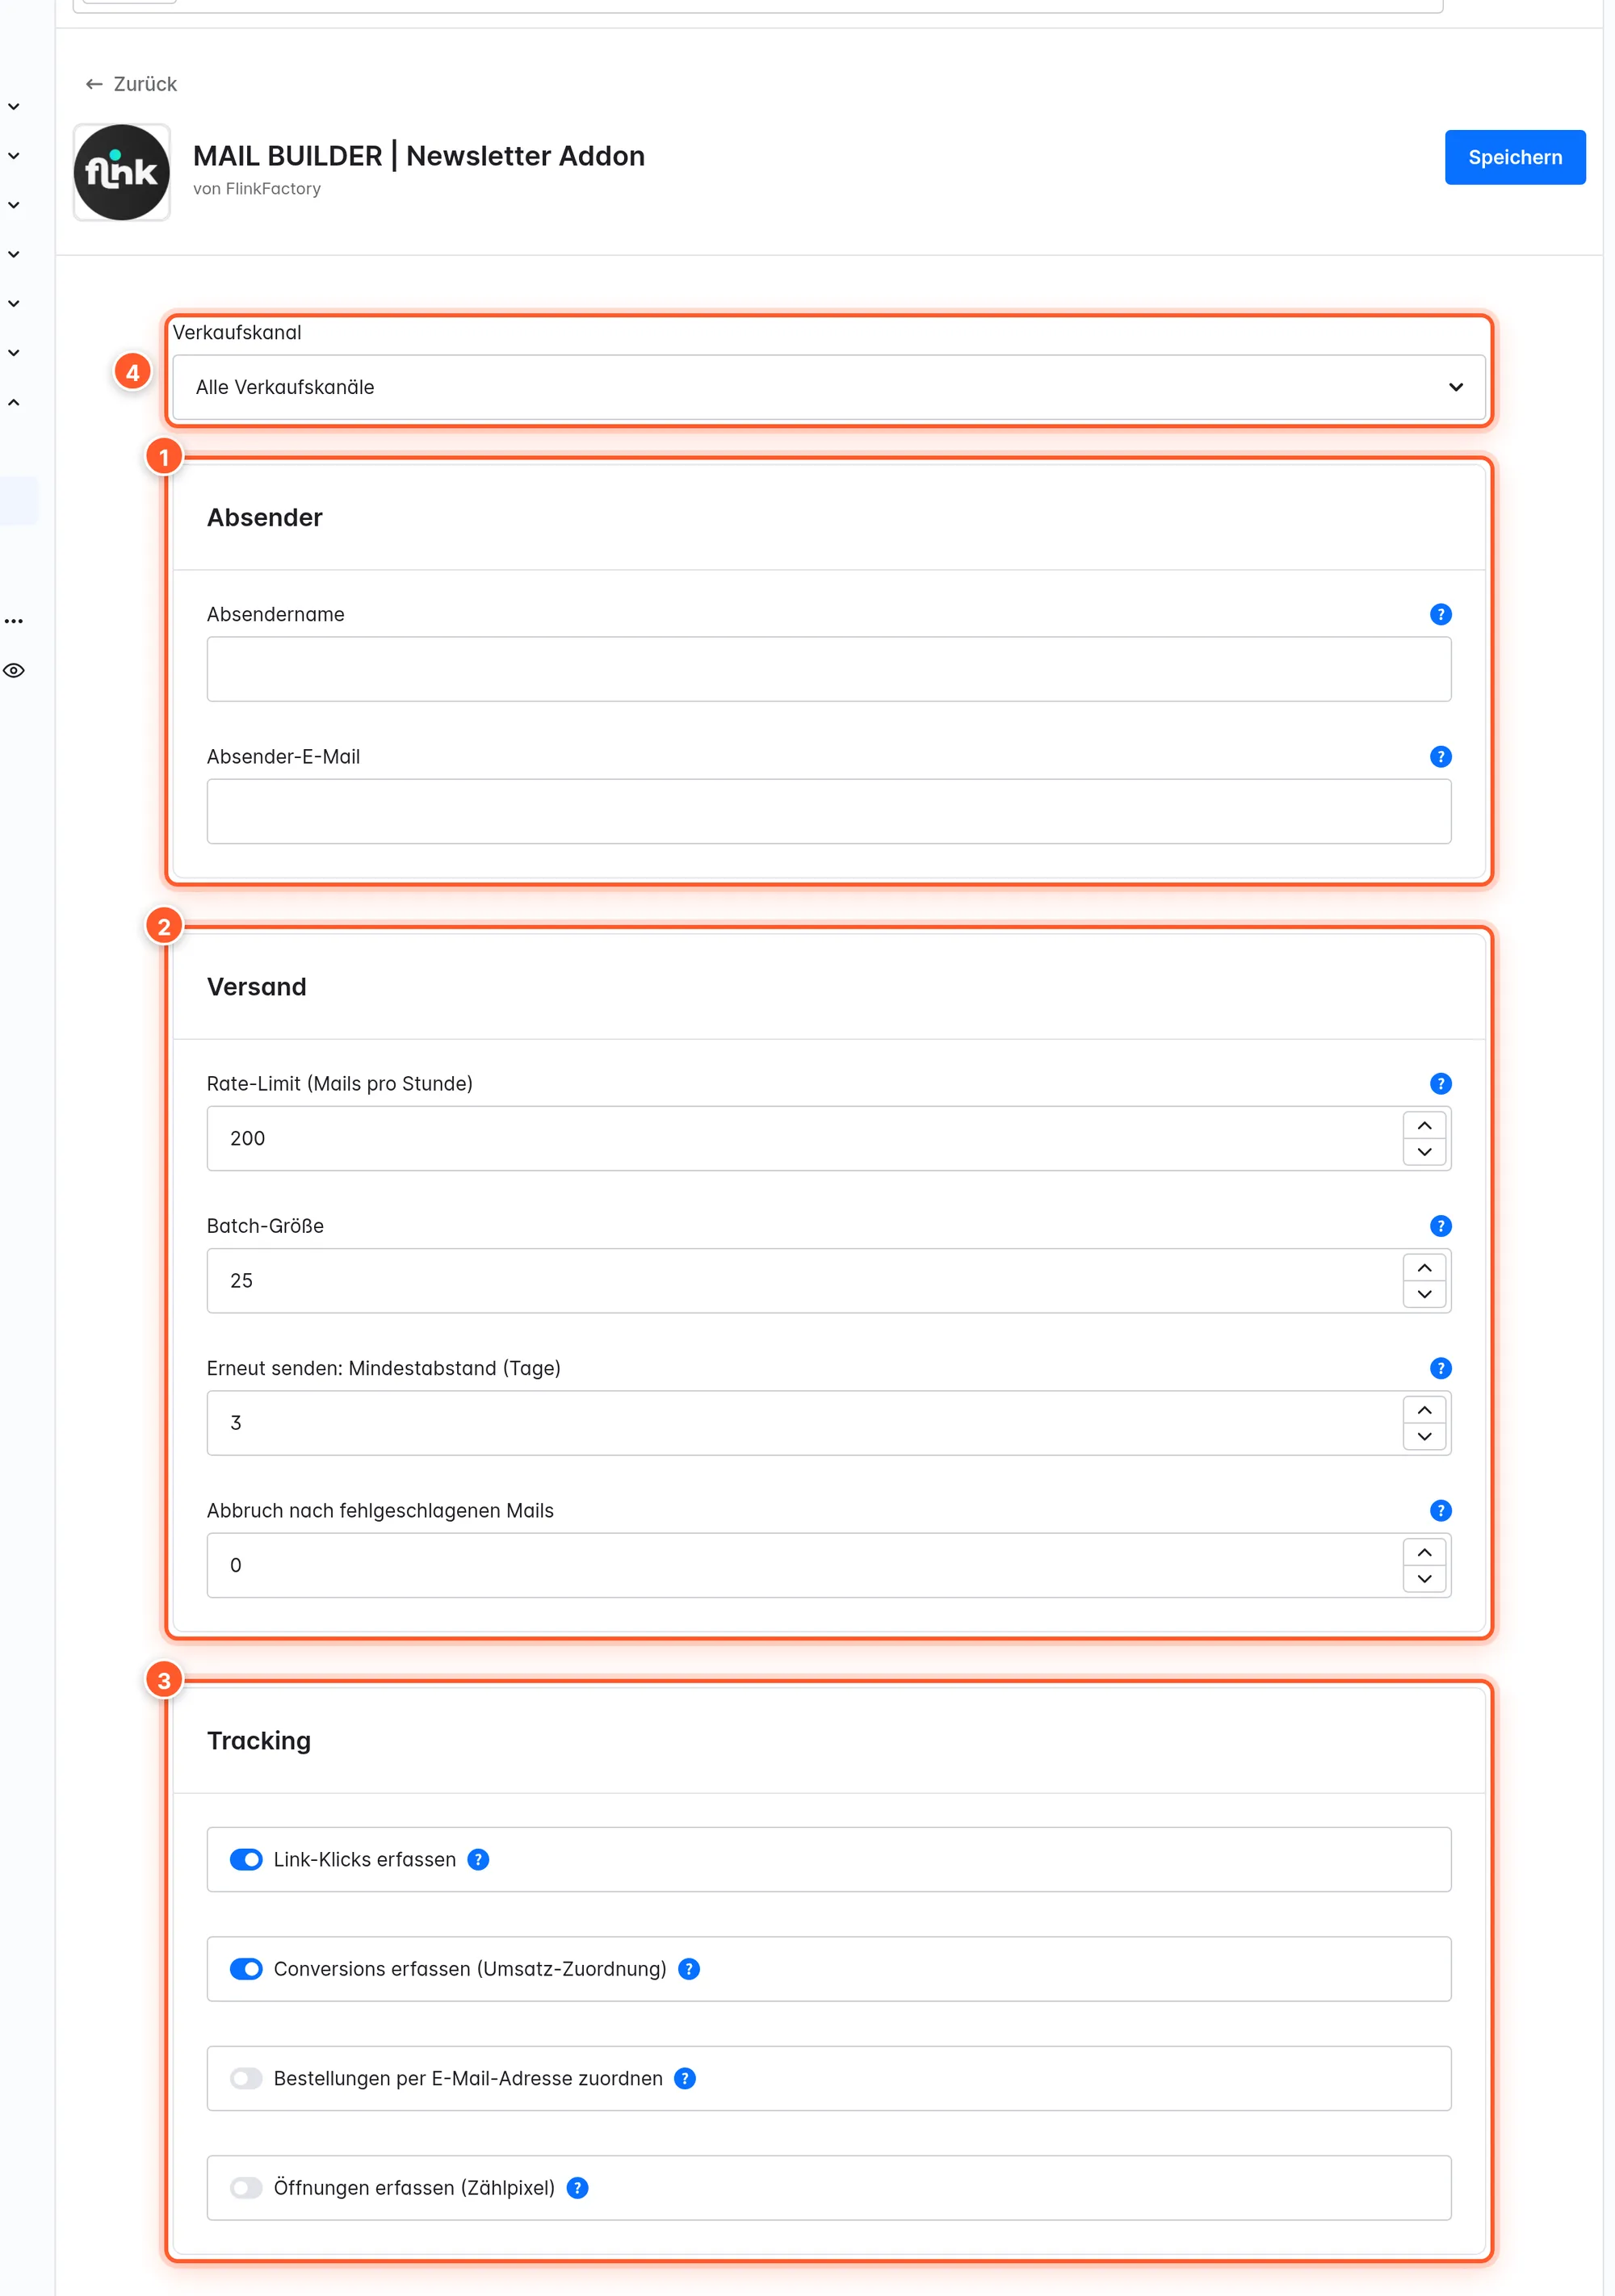
Sender
| Setting | Default | Effect |
|---|---|---|
| Sender name | empty = shop name from the basic information | Name for all newsletters. Individual newsletters can’t override it (deliverability). |
| Sender email | empty = shop email from the basic information | Sender address for all newsletters. If both are missing, the checklist blocks. |
Delivery
| Setting | Default | Effect |
|---|---|---|
| Rate limit (mails per hour) | 200 | Maximum number of newsletter mails per hour. Keep it below your SMTP provider’s limit. |
| Batch size | 25 | Recipients per queue message. |
| Resend: minimum delay (days) | 3 | “Resend” is possible at the earliest this many days after sending. |
| Abort after failed mails | 0 (off) | Aborts sending as soon as this many mails of a newsletter have failed. |
Tracking
| Setting | Default | Effect |
|---|---|---|
| Track link clicks | on | Click counting via signed redirect. |
| Track conversions (revenue attribution) | on | Cookie-based attribution of orders (with consent). |
| Match orders by email address | off | Attribution via the email address when there’s no cookie. |
| Track opens (tracking pixel) | off | Tracking pixel for opens. |
Permissions
Under Settings › Users & permissions, newsletters have the roles Viewer, Editor (incl. design and suppression list), Creator and Deleter. Sending and scheduling require editor permissions.
Tips & hidden features
- Duplicate (at the top of the newsletter or in the list’s context menu) copies a newsletter including its own copy of the design and the audience filters as a new draft (“Copy of …”) – even from newsletters that have already been sent. The fastest way to the next issue. The copy doesn’t take over the A/B subject.
- Personal coupon codes: A coupon block with a Shopware promotion using individual codes generates a separate, redeemable code for each recipient from the promotion’s code pattern when sending. Preview and test mail only show sample codes.
- Reactivate inactive subscribers: The Newsletter engagement › Neither opened nor clicked filter over the last 3–5 newsletters plus a coupon makes a reactivation campaign.
- Loyal customers without orders: Order activity › Has not ordered + Time frame (days) 90 reaches subscribers who haven’t bought anything in a long time.
- The list shows opens and clicks of all sent newsletters at a glance – ideal for comparing subject lines across issues.
- The statistics CSV export contains key figures, A/B result and links for your own analysis.
- Once you’ve designed a template with brand kit, product list and unsubscribe link, Duplicate makes it your newsletter standard.
Frequently asked questions
“Send newsletter” is grayed out – why?
At least one item in the pre-send checklist is red. The most common reasons: the design hasn’t been saved in the builder yet (“Published design”), it was changed afterwards (“Design up to date”), the unsubscribe link is missing, or the audience is empty. Fix the item and click Refresh checklist.
Sending is stuck at “Sending”.
Sending runs through the message queue. Check that a worker (messenger:consume) or the admin worker is running and that the scheduled tasks are being executed. A scheduled task checks for due and stuck newsletters every minute and triggers them again. Also keep the rate limit in mind: at 200 mails per hour, 2,000 recipients take ten hours.
How many recipients do I reach?
Only subscribers with the status confirmed or direct, in the selected sales channel and in the selected language – minus unsubscribes and the suppression list. With several languages, create a separate newsletter per language.
Why don’t I see any opens?
Open tracking is off by default. Switch on Track opens (tracking pixel) if you have the necessary consent. For A/B tests without open tracking, choose the Clicks winner metric.
Why does the product list in the editor only show “Sample product”?
That’s intended: the canvas shows placeholders; real products are loaded by the preview (builder and Design tab) and when sending.
Can I change the sender address per newsletter?
No. Sender name and address deliberately apply to all newsletters (configuration, per sales channel if needed) so that SPF/DKIM and reputation stay stable.
Do I really need the Email Template Builder?
Yes. The add-on uses its editor, templates, brand kit and renderer. It can’t be installed without an active builder. More about the builder: Email Template Builder documentation.