
Documentation
Email Template Builder
Version 1.4.0 · updated November 18, 2026
Overview
With the Email Template Builder you design all of Shopware’s email templates – order confirmation, shipping confirmation, registration, password reset, invoice mail and any other – in a visual editor. You drag blocks onto the canvas, edit texts directly and see the result with real shop data in the preview. You don’t need Twig or HTML skills; if you have them, you can still use source code and variables at any time.
The builder generates responsive email HTML based on MJML including an automatic plain-text version, and writes both into the Shopware email template when you publish. Shopware then sends the mails through your flows as usual – the builder doesn’t change how mails are sent. It requires Shopware 6.7.
What you’ll find in the builder:
- 25 templates in five styles, optionally in your shop’s logo and colors
- Blocks for content, order data, products, coupons, social media and more
- Brand kit for logo, colors, font and buttons – central for all mails
- Preview for desktop, mobile, both side by side and simulated dark mode
- Send QA, test mail, version history and block library
- a separate design per language
- Seasons (from 1.4.0): separate versions for Christmas, Black Week and more, sent automatically during the period
- optionally the AI assistant (in-app purchase “AI Features”)
- with the Newsletter Add-on you also design and send newsletters in the same editor
Setup
- Install and activate the plugin under Extensions › My extensions.
- Set up your logo and colors under Settings › Mail Builder brand kit (see Brand kit). It takes two minutes and makes all templates look like your shop right away.
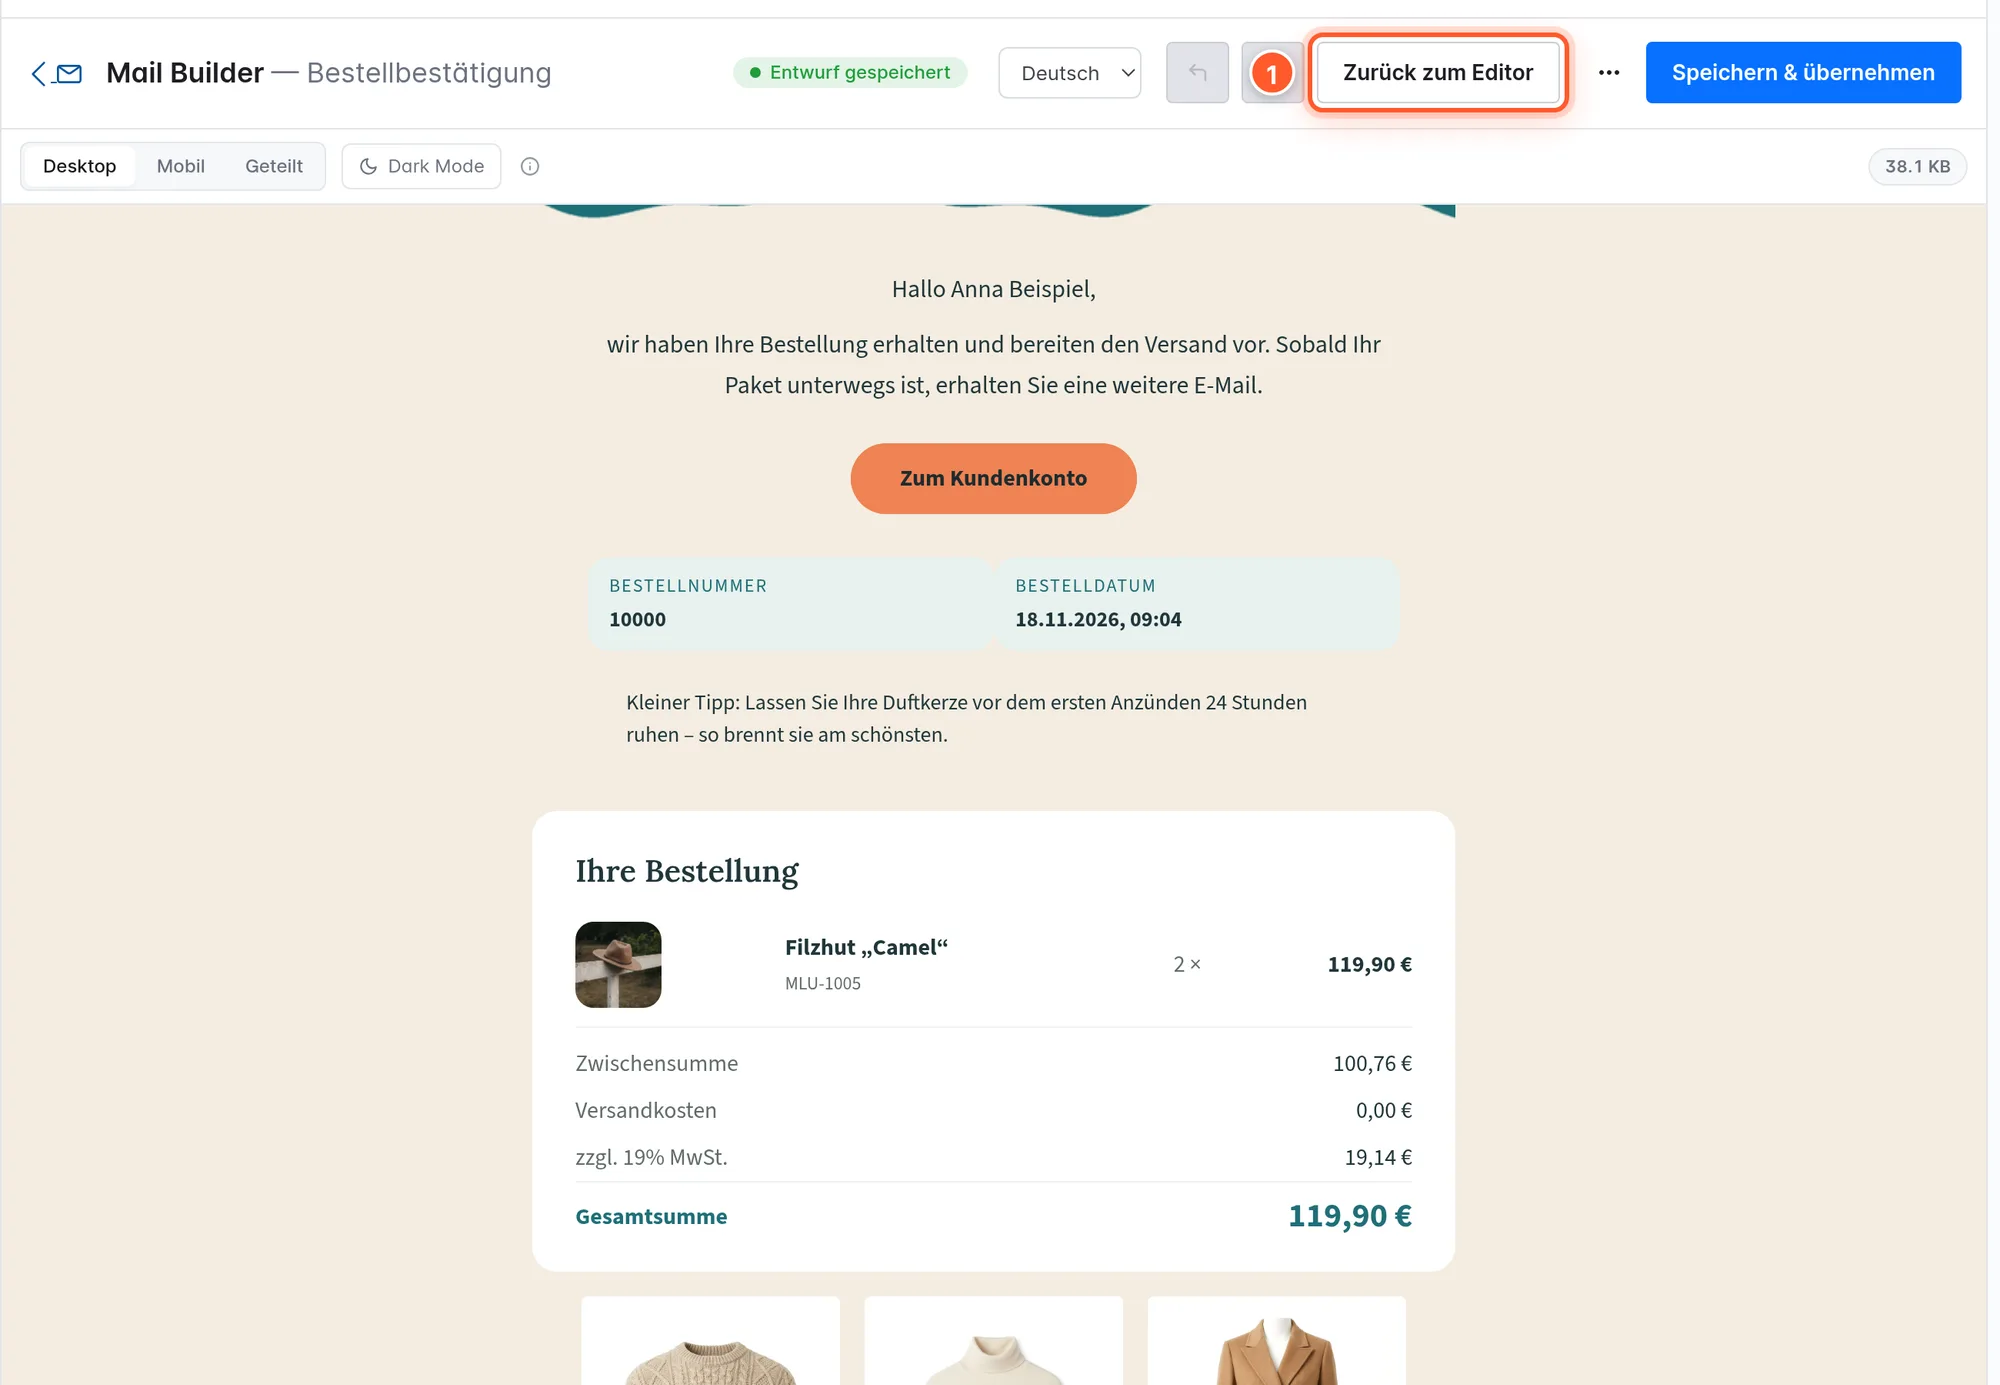
- Open Settings › Email templates, choose a template (e.g. Order confirmation) and click Open in Mail Builder 1 at the top.
- At the top of the builder, choose the Language you want to design, and a design in the Templates tab (see Templates).
- Adjust texts and images, check the Preview and click Save & apply. Only now does the new design land in the email template – until then, Shopware keeps sending the previous mail unchanged.
Draft and live mail are separate. Every change is saved automatically as a draft after about 1.5 seconds (indicator “Draft saved”). The email that gets sent only changes with Save & apply. So you can work at your own pace, close the builder and continue later.
The editor
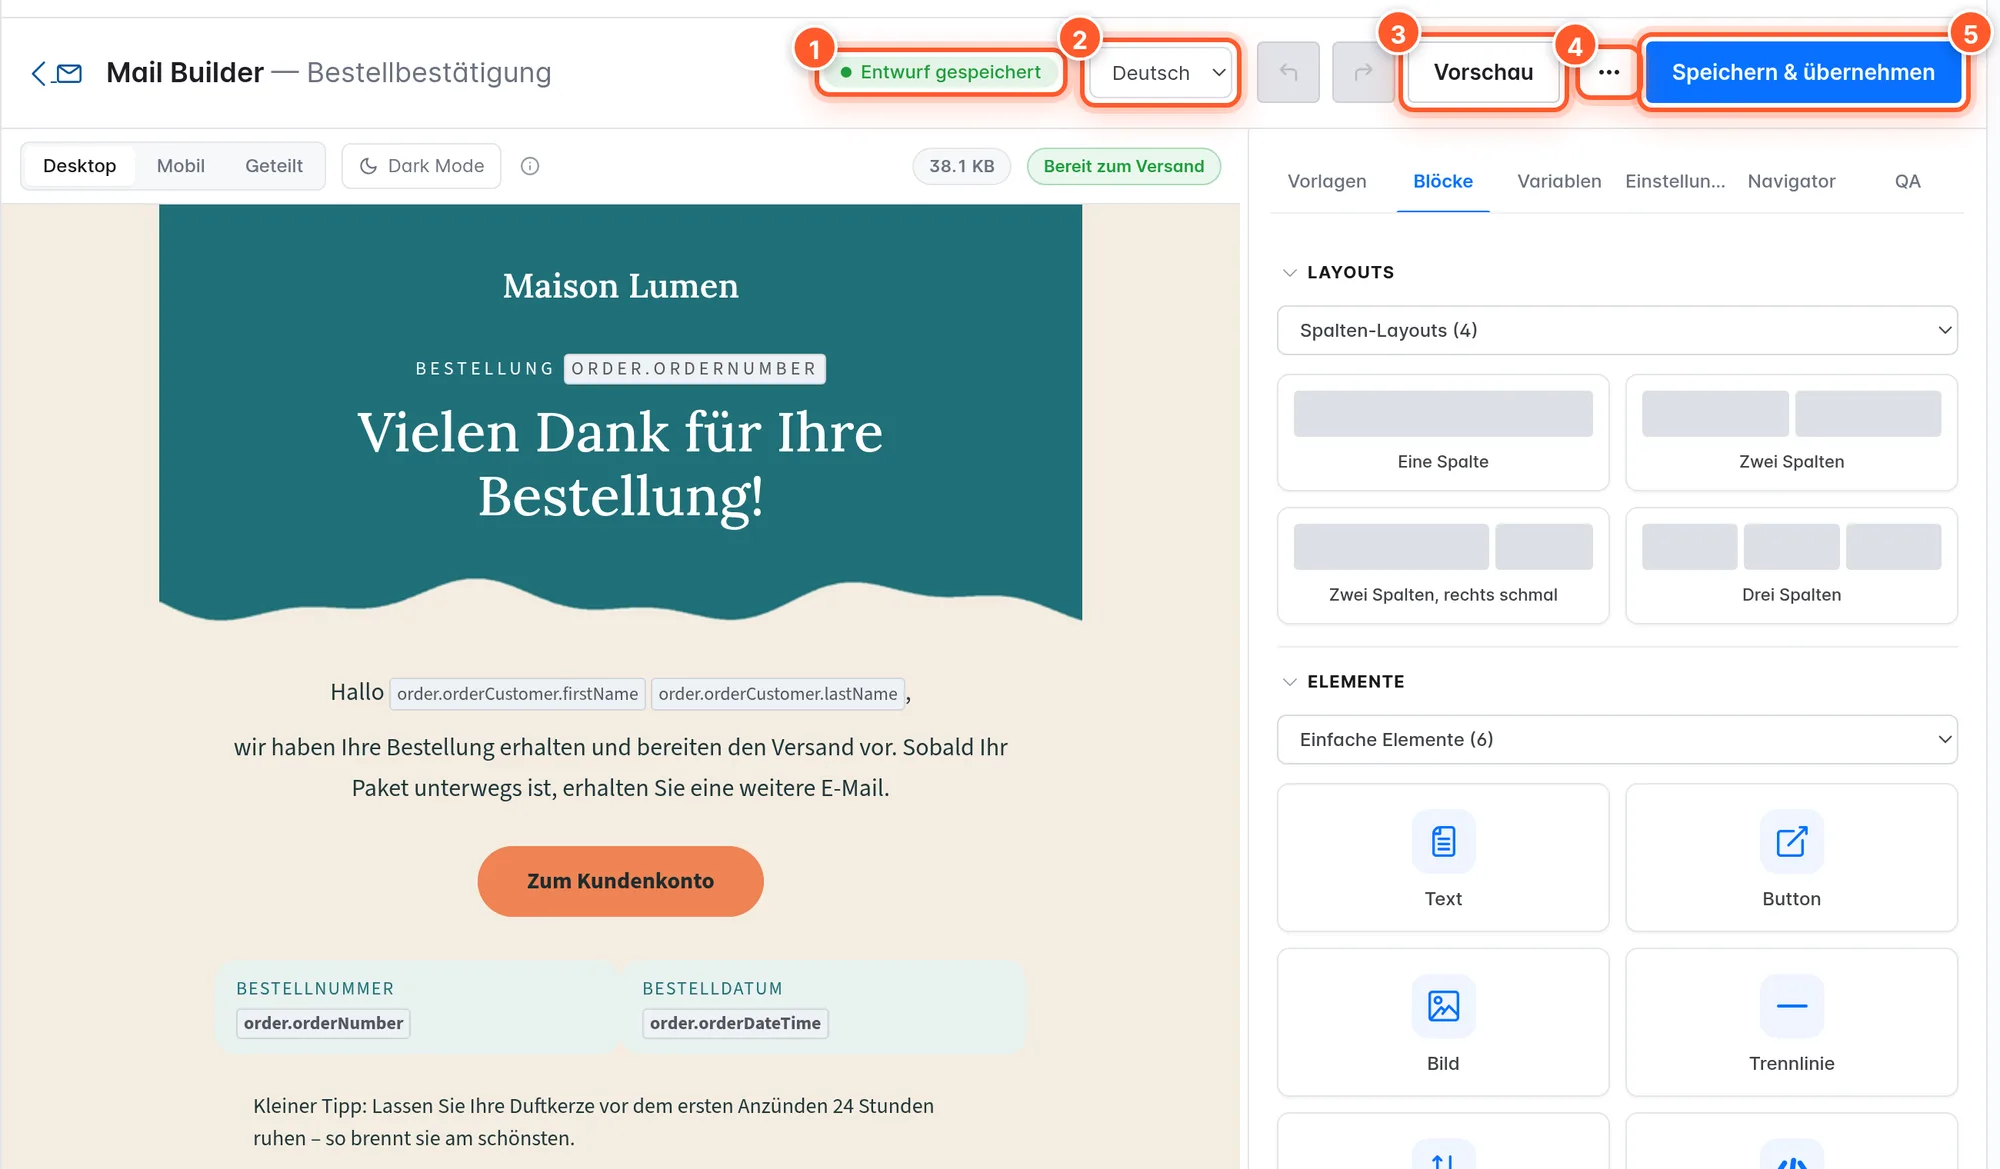
- On the left is the canvas. A click on an element selects it; elements can be moved by drag and drop.
- On the right is the inspector with the tabs Templates, Blocks, Variables, Settings, Navigator and QA. Drag its edge next to the canvas to make it wider or narrower – the builder remembers the width.
- At the top you’ll find the save status 1, language 2, Undo/Redo, Preview 3, the … menu 4 with Versions, Test mail and the AI features, and Save & apply 5.
A mail is built from layouts (rows with one to three columns), columns and elements (text, image, button …). The breadcrumb bar in the Settings tab shows which level is selected. The Navigator tab lists the whole structure as a tree – handy for reaching small or hidden elements; hidden elements are marked –M (mobile) or –D (desktop) there.
Templates
In the Templates tab you choose from 25 designs in the categories Minimal, Elegant, Bold, Playful and Themed – from “Clear” and “Nordic” to “Luxury” and “Boutique” to “Receipt” and “Newspaper”. Every template is available for all mail types: the content adapts automatically, whether you’re designing an order confirmation, a password mail or a contact form.
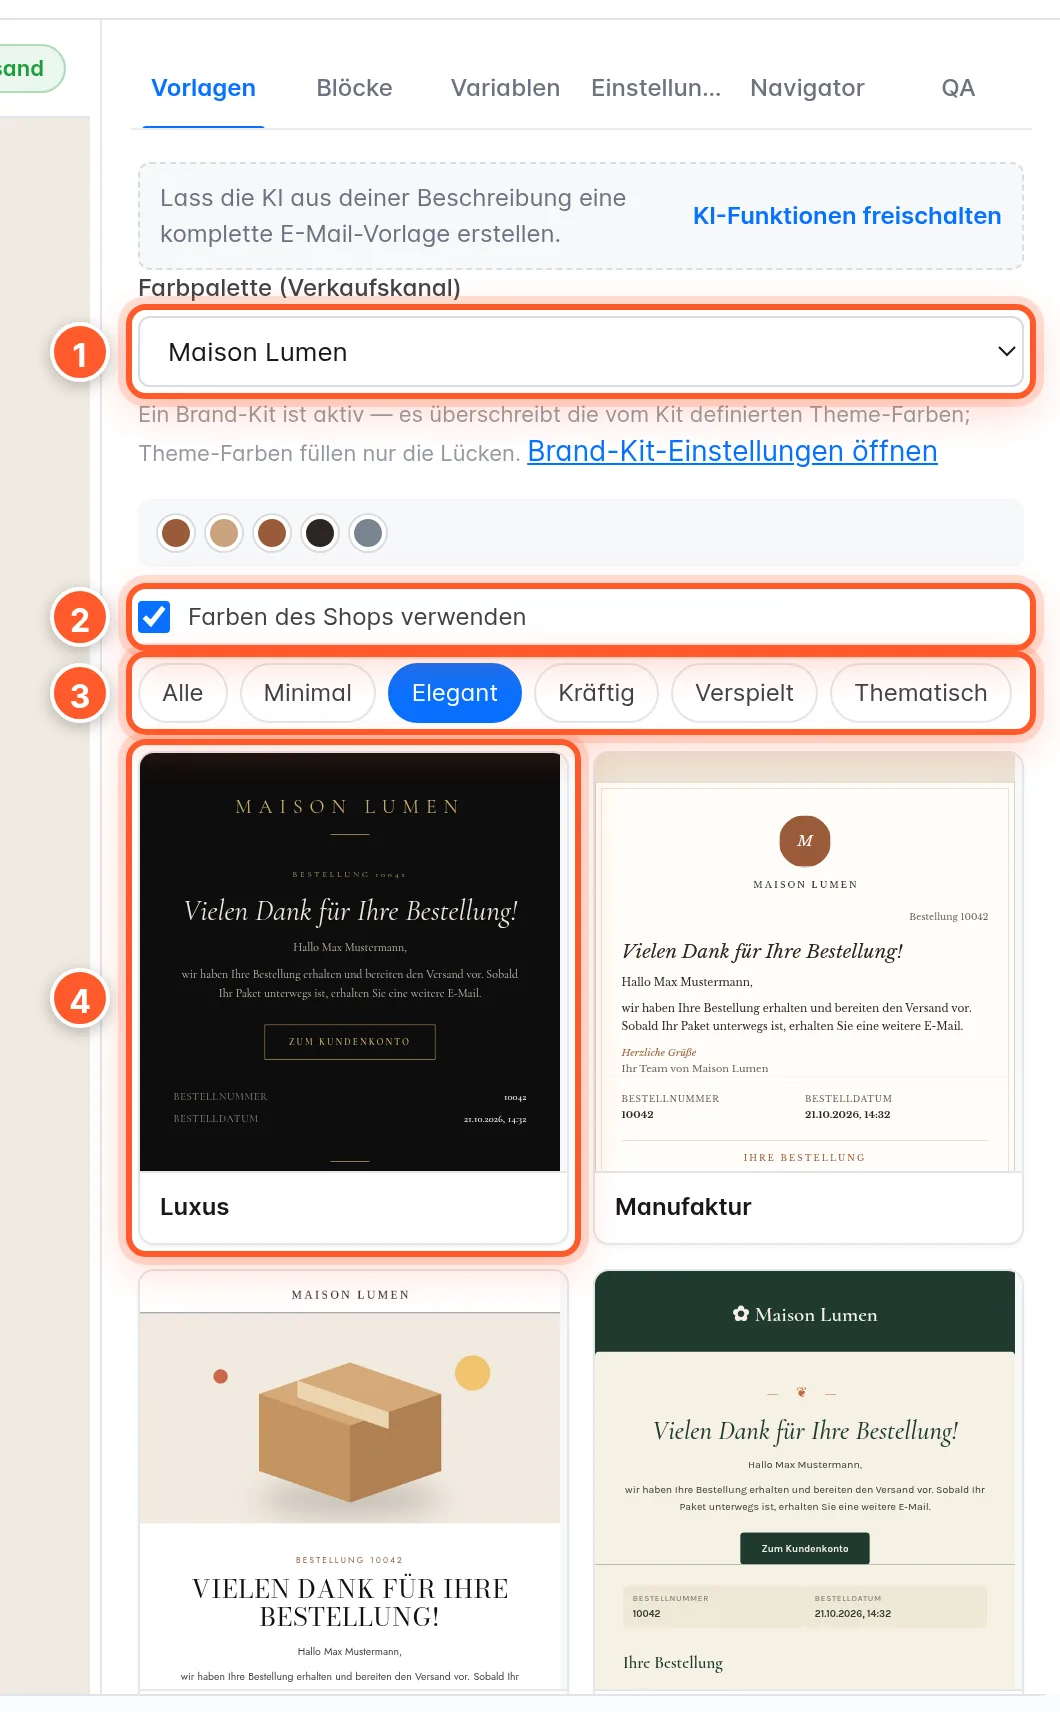
- Colour palette (sales channel) 1: The thumbnails show the logo, shop name and theme colors of the selected sales channel. If a brand kit is active, its colors take precedence; theme colors only fill the gaps.
- Use the shop colours 2: on = the template takes over your colors, off = it keeps its own color scheme.
- A click on a template 4 opens the large preview.
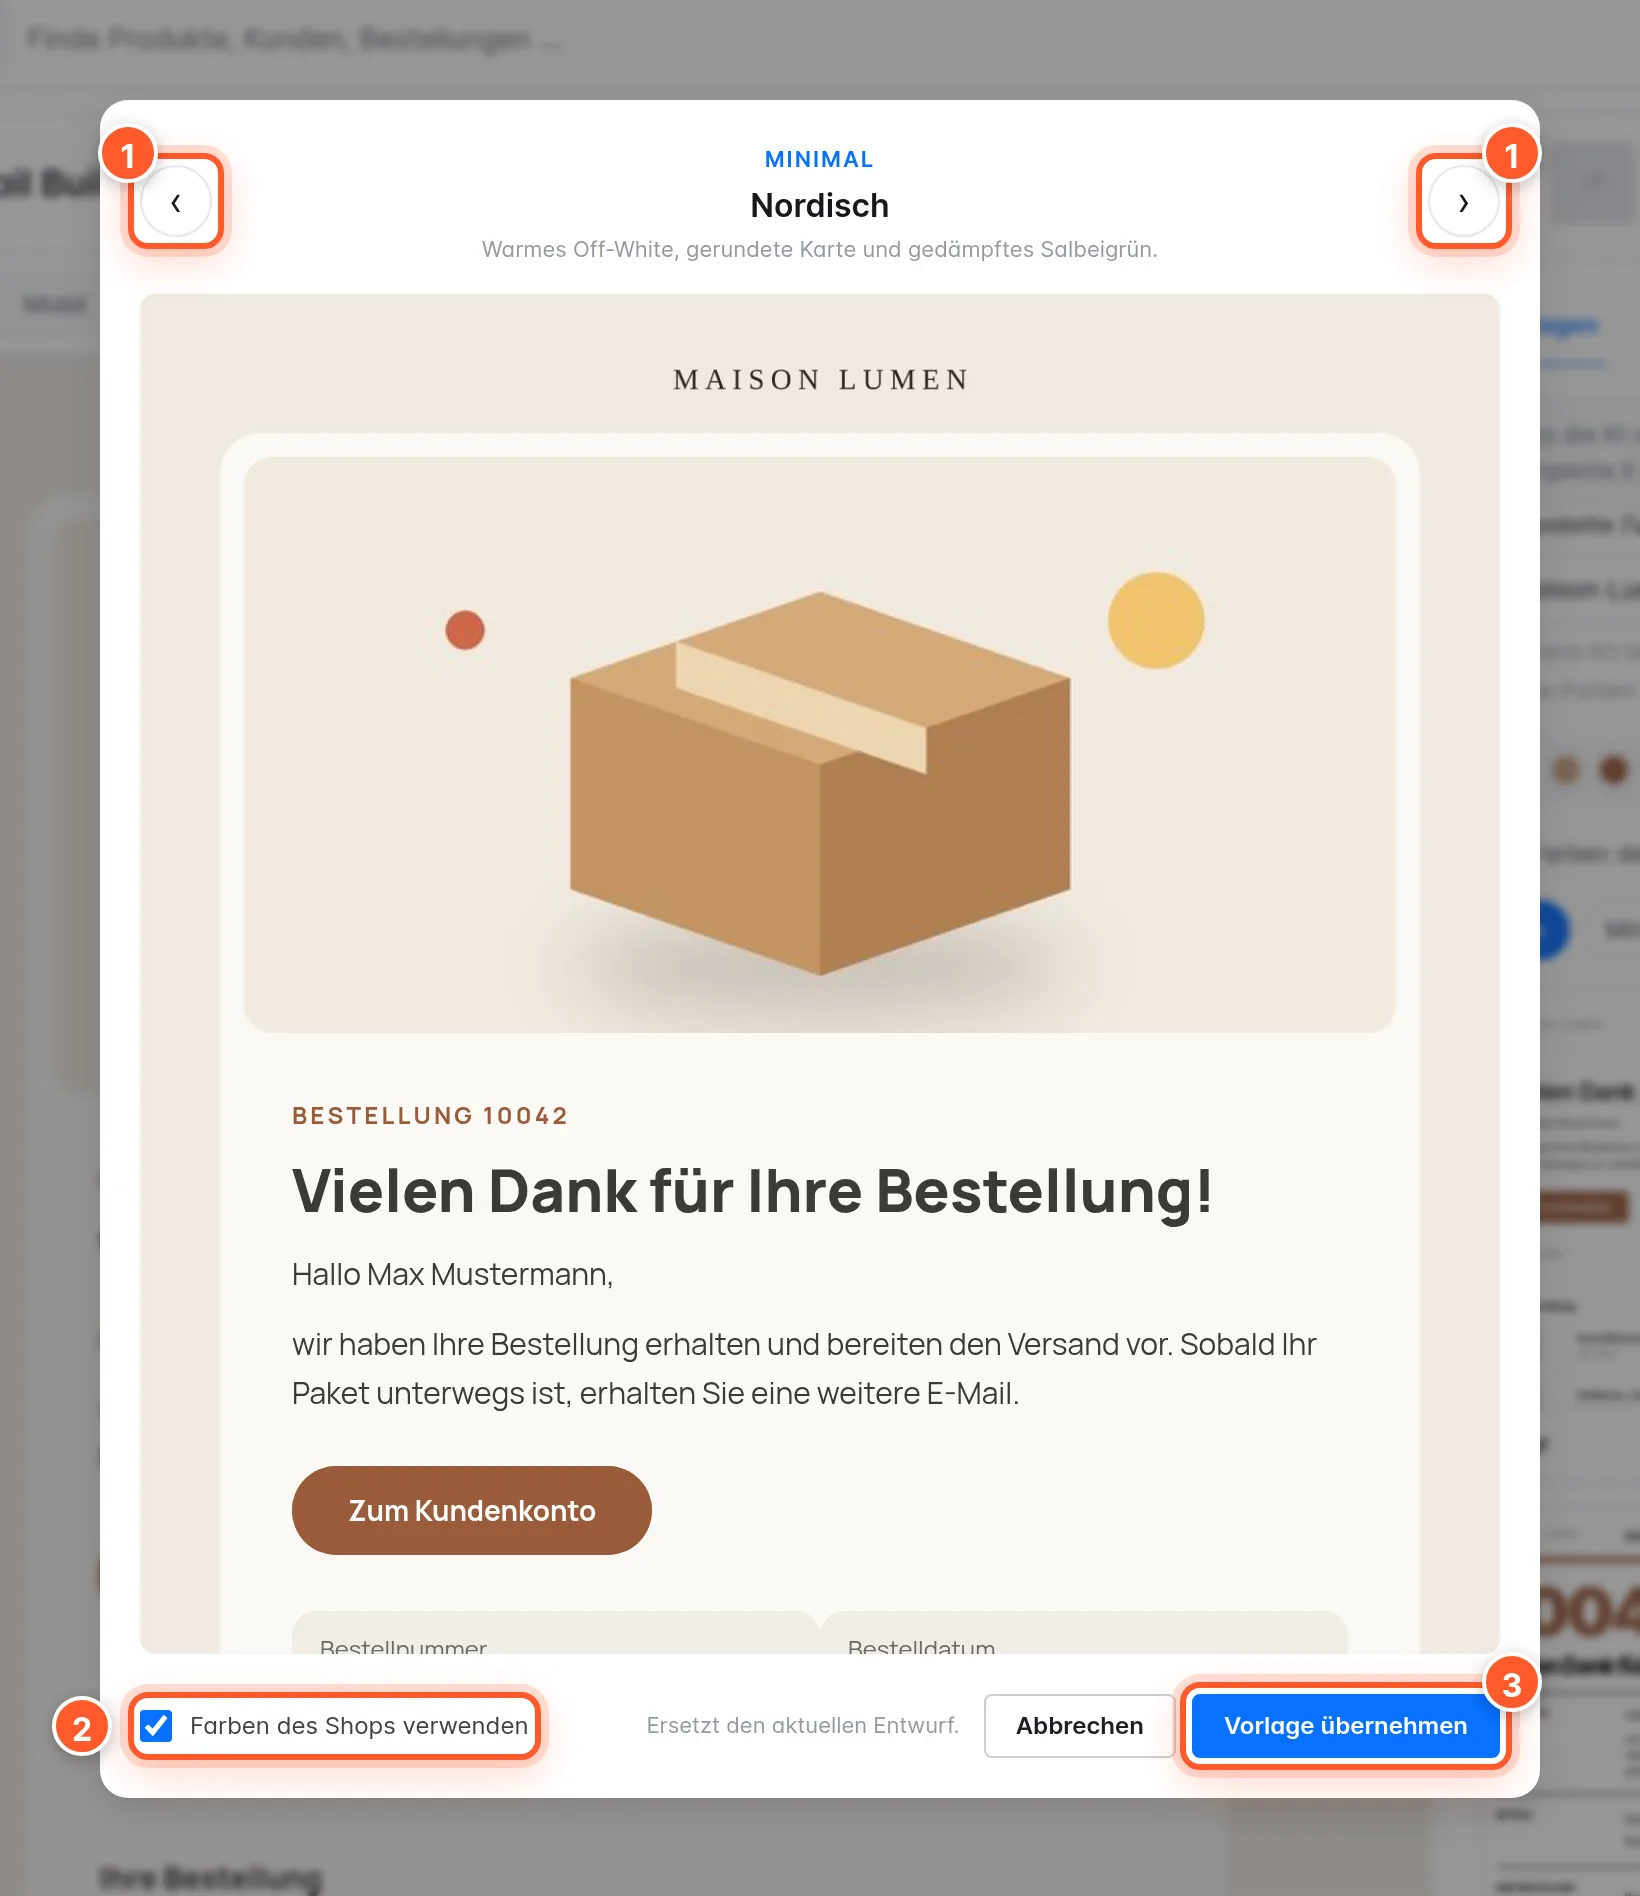
Apply template 3 replaces the current draft. Preheader and link tracking settings are kept, and Undo brings back the previous state right away.
Inserting and editing blocks
In the Blocks tab you’ll find the Layouts at the top and the Elements below, each with a select field for the category.
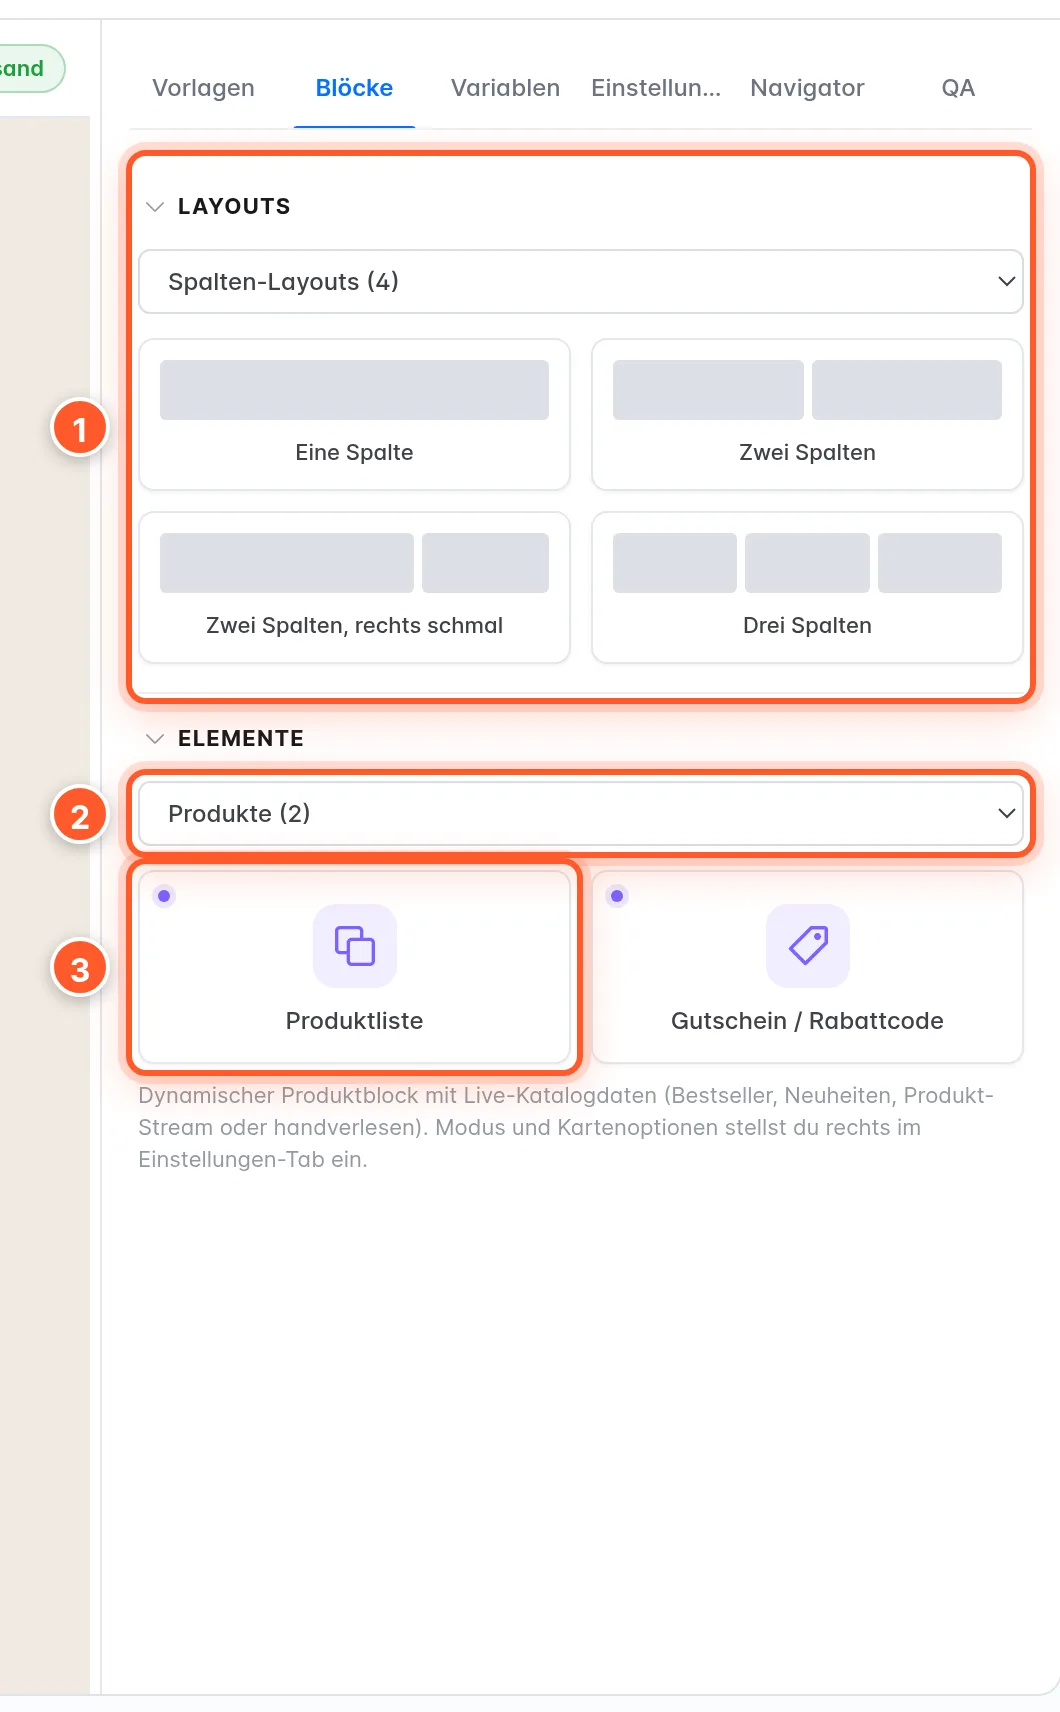
| Category | Elements |
|---|---|
| Basic elements | Text, Button, Image, Divider, Spacer, HTML |
| Products | Product list, Coupon / promo code |
| Order data | Order table, Order totals, Addresses, Payment & shipping – only for order-related mails |
| Social & media | Social icons, Video, Menu / links, Rating stars |
| Block library | your saved blocks (see Block library) |
To insert, drag an element to the spot you want – a line shows where it will land. Or simply click it: it’s then inserted directly after the selected element (without a selection, at the end of the mail).
A click on an element on the canvas opens its settings.
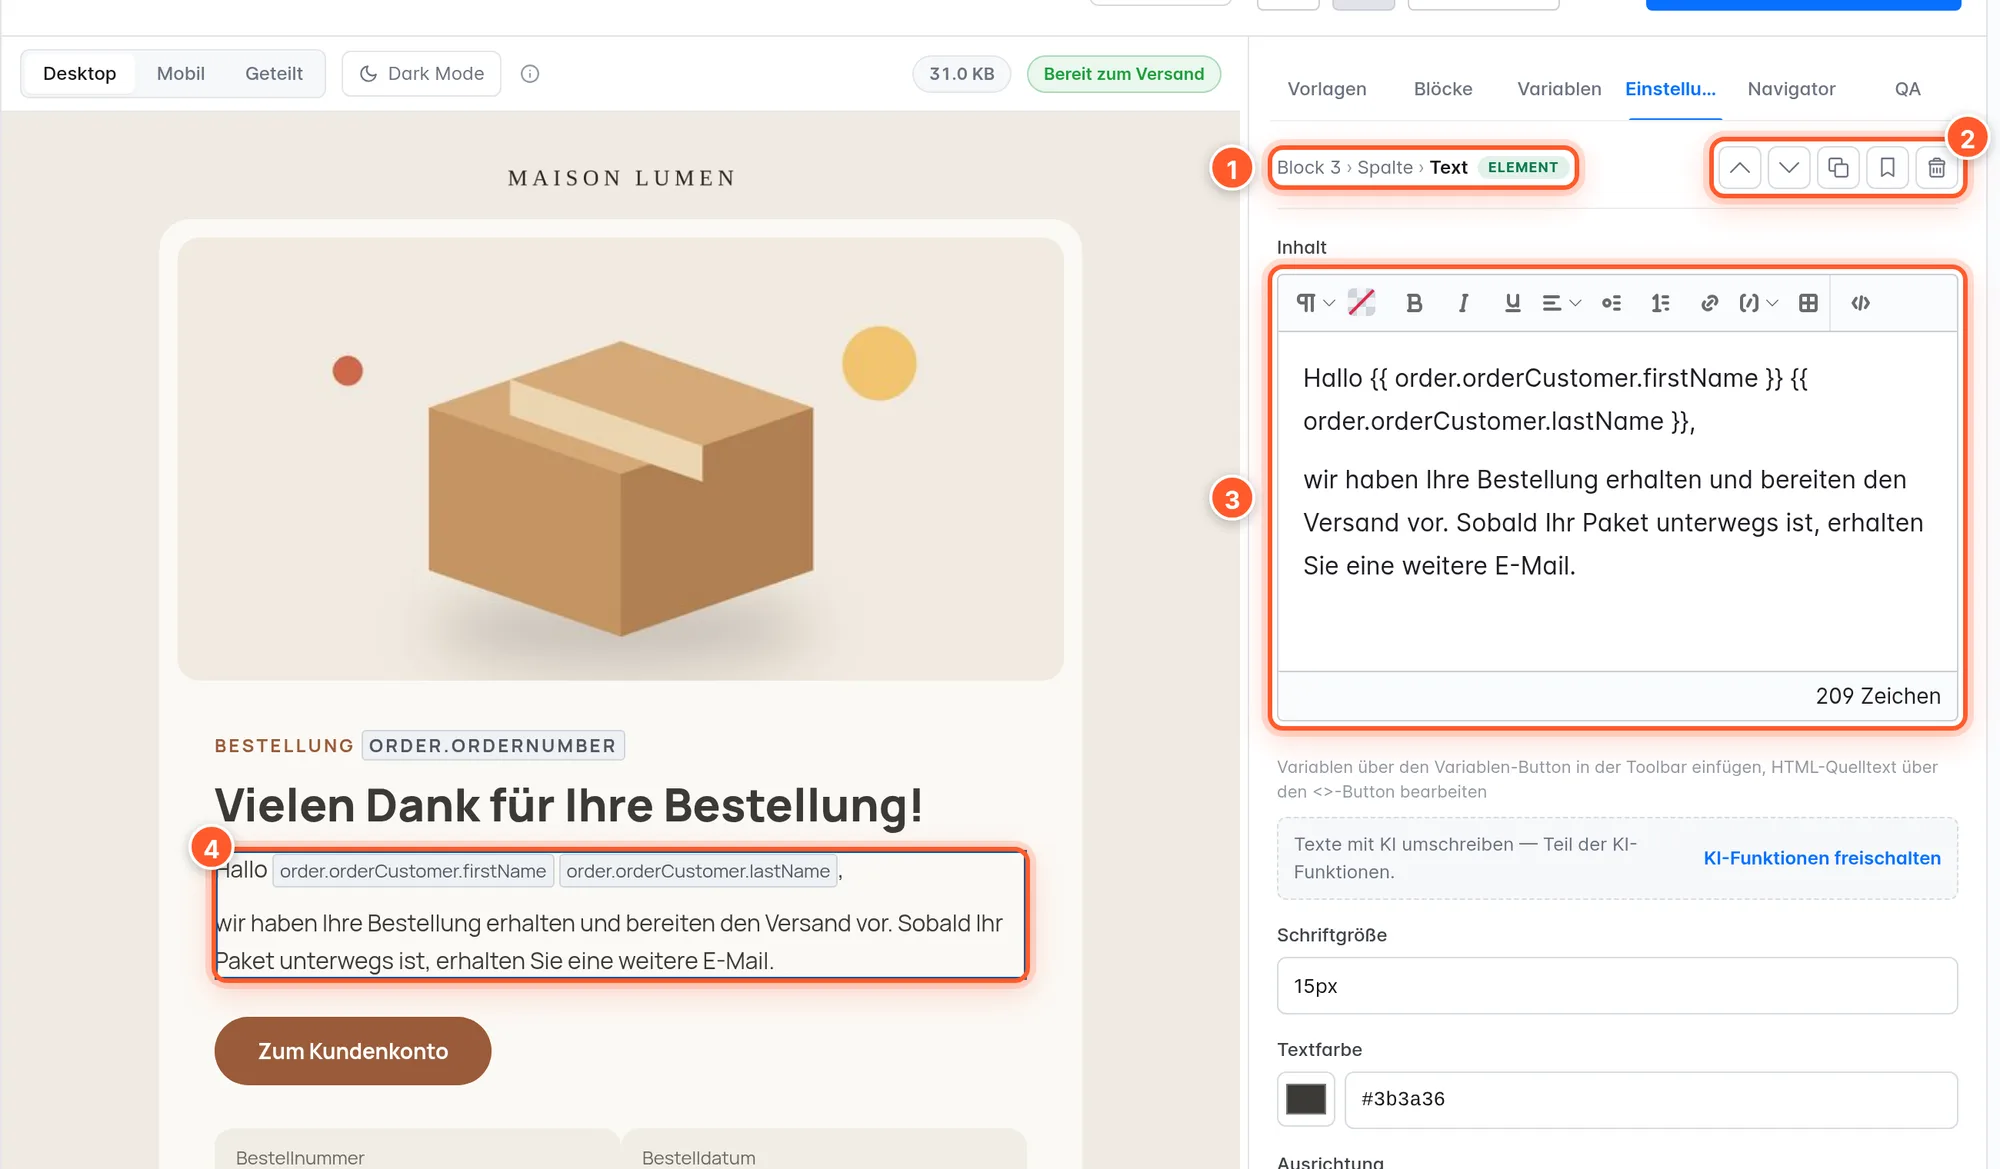
- Via the breadcrumbs 1 you jump to the parent column or layout, e.g. to change the background color or padding of the whole row.
- The actions 2 move, duplicate, save to the library or delete the element.
- In the text editor 3 you insert shop data via the variable button; <> lets you edit the HTML source. If a text contains Twig logic (e.g.
{% if %}), it’s automatically edited as source code. - Links can be set as External URL, Category, Product or Landing page – the builder creates the matching shop URL for each language.
- Choose images via Media directly from the Shopware media library, or upload them there.
Dynamic order and product blocks
The Order data blocks show the order’s real data when sending. You set columns, headings, line color, layout and color of the totals, and the backgrounds of the address fields in the Settings tab. In the Order table, each column defines heading and cell content together; per column you decide whether it stays in the row on phones, gets its own row or is hidden.
The Product list loads products live from your catalog when sending – ideal for recommendations in order or shipping mails.
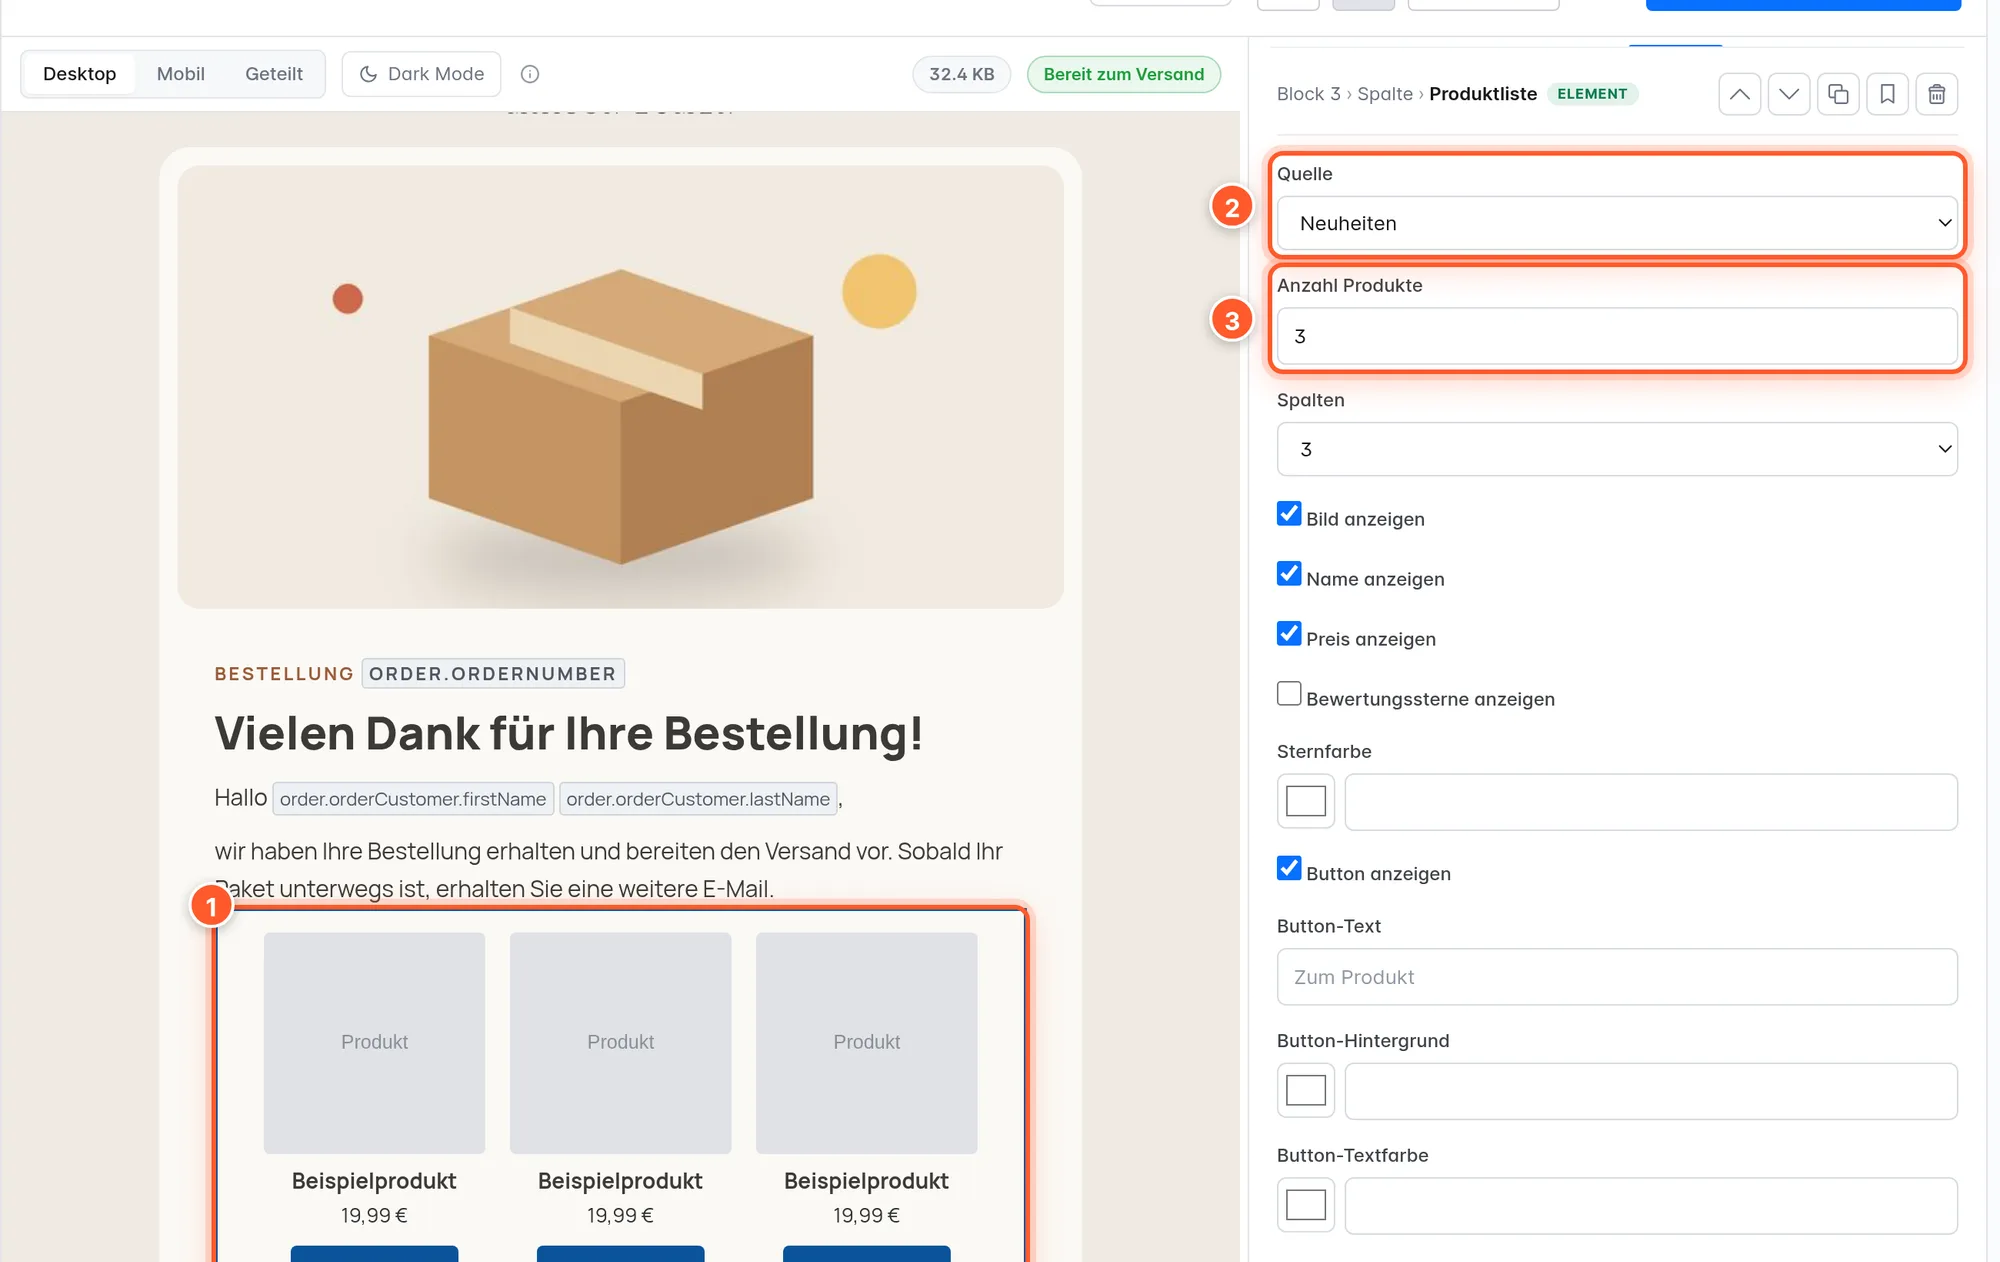
- Source 2: Best-sellers, New arrivals, Product stream (dynamic group) or Hand-picked.
- Number of products, Columns 3 and whether image, name, price, rating stars and button appear; button text and colors are adjustable.
- On the canvas, the block always shows sample products. You see the real products in the Preview.
The Coupon / promo code block shows a Fixed code, the code From a promotion (Shopware promotions) or a code From a variable – with an optional label above or below the code.
Tip: Any ready-made block (e.g. the order table) can be turned into freely editable HTML + Twig via Convert to text element – for special requests the options don’t cover.
Visibility and conditions
Every element can appear only under a condition or be hidden on a device type. You’ll find this in the element’s Settings tab under Visibility.
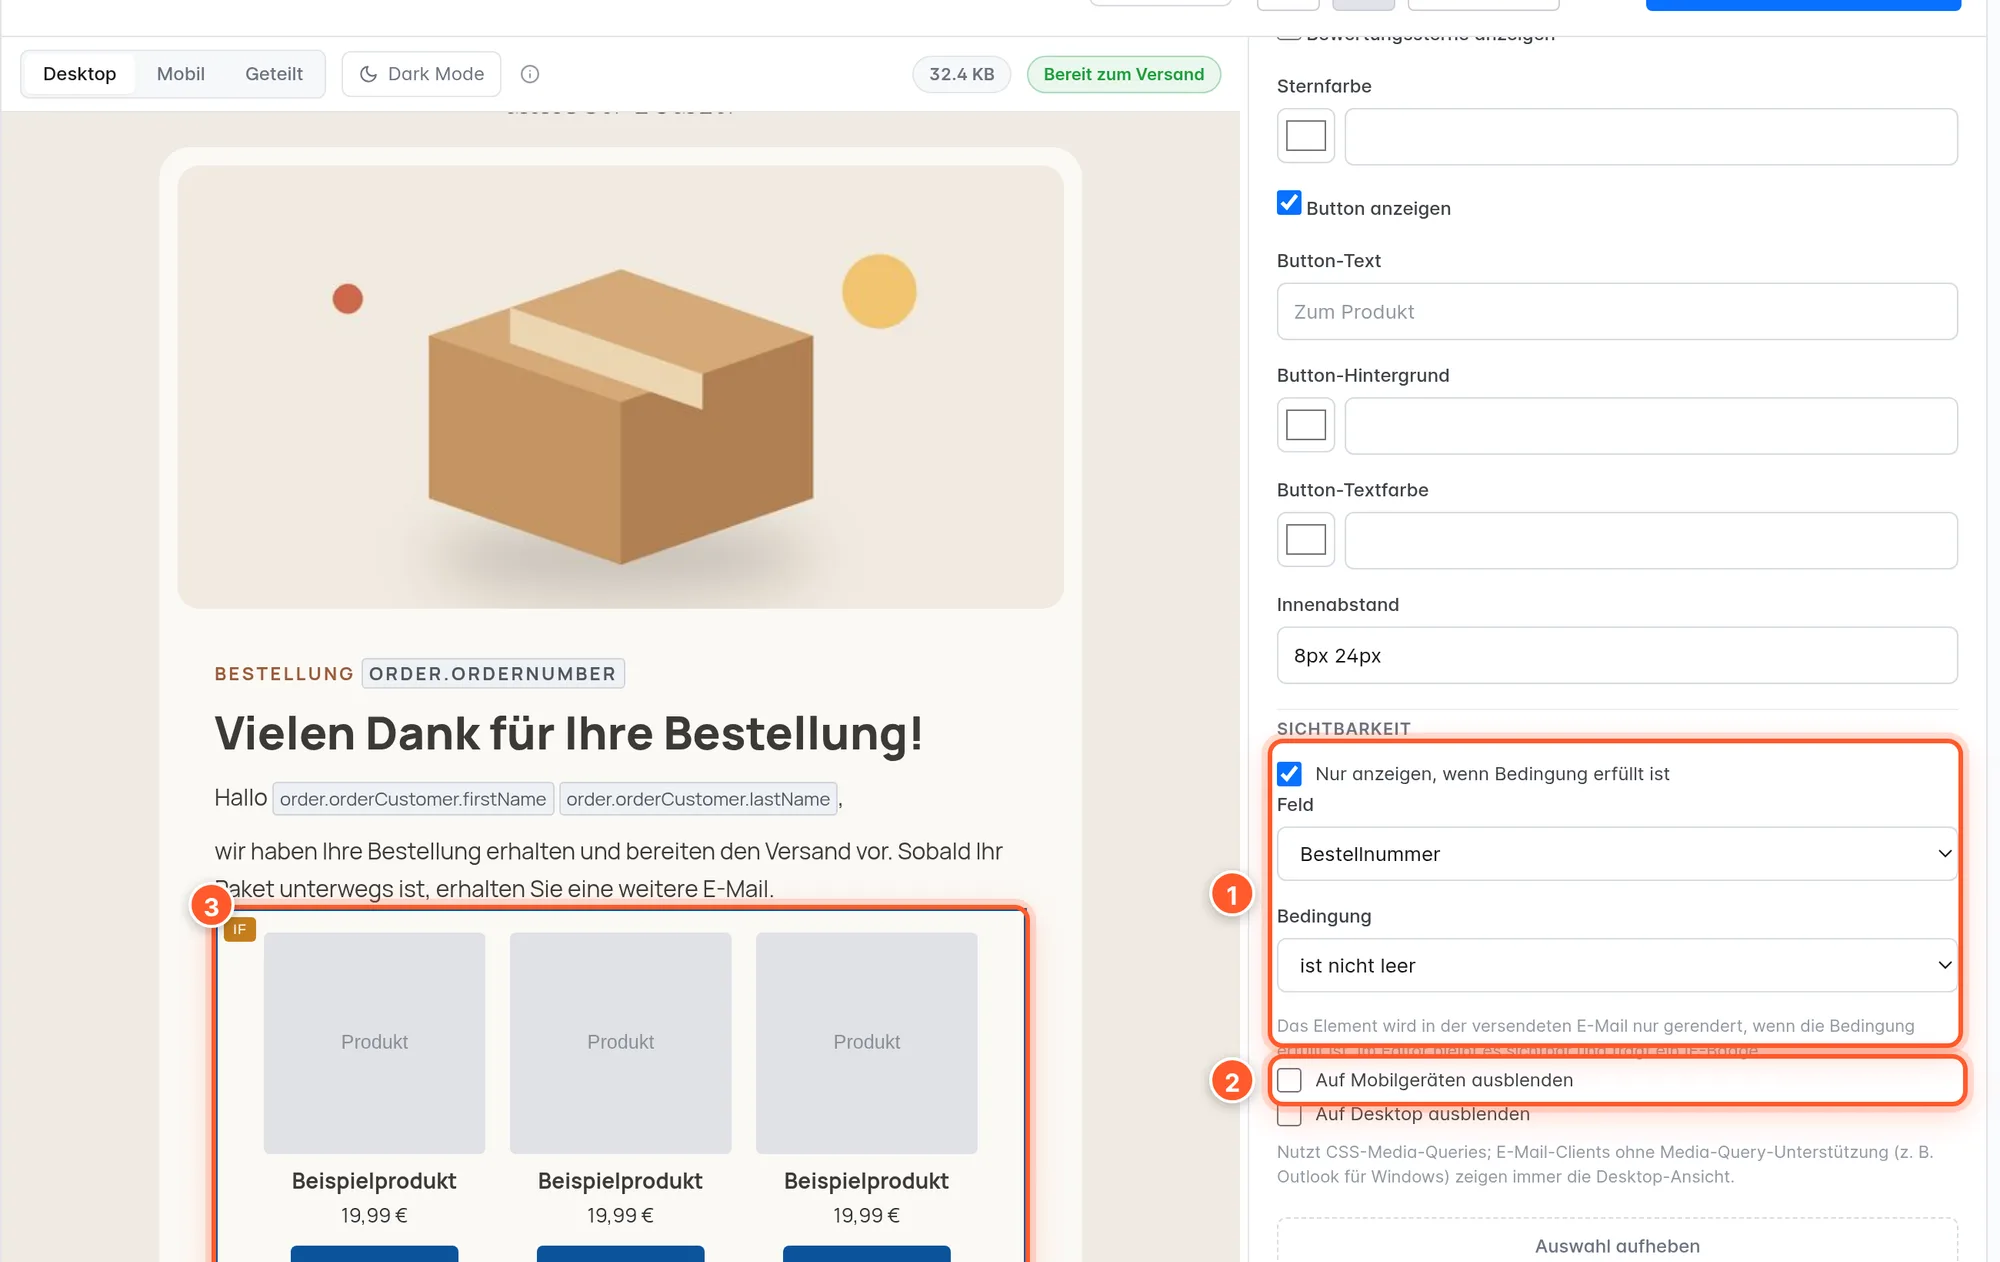
- Only show when a condition is met 1: choose a Field (or Custom field… for any variable path), a Condition (=, ≠, >, ≥, <, ≤, contains, is empty, is not empty) and a Value. Examples: coupon block only above a certain order value, note only for a specific shipping method, greeting with first name only if the first name isn’t empty.
- In the editor, the element stays visible and shows an IF badge 3; in the sent mail it only appears if the condition is true.
- Hide on mobile / Hide on desktop 2 use CSS media queries. Mail clients without media query support (e.g. Outlook for Windows) always show the desktop version.
- Show only during a season (from 1.4.0): the element is only included in emails sent during the selected season – so a seasonal banner doesn’t need a second design. In the editor it’s marked SEASON.
Variables
The Variables tab lists the shop data that fits this mail – grouped by General, Order, Customer, Contact form and so on, each with a sample value. A click copies the variable to the clipboard; in the text editor you insert it directly via the variable button.
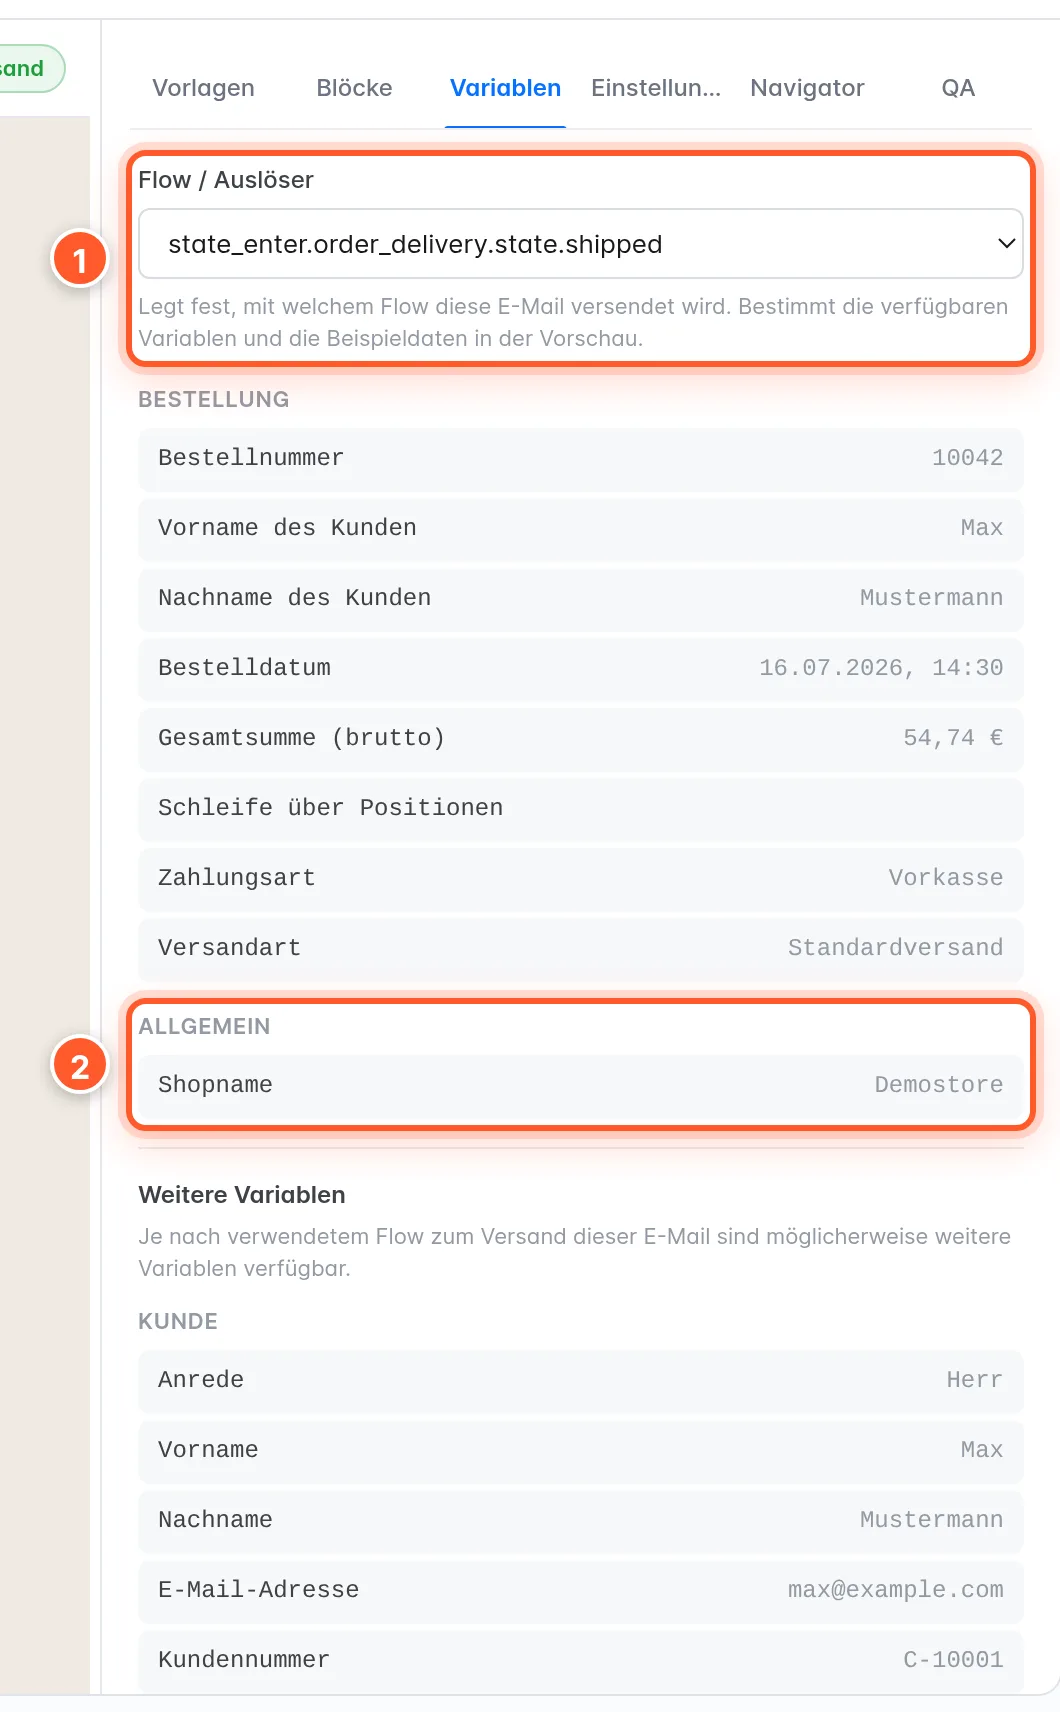
Flow / trigger 1: by default, the builder detects from the mail type which data is available (Automatic (by email type)). If a template is sent by a specific flow, choose it here – the builder then shows exactly its variables and sample data. If your design uses variables the selected event doesn’t provide, the builder warns you when publishing.
Document settings, preheader and link tracking
If nothing is selected (click next to the mail), the Settings tab shows the Document settings: background color, background image, text color, font family, an optional web font and an optional heading font, with preheader, link tracking and brand kit below.
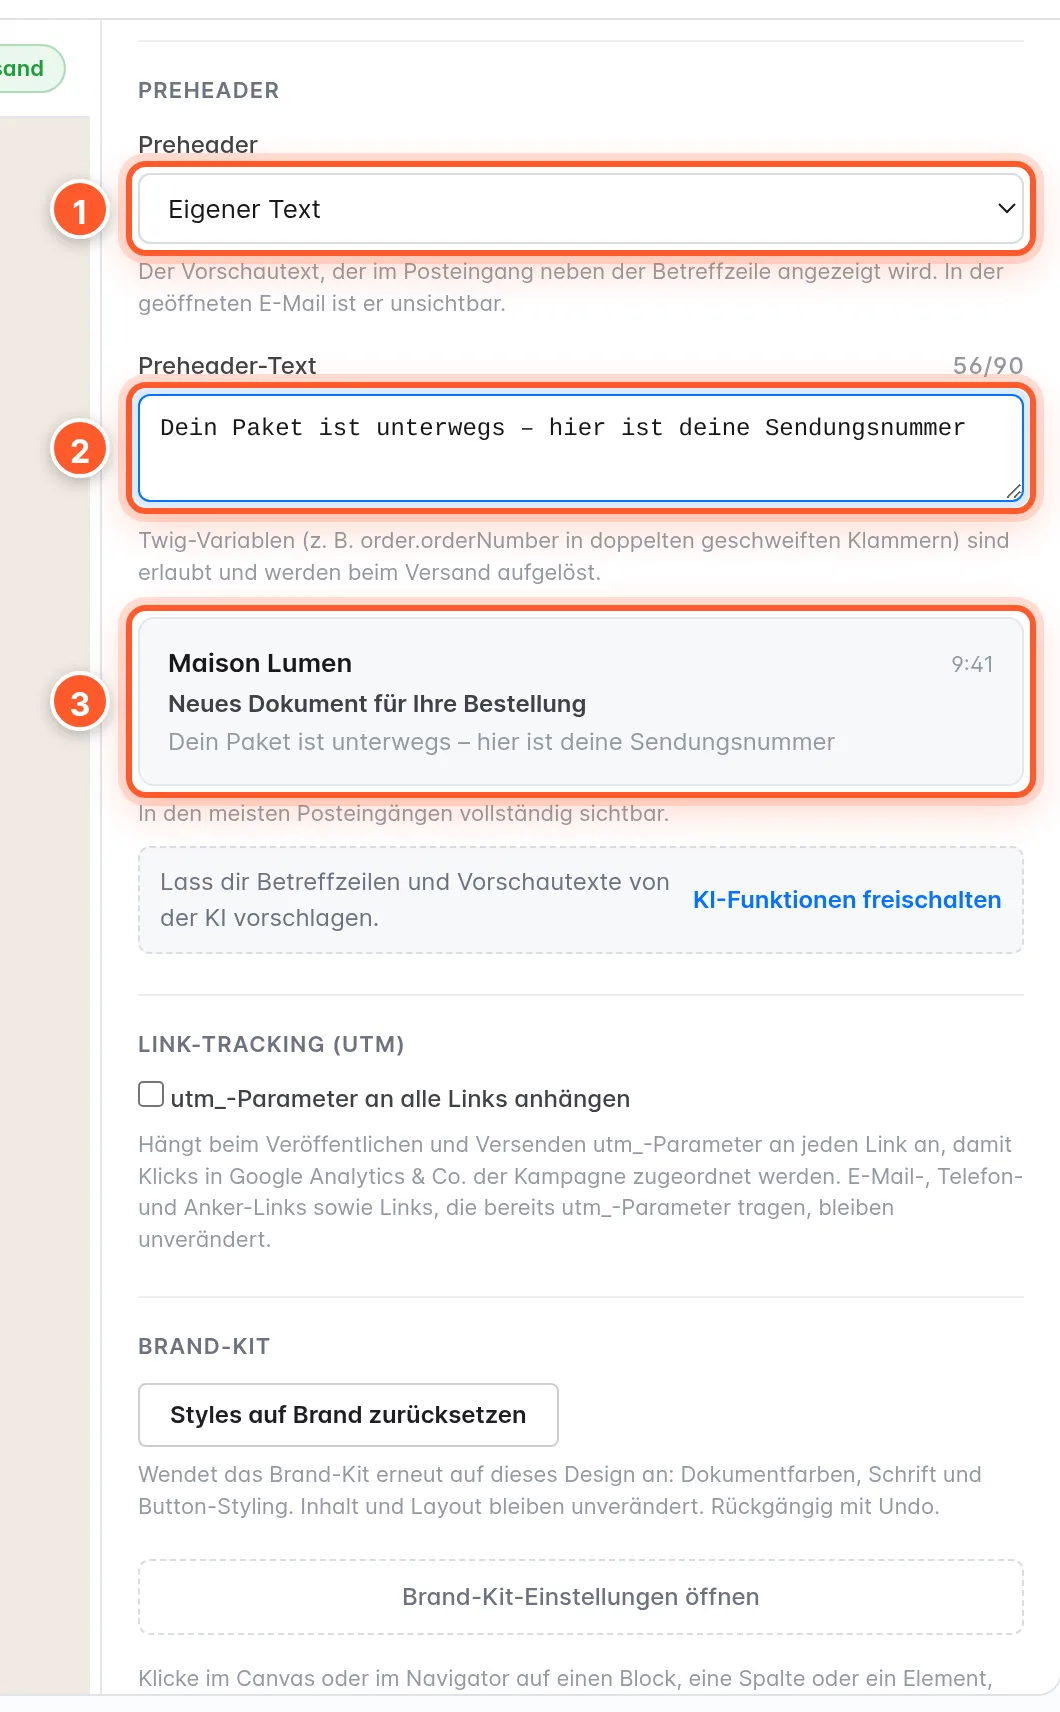
- Preheader 12: the preview text next to the subject in the inbox. Automatic (first text of the email), Custom text (Twig variables allowed, e.g. the order number) or Off. The inbox preview 3 warns you if the text is longer than about 90 characters and might be cut off.
- Link tracking (UTM): Append utm_ parameters to every link adds
utm_source,utm_medium,utm_campaign(empty = technical name of the mail template) and optionallyutm_termandutm_contentwhen publishing. Email, phone and anchor links, and links that already carry utm_ parameters, stay unchanged. - Web font: name + https stylesheet URL (e.g. Google Fonts). Only some clients (mainly Apple Mail/iOS) show web fonts; all others use the fallback font from Font family.
- Reset styles to brand applies the brand kit to this design again – colors, font and buttons, without changing content or layout.
Preview and test mail
You switch the view above the canvas.
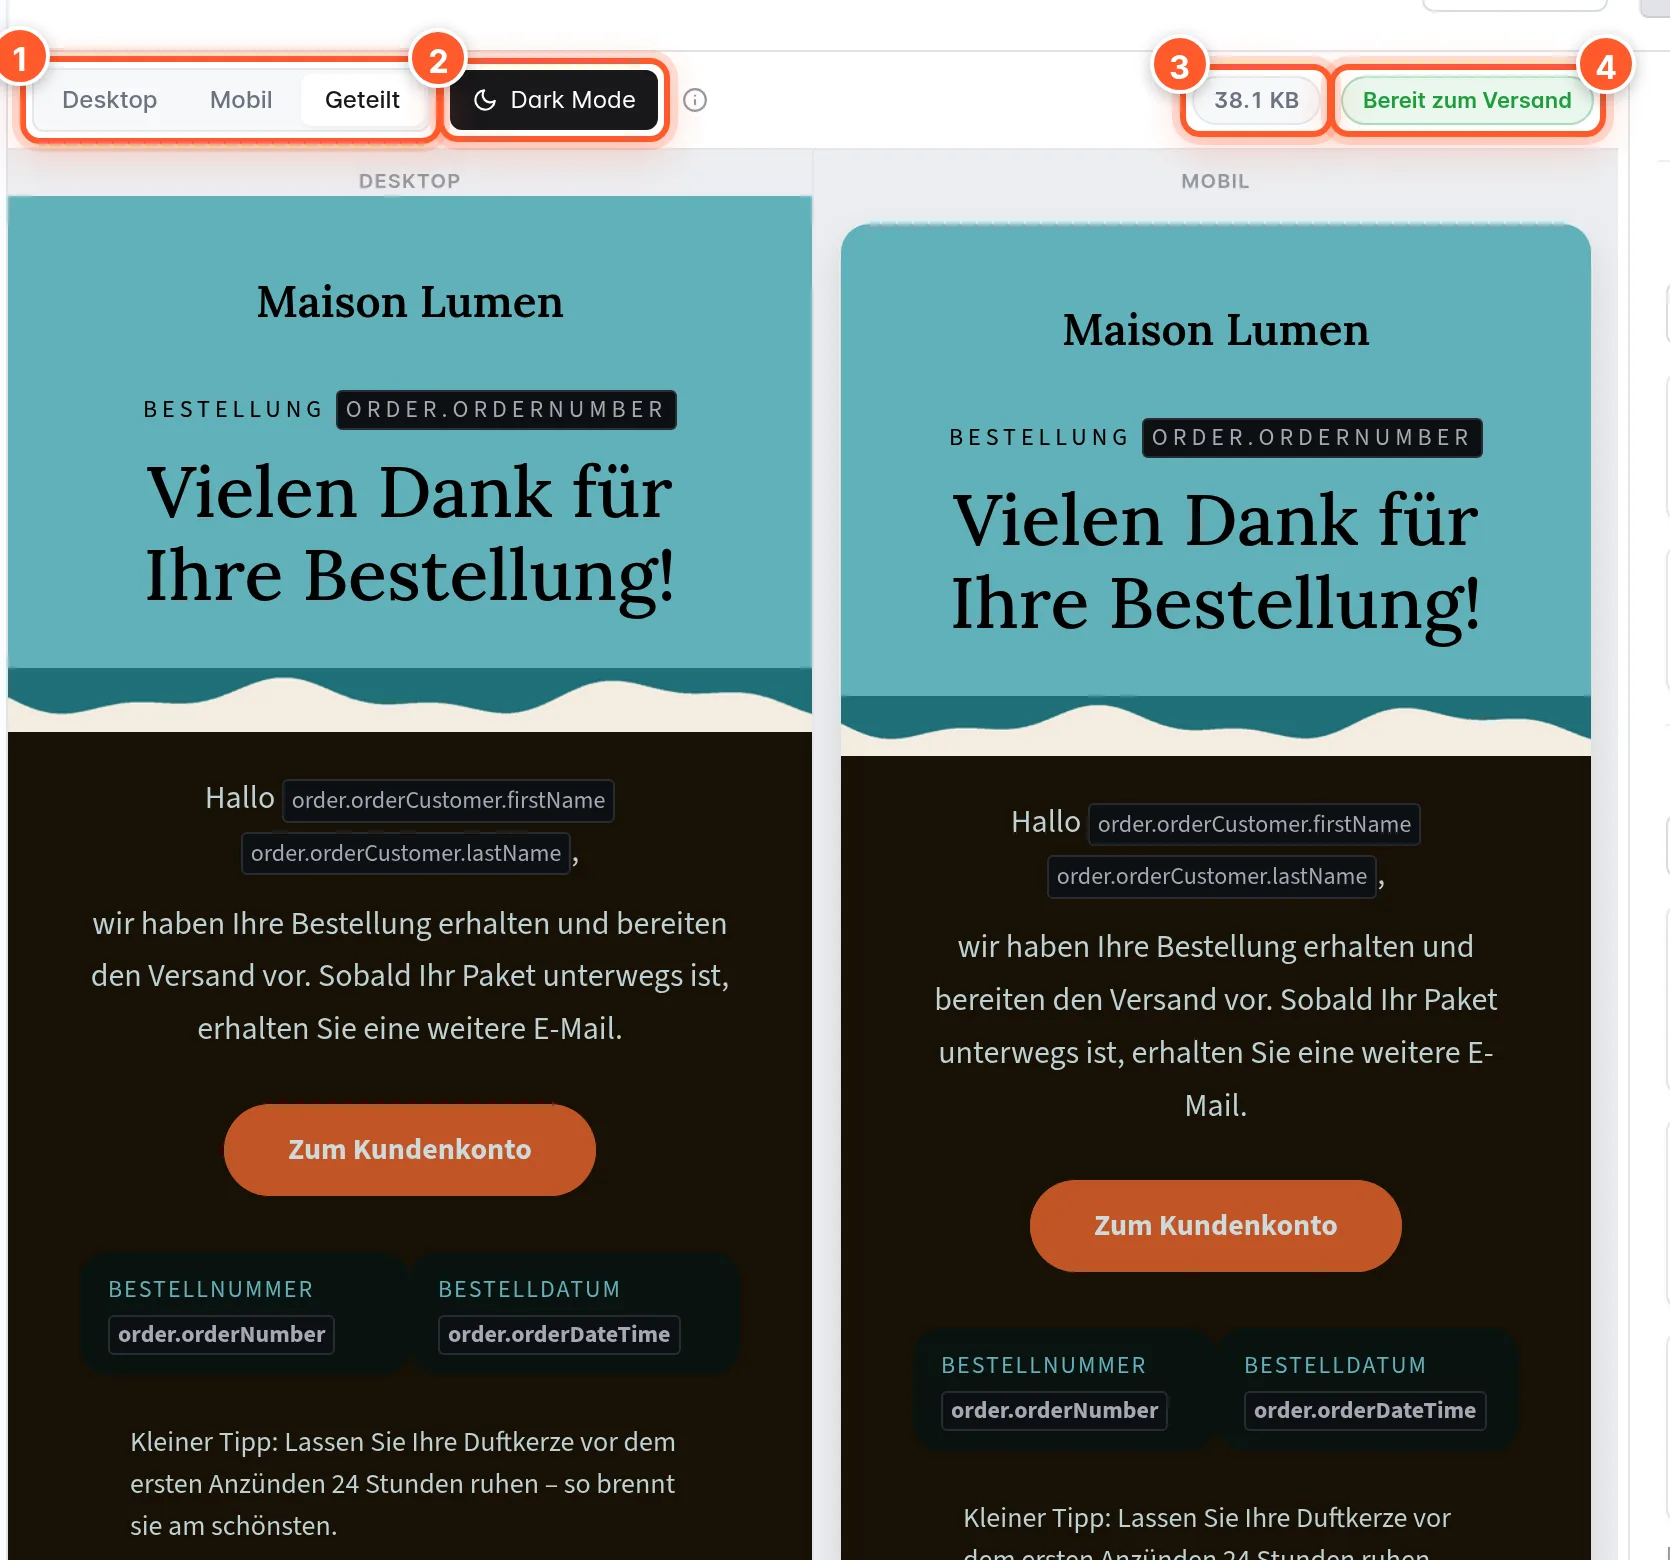
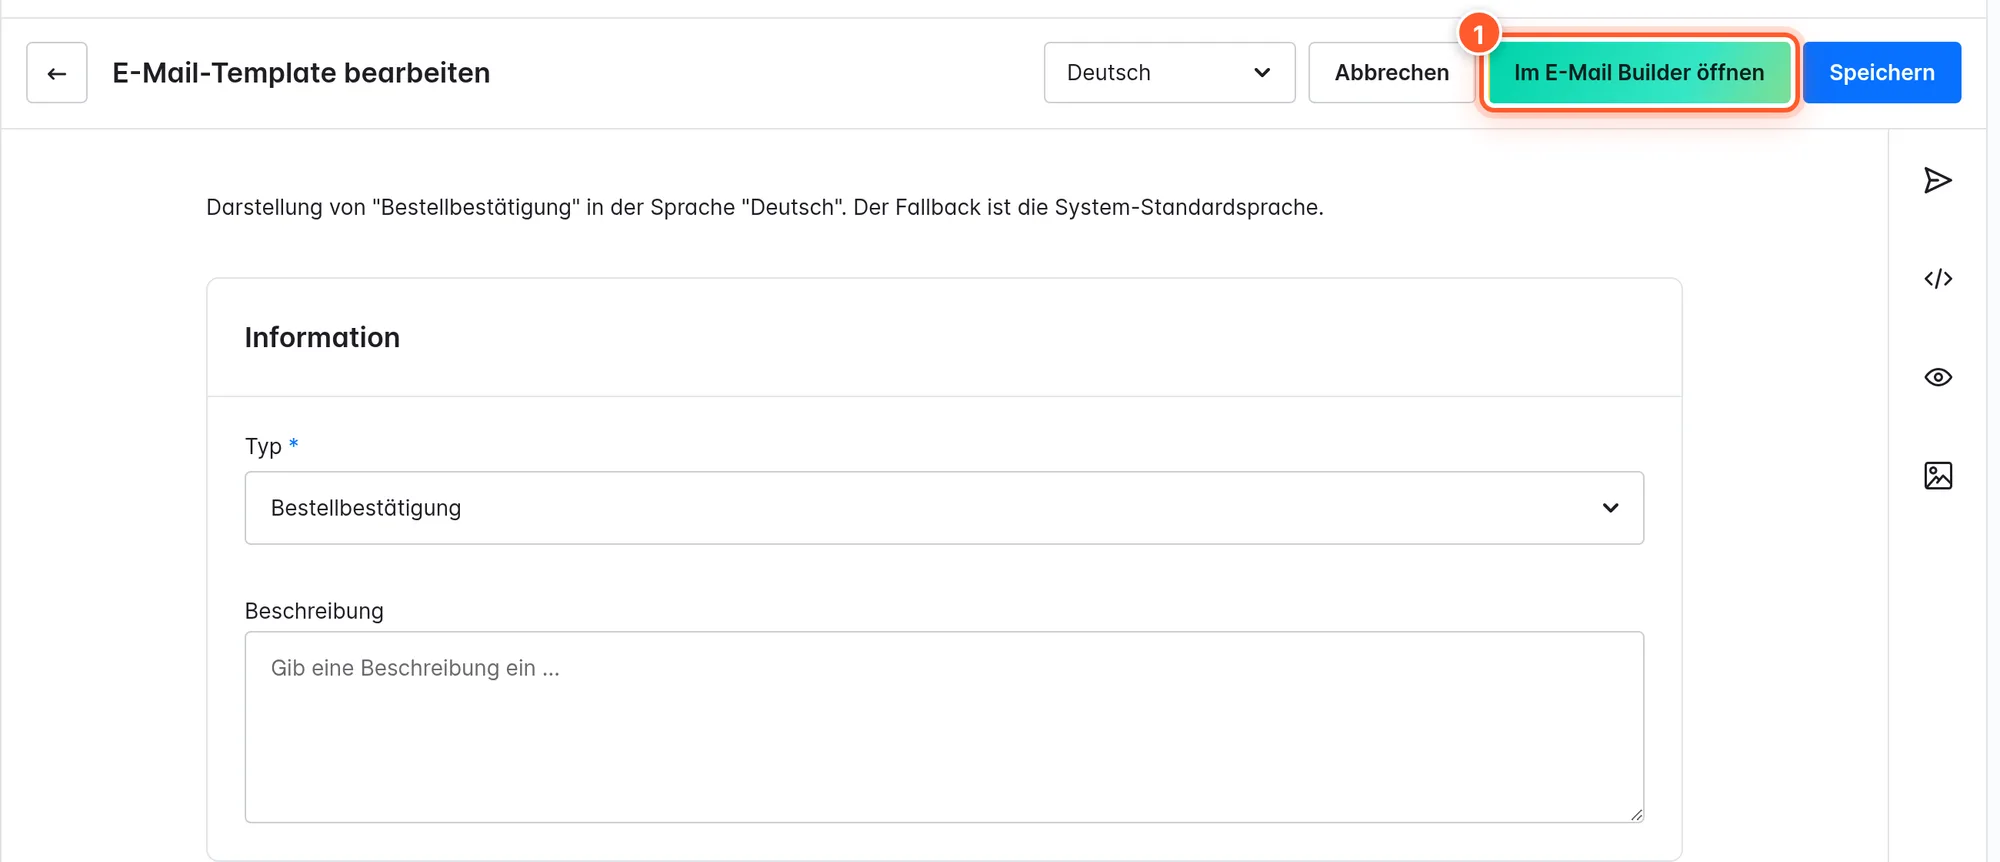
- Desktop / Mobile / Split 1: Split shows desktop and mobile side by side – and you keep editing.
- Dark mode 2 simulates the aggressive color inversion of the Gmail apps as a worst-case check. Outlook recolors more gently, Apple Mail usually shows the light version. The sent mail stays unchanged.
- The size 3 of the email HTML: Gmail clips messages over about 102 KB; from 100 KB the badge turns yellow.
- Preview (at the top) renders the mail with real data from your shop, e.g. the latest order, and shows template errors directly.
- … › Test mail sends the current draft with sample data to any address. The builder remembers the last address used.
Send QA
The badge 4 above the canvas shows Ready to publish or the number of open issues. A click opens the QA tab.
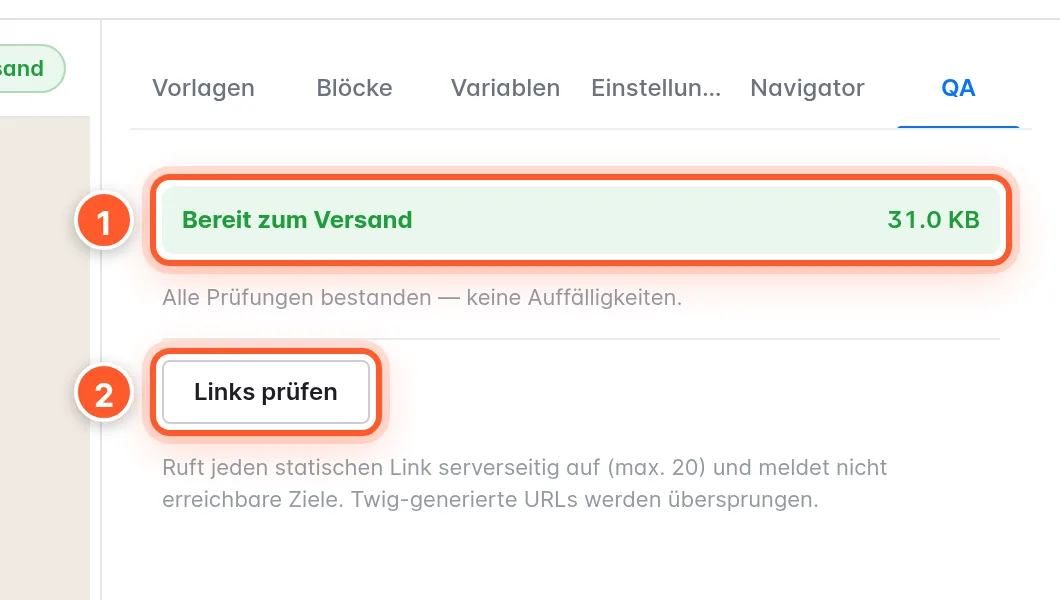
The checks cover missing alt texts, too little text contrast (WCAG AA), font sizes below 12 px, a missing or disabled preheader, empty links or links to “#”, Gmail clipping above 100 KB, an empty plain-text version and typical spam phrases (as a hint only). Jump to block selects the affected element. Check links 2 calls up to 20 fixed links on the server and reports unreachable targets; links generated via Twig are skipped.
Versions
Every Save & apply automatically creates a snapshot (the last 20 are kept). Under … › Versions you can also save named versions, which are kept permanently – for example before a Christmas campaign.
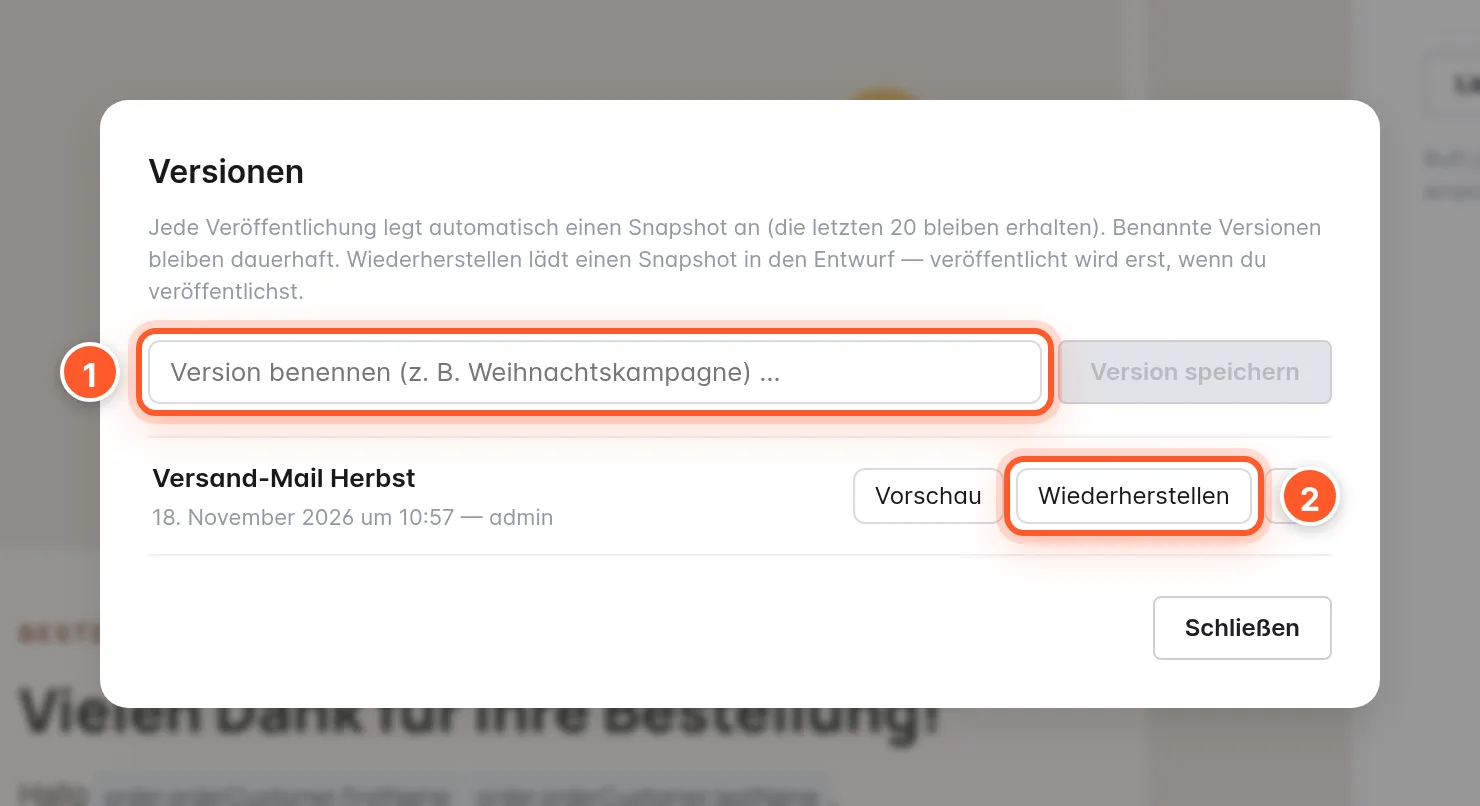
Preview shows a version, Restore 2 loads it into the draft. It only goes live when you click Save & apply again.
Brand kit
Under Settings › Mail Builder brand kit you store your brand guidelines once, centrally. New designs and all templates take them over automatically.
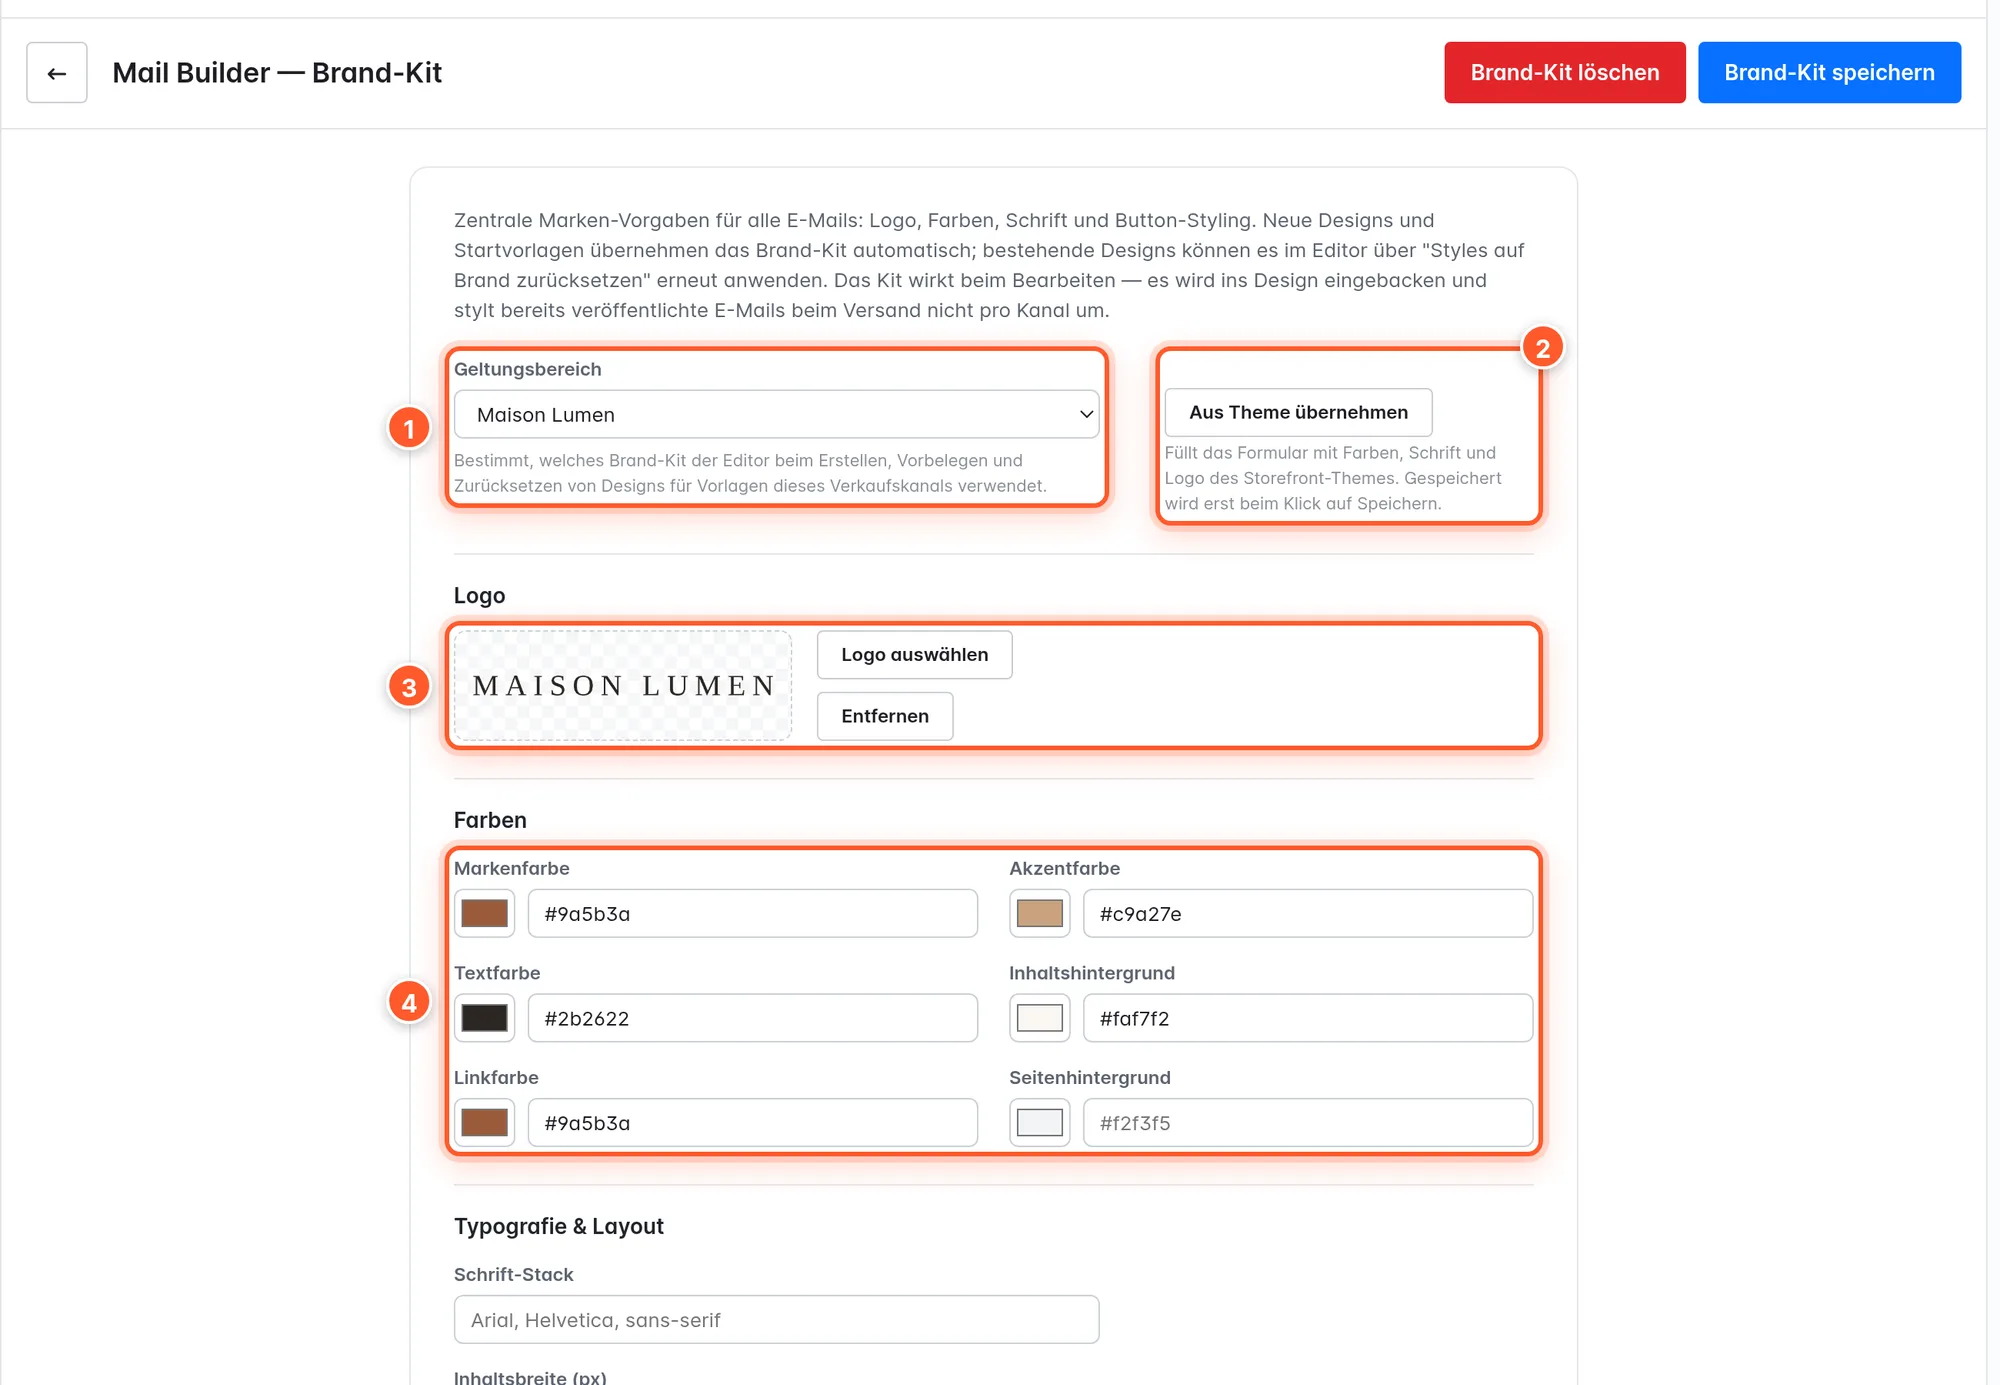
- Scope 1: Global (all sales channels) or a separate kit per sales channel. The builder uses the kit of the channel whose color palette you selected in the Templates tab.
- Seed from theme 2 fills the form with the colors, font and logo of your storefront theme. It’s only saved with Save brand kit.
- Logo 3 from the media library.
- Colours 4: Brand colour, Accent colour, Text colour, Content background, Link colour, Page background.
- Typography & layout: Font stack and Content width (px) (320–900 px, default 600 px).
- Buttons: Background, Text colour, Corner radius (px) with live preview.
The brand kit takes effect while designing: it’s baked into the design. Mails that are already published don’t change on their own. To adapt an existing design to a changed kit, use Reset styles to brand in the document settings and publish again.
Seasons
From version 1.4.0, every email can get a seasonal version, for example for Christmas or Black Week. During the season, Shopware automatically sends this version, before and after it the standard design again – without you having to republish anything.
1. Create seasons: Under Settings › Mail Builder seasons you create seasons once for the whole shop.
- Add season opens the form with Ready-made seasons (Christmas, Black Week, Easter, Valentine’s Day, Summer, Halloween, New Year) or your own Name.
- Period: Fixed dates (first and last day), Around Easter or Around Black Friday (days before and after each – these dates are recalculated every year). Repeats every year repeats fixed dates automatically.
- Colour for the year overview; with the On toggle you pause a season without deleting its versions.
- The Year overview shows all seasons as bars, and the Emails table shows per language which seasonal versions are published, still a draft or missing. Under What is sent on a day? you can check any day.
- Time zone: seasons start at 00:00 on their first day and end at midnight after the last day.
- If seasons overlap, the one that started last is sent. If an email has no version for it, the next running season applies, then the standard design.
2. Create a seasonal version: In the editor, click Seasonal version at the top, choose the Season and under Start with a Copy of the standard design (recommended), A template from the library or an Empty design. The Seasonal version: … bar then appears above the canvas with the Subject during the season field (empty = standard subject). Use the selector at the top to switch between the Standard design and the seasonal versions.
3. Publish: Save & apply publishes the seasonal version; the standard design stays unchanged. You can show the preview and test mail for each season (“Preview: during …”).
On Shopware’s email template page, a notice tells you when a seasonal version is currently being sent instead of the content.
Block library
Recurring sections – footer with contact details, service box, social bar – you save once and use in all mails.
- Select an element or layout and click the bookmark (Save to library) in the actions.
- Give it a Name and optionally a Category. Via Save as you can update an existing block instead of creating a new one.
- In any other mail you’ll find the block under Blocks › Elements › Block library, with search and category filter.
When inserting, you have two options:
- Insert copy (or drag): an independent copy you can edit freely.
- Insert linked: the block stays connected to the library and always shows its current version. When you update the library block, the builder offers to republish all templates that use it linked via Update linked templates. Caution: other unpublished drafts of these templates go live too.
Blocks that need order or customer data are marked in the library; the builder warns you if you insert them into a mail without that data. You turn a linked element into an editable copy with Detach from library. If you delete a library block that’s in use, all usages are automatically converted into copies – no mail loses content.
Multilingual mails
Each language has its own design. Switch via the language selector at the top. When you open a language for the first time, it starts as a copy of the default language’s design – so you only need to translate the texts. Save & apply writes the design into the mail template’s translation for exactly this language. Published mails declare their language (lang attribute) – good for screen readers and webmail.
AI assistant (optional)
The “AI Features” in-app purchase unlocks AI tools. Without the purchase, the builder shows Unlock AI features in the relevant places.
- Create with AI (Templates tab): describe the mail in your own words, optionally with a sample image (PNG, JPEG, WebP up to 8 MB) – the AI builds a complete, editable template from it, optionally in the sales channel’s colors.
- AI text tools on the text element: Shorten, Expand, Fix grammar and Change tone (Professional, Friendly, Urgent, Playful). Variables are kept – if one gets lost, the result is discarded.
- Suggest subject with AI (document settings): subject lines and preview texts based on the content.
- Generate alt text with AI on the image element.
- … › Translate with AI: translates all texts of the design into a target language; variables and links are kept.
- Convert with AI: if you open a mail that already has custom HTML, the builder offers to convert it into editable blocks (or Start blank).
Settings
The builder has no plugin configuration; all settings live in the editor and the brand kit.
| Where | Setting | Effect |
|---|---|---|
| Editor, Templates tab | Colour palette (sales channel), Use the shop colours | Colors and logo of the templates |
| Editor, Variables tab | Flow / trigger | Available variables and sample data |
| Editor, Document settings | Background colour, Background image, Text colour, Font family | Basic design of the mail |
| Web font: Font name, Stylesheet URL (https) | Web font for supporting clients | |
| Heading font (optional): font name, stylesheet URL, Fallback fonts | Separate font for headings | |
| Preheader, Preheader text | Inbox preview text | |
| Link tracking (UTM) | utm_ parameters on links | |
| Reset styles to brand | Apply the brand kit again | |
| Element, Settings tab | Visibility | Condition, hide on mobile/desktop |
| Settings › Mail Builder brand kit | Scope, logo, colors, font, content width, buttons | Central brand guidelines |
Permissions: The builder is available via Shopware’s permissions for email templates (viewing opens the builder).
Tips & hidden features
- Click instead of dragging: A click on an element in the Blocks tab inserts it directly after the selected element – faster than drag and drop in long mails.
- Reuse Grid Builder layouts: If the Grid Builder is installed, Grid Builder layouts also appear under Blocks › Layouts. The grid is translated into mail-friendly columns (the Shopping Experience content isn’t).
- Neno import: If you built templates with the Visual Mail Editor (Neno) plugin, the builder imports them automatically as a draft the first time you open them and names elements that couldn’t be converted 1:1.
- Header/footer warning: If a filled set is assigned to a sales channel under Settings › Email templates › Header and footer, the builder warns you when publishing – Shopware would wrap it around the complete builder mail and break the layout. Empty the set or remove the assignment.
- Plain-text version: The invisible plain-text version is generated automatically from the design. In the HTML element, enter under Plain-text version what plain-text recipients should read instead.
- HTML element with linter: The builder warns about
<script>,<form>, external stylesheets andposition: fixed– things mail clients don’t support. - Corner radius per corner: For layouts, columns, buttons and images, each corner can be rounded individually; the chain icon links all corners back to one value.
- Table columns on phones: In the order table, you set the Mobile behavior per column (keep in row, full width, hide).
- Everything can be undone: Even applying a template or resetting to the brand kit can be reversed with Undo.
Frequently asked questions
I saved, but customers still get the old mail.
The automatically saved draft doesn’t change the live mail. Click Save & apply – only then are the HTML and text written into the Shopware email template. With several languages: publish per language.
The mail looks broken in the inbox, with extra content at the top and bottom.
A header/footer set is assigned to the sales channel (Settings › Email templates › Header and footer). Builder mails are complete emails; empty the set or remove the assignment. The builder warns you when publishing.
Why does the product list only show “Sample product”?
The canvas shows placeholders. Real products are loaded by the Preview – and when sending.
Variables stay empty in the mail.
The variable doesn’t belong to the event that sends the mail (e.g. order data in a registration mail). In the Variables tab, choose the matching Flow / trigger – the builder then only shows available variables and warns you when publishing.
The order data blocks are missing in the Blocks tab.
They only appear in order-related mails (order, shipping, payment, invoice, documents) or when a flow with order data is selected as the trigger.
The web font isn’t shown in Gmail/Outlook.
That’s normal: web fonts are mainly shown by Apple Mail and iOS Mail. All others use the fallback font from Font family – choose a similar system font there.
Can I take over templates from another email plugin?
Designs from the Visual Mail Editor (Neno) are imported automatically. The AI assistant can convert existing custom HTML into blocks, or you can put it into an HTML element. If it doesn’t work with your plugin, get in touch.
I design newsletters – where do I find them?
You design and send newsletters with the Newsletter Add-on under Marketing › Newsletter. It uses the same editor with six dedicated newsletter templates.