
Documentation
Shop Quest
Version 1.0.0 · updated November 18, 2026
Overview
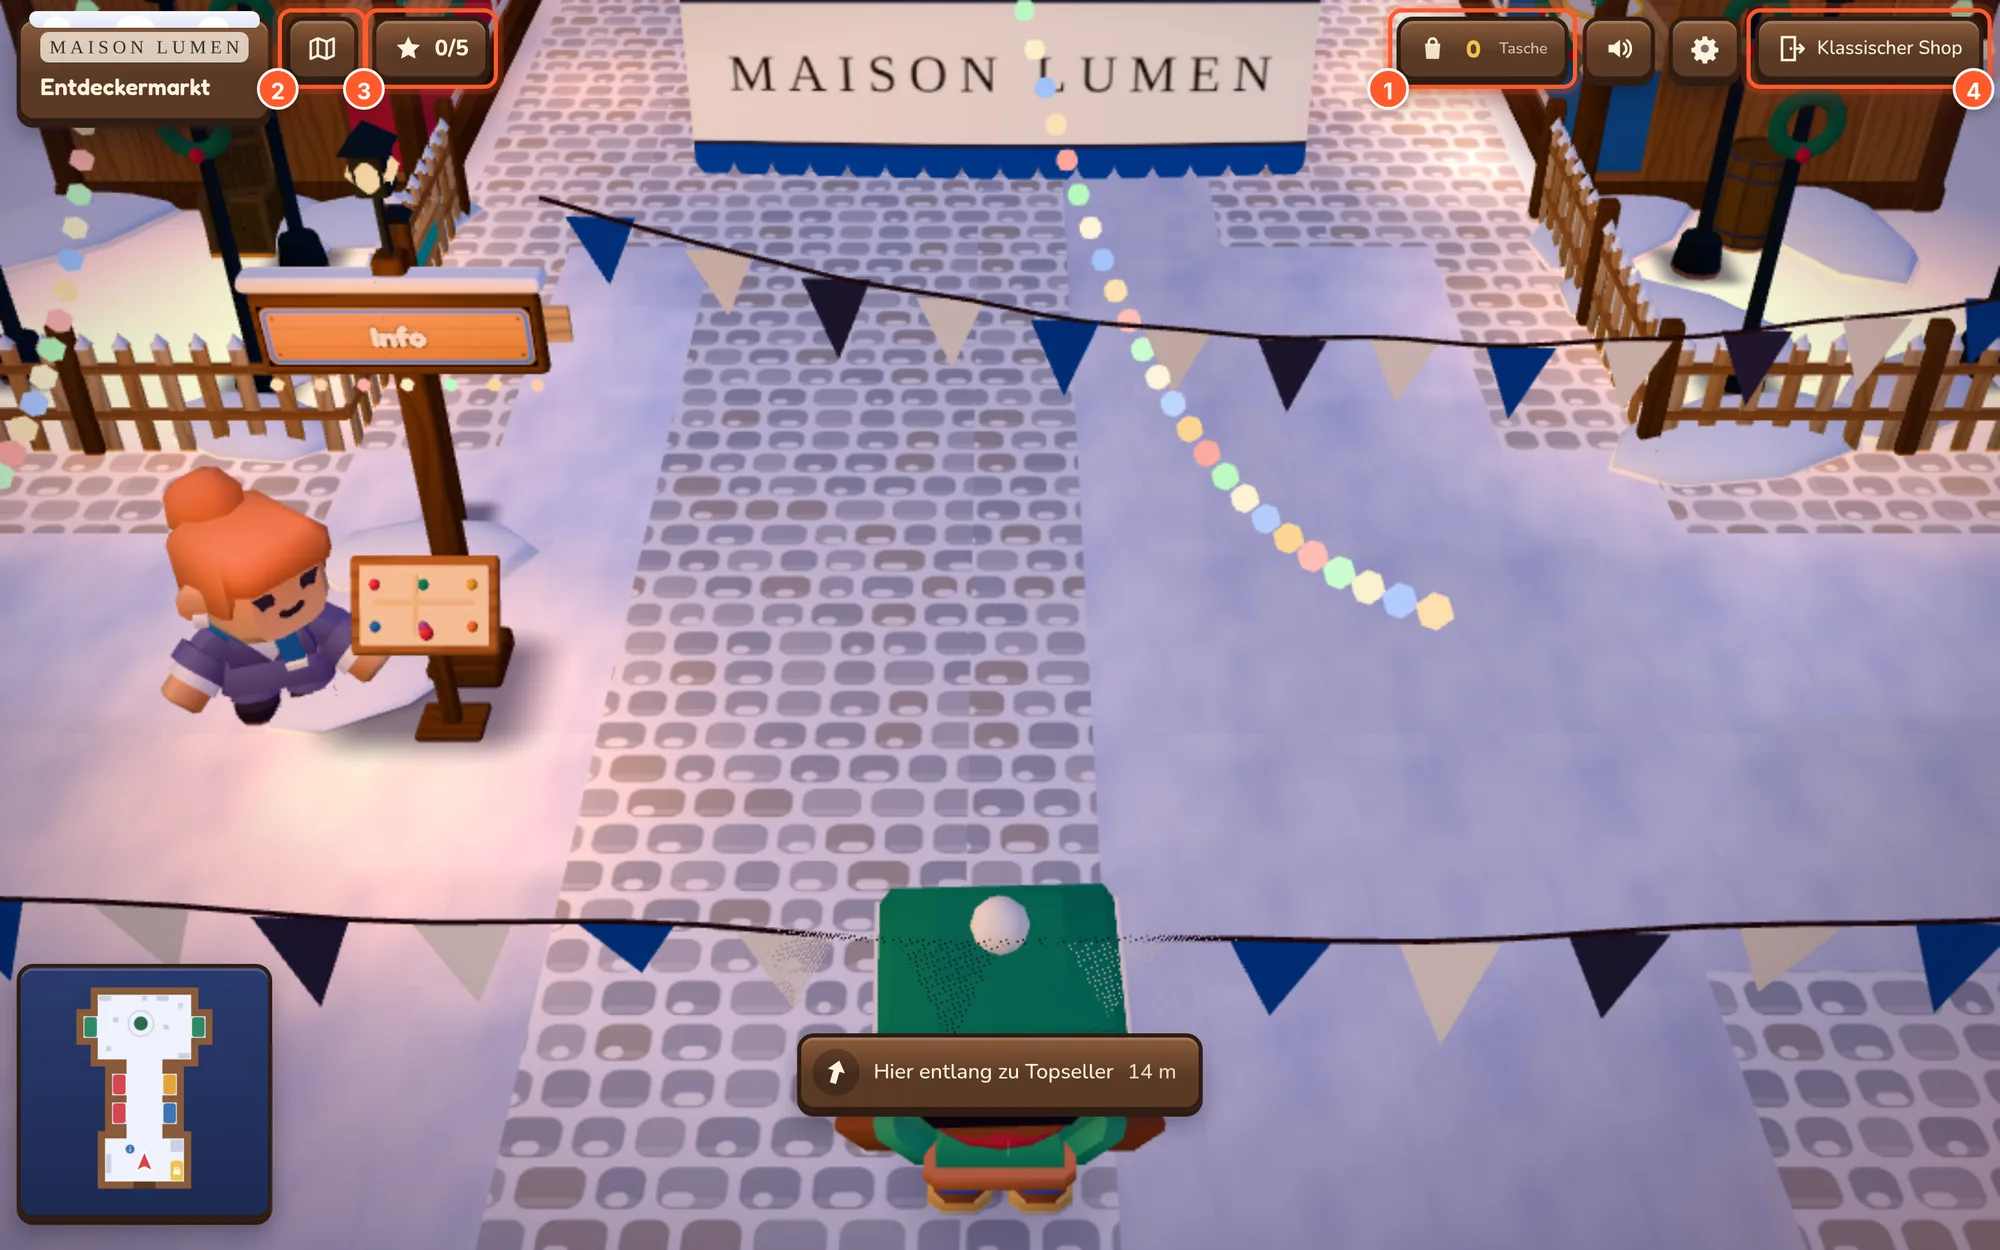
Shop Quest turns your shop into a small game world in the browser. Your categories become market stalls or rooms, with the products on display with image and price. Visitors walk around with keyboard and mouse, by touch (joysticks or tapping) or with a gamepad, look at products and put them in the Bag. The bag is the real Shopware cart, and payment happens in the completely normal checkout.
The classic shop stays as it is. The game world is an additional offer at /play (main game) or at its own address like /play/christmas-market. You can offer it all year round or only for certain periods.
You set up everything important in one place: Marketing → Shop Quest. There you’ll find the list of your games, and from there the wizard, the editor, the Level Studio, the season calendar, the analytics and the settings.
As long as no game is set up, Shop Quest shows nothing in the shop, not even a header button. So you can install the plugin and prepare everything at your own pace.
It requires Shopware 6.7.
Setup
- Install and activate Shop Quest under Extensions → My extensions.
- Open Marketing → Shop Quest and click Set up your first game (or New game if games already exist).
- Go through the wizard’s six steps (in detail below). With Publish right away the world is playable immediately.
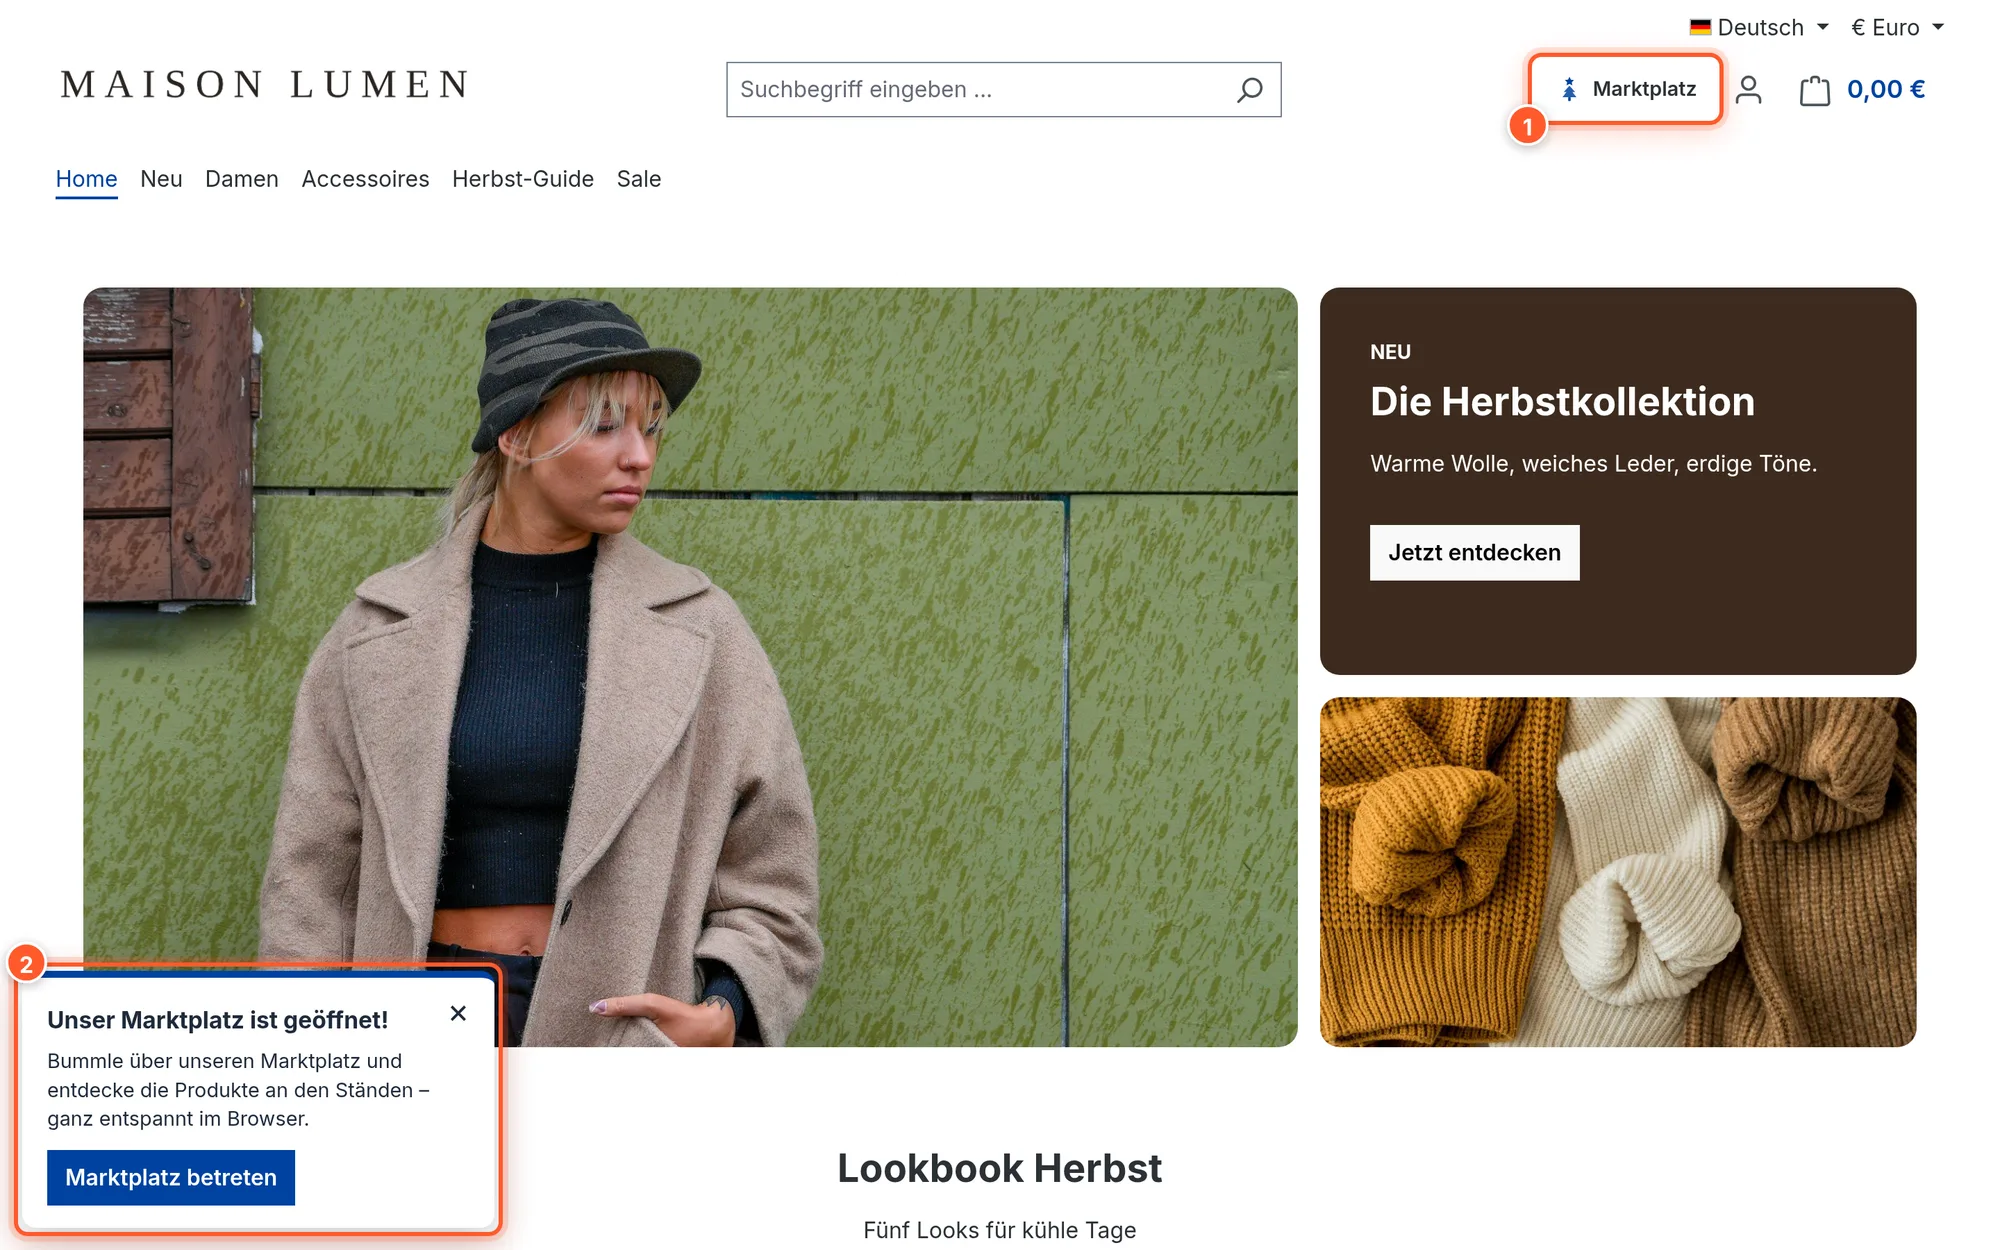
- Open your shop: the button to the game world appears in the header, and the invitation on the home page.
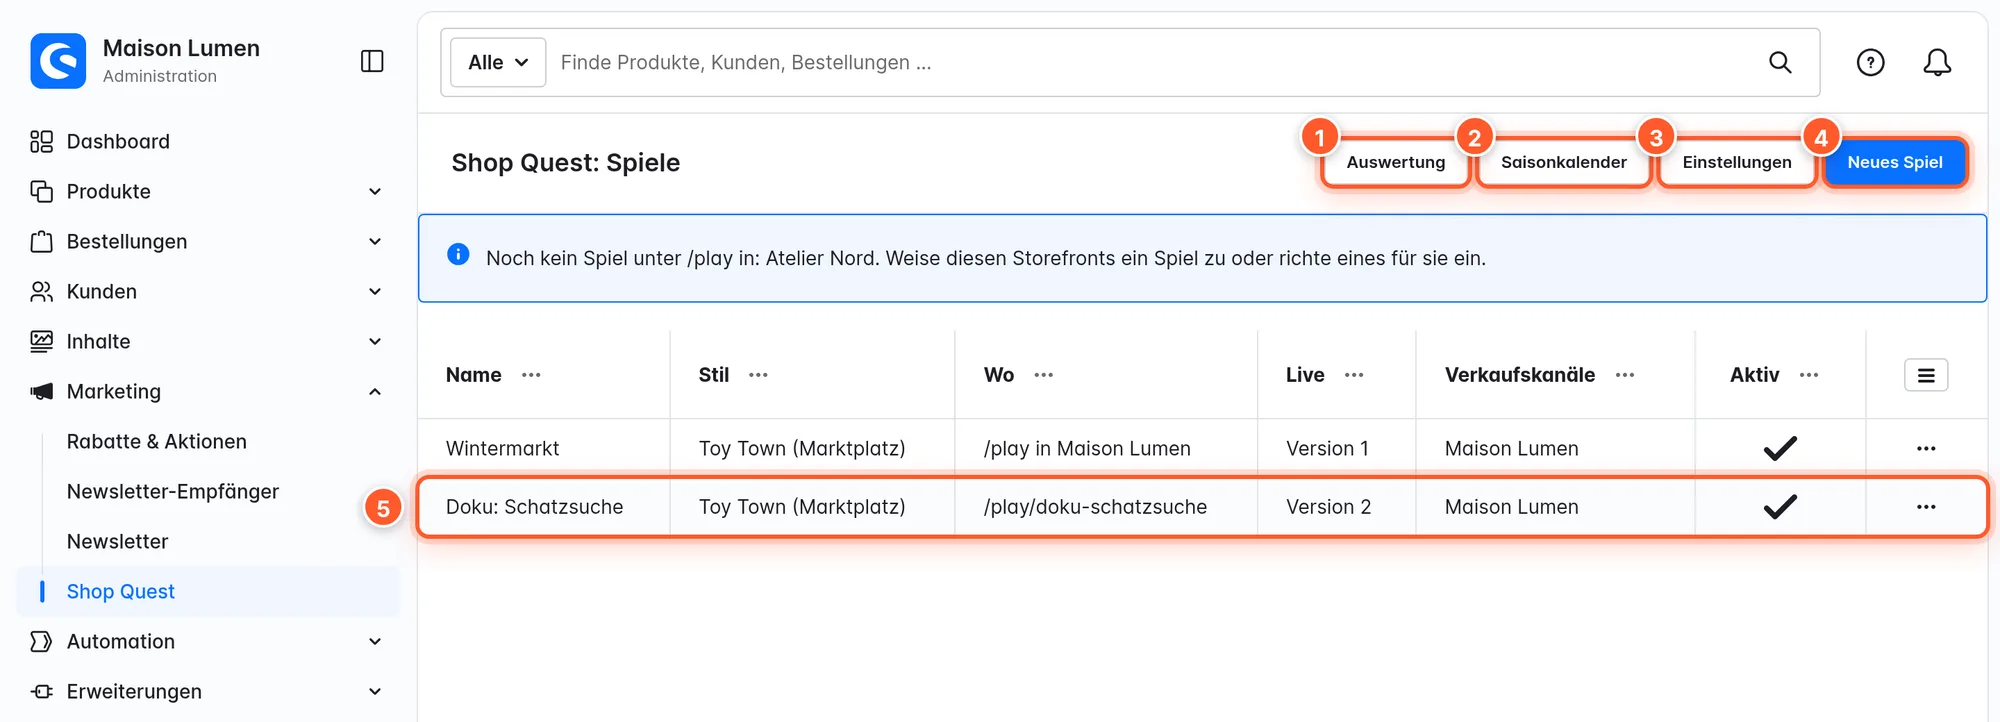
The list also tells you when a sales channel has no game at /play yet. So you see right away where something is still missing.
Step 1: How
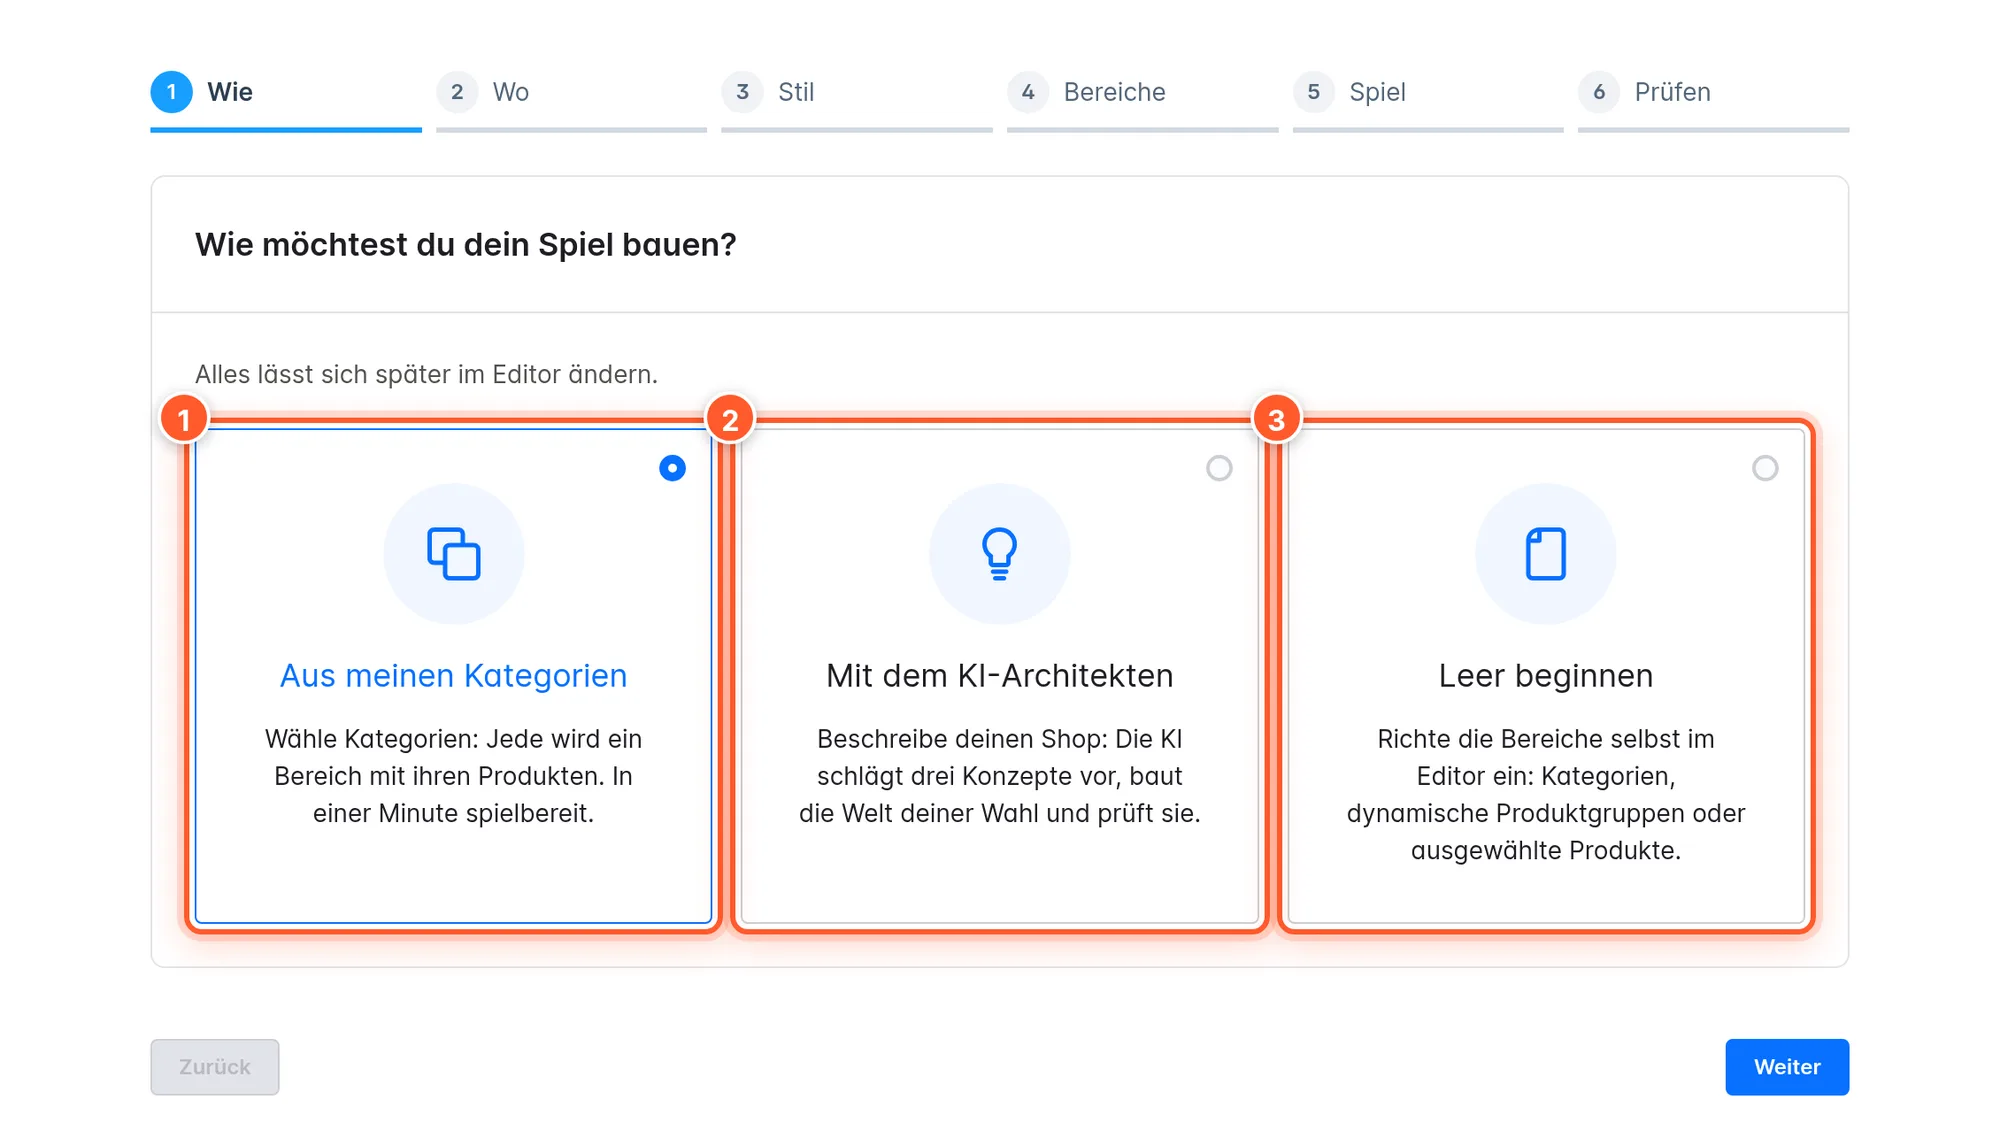
- From my categories: Each selected category becomes an area with its products. The best start for most shops.
- With the AI Architect: You describe your shop, the AI suggests three concepts and builds the chosen world. Without a booking, the next page shows what the AI Architect includes and how to book it (see AI Architect).
- Start empty: After creating, the editor opens, and you create the areas yourself there.
Step 2: Where
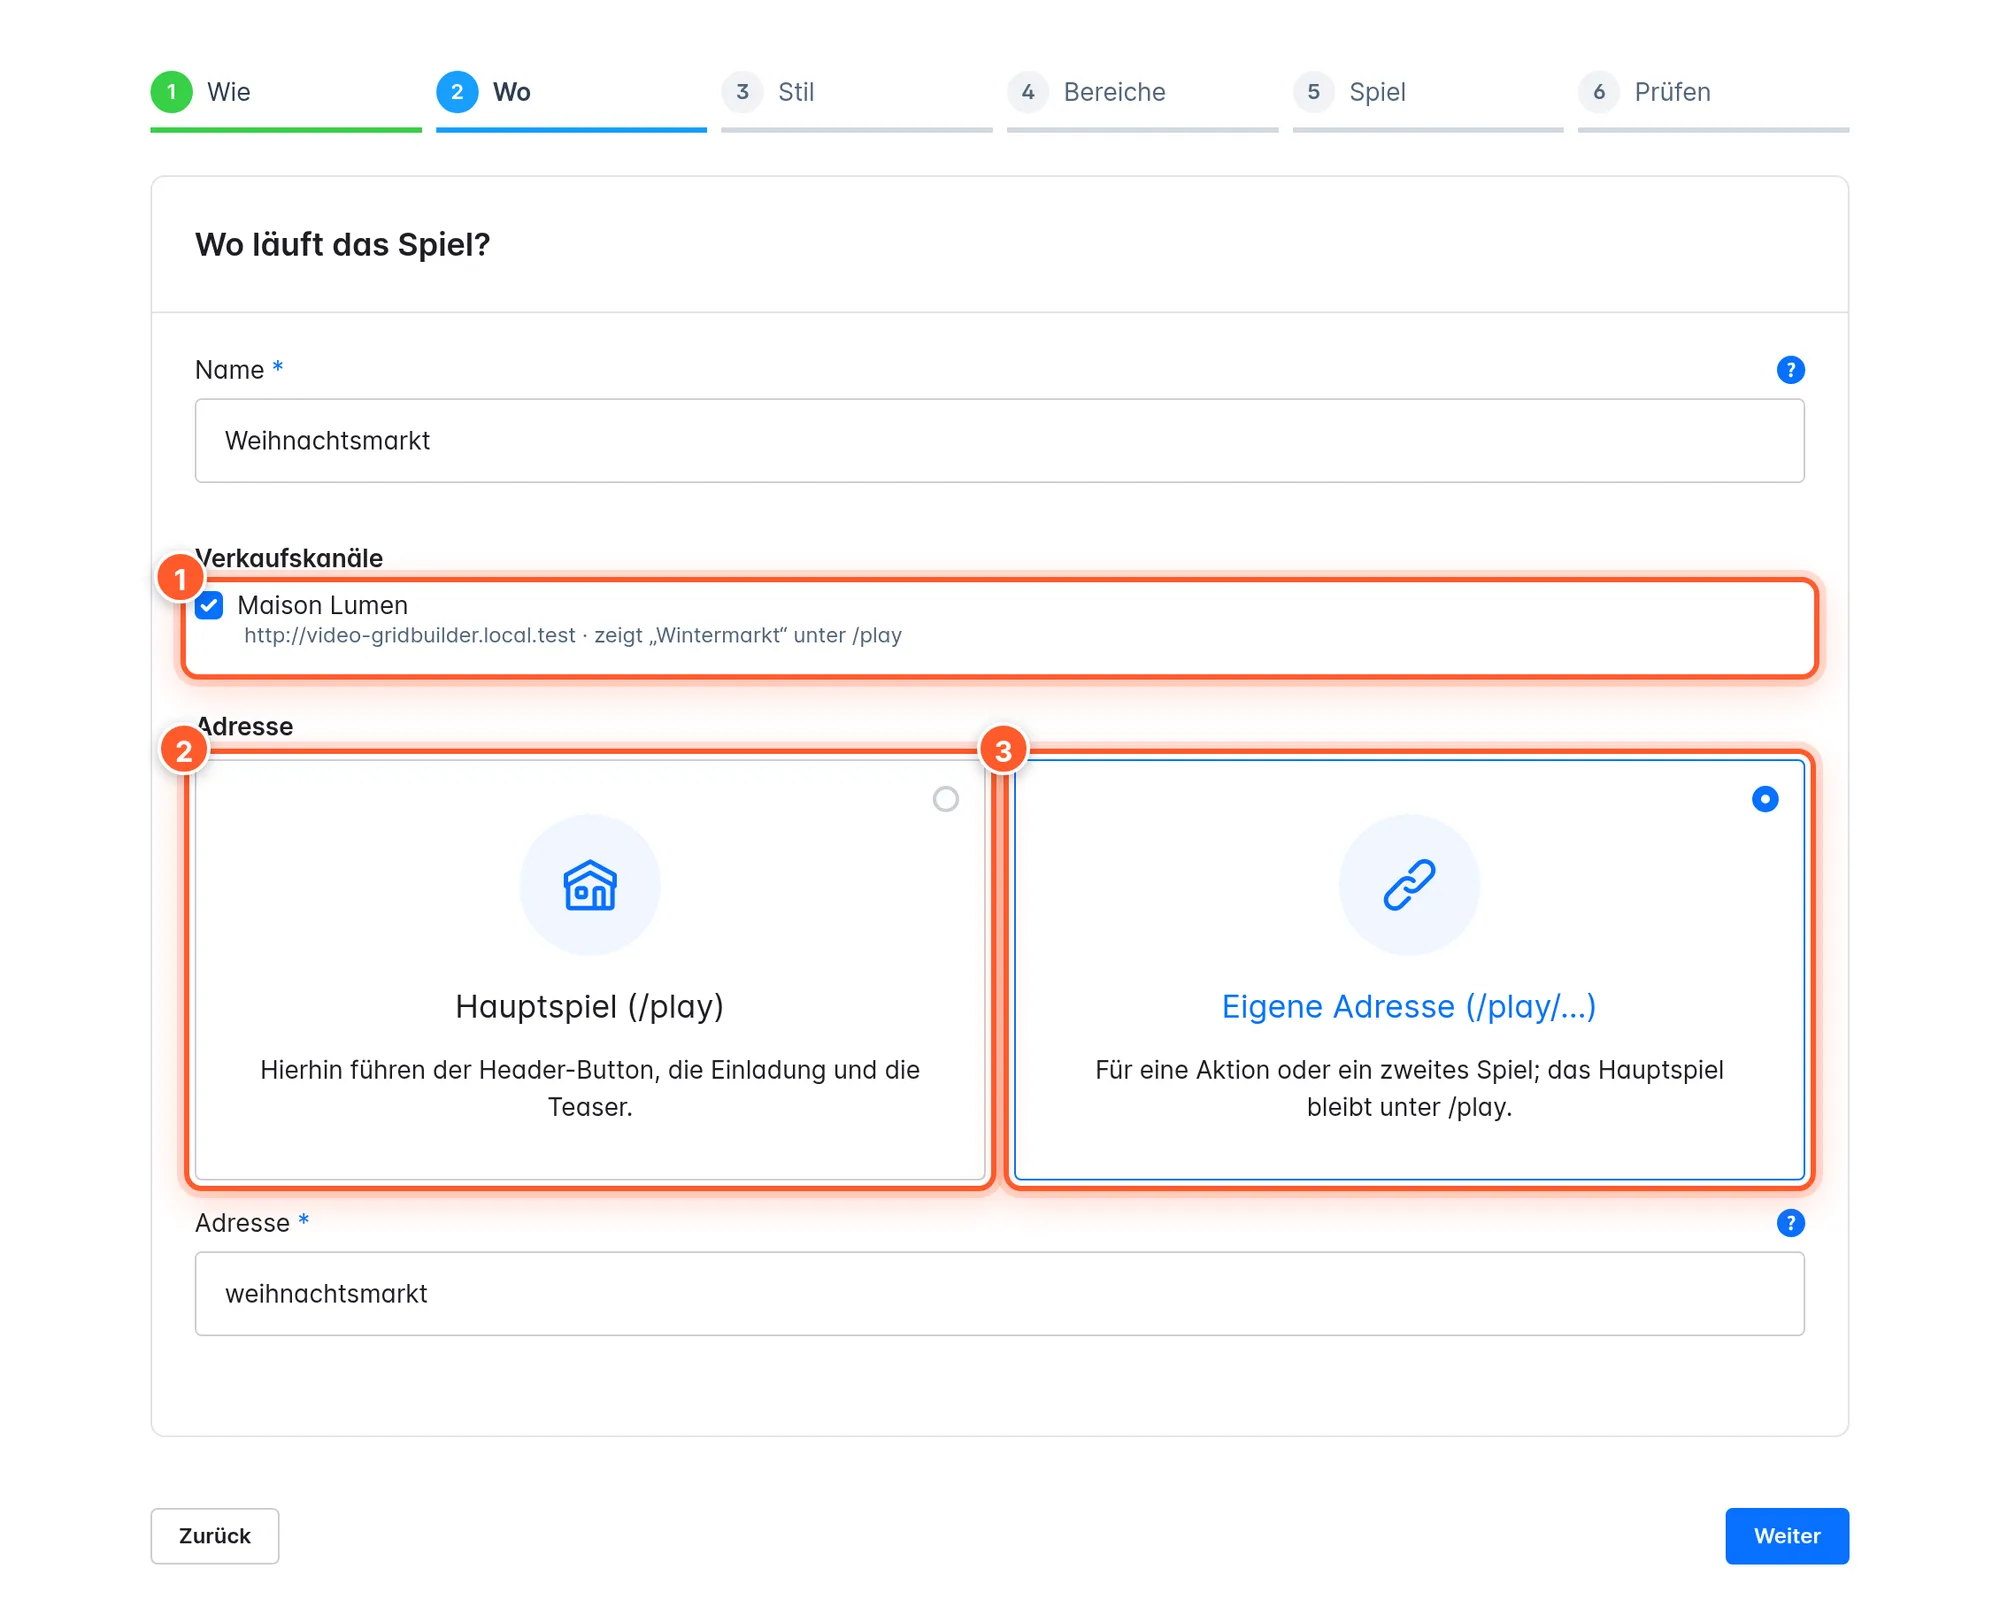
- Name: only visible to you in the Administration.
- Sales channels: Below each channel it says which game is currently running there at
/play. - Address: The Main game (/play) is the target of the header button, invitation and teaser. With Own address (/play/…) the game runs additionally, for example at
/play/christmas-marketfor a campaign. Lowercase letters, digits and hyphens are allowed.
If a channel already has a main game, the older game stays at /play. The wizard warns you in that case. Give the new game its own address or deactivate the old game afterwards.
Step 3: Style
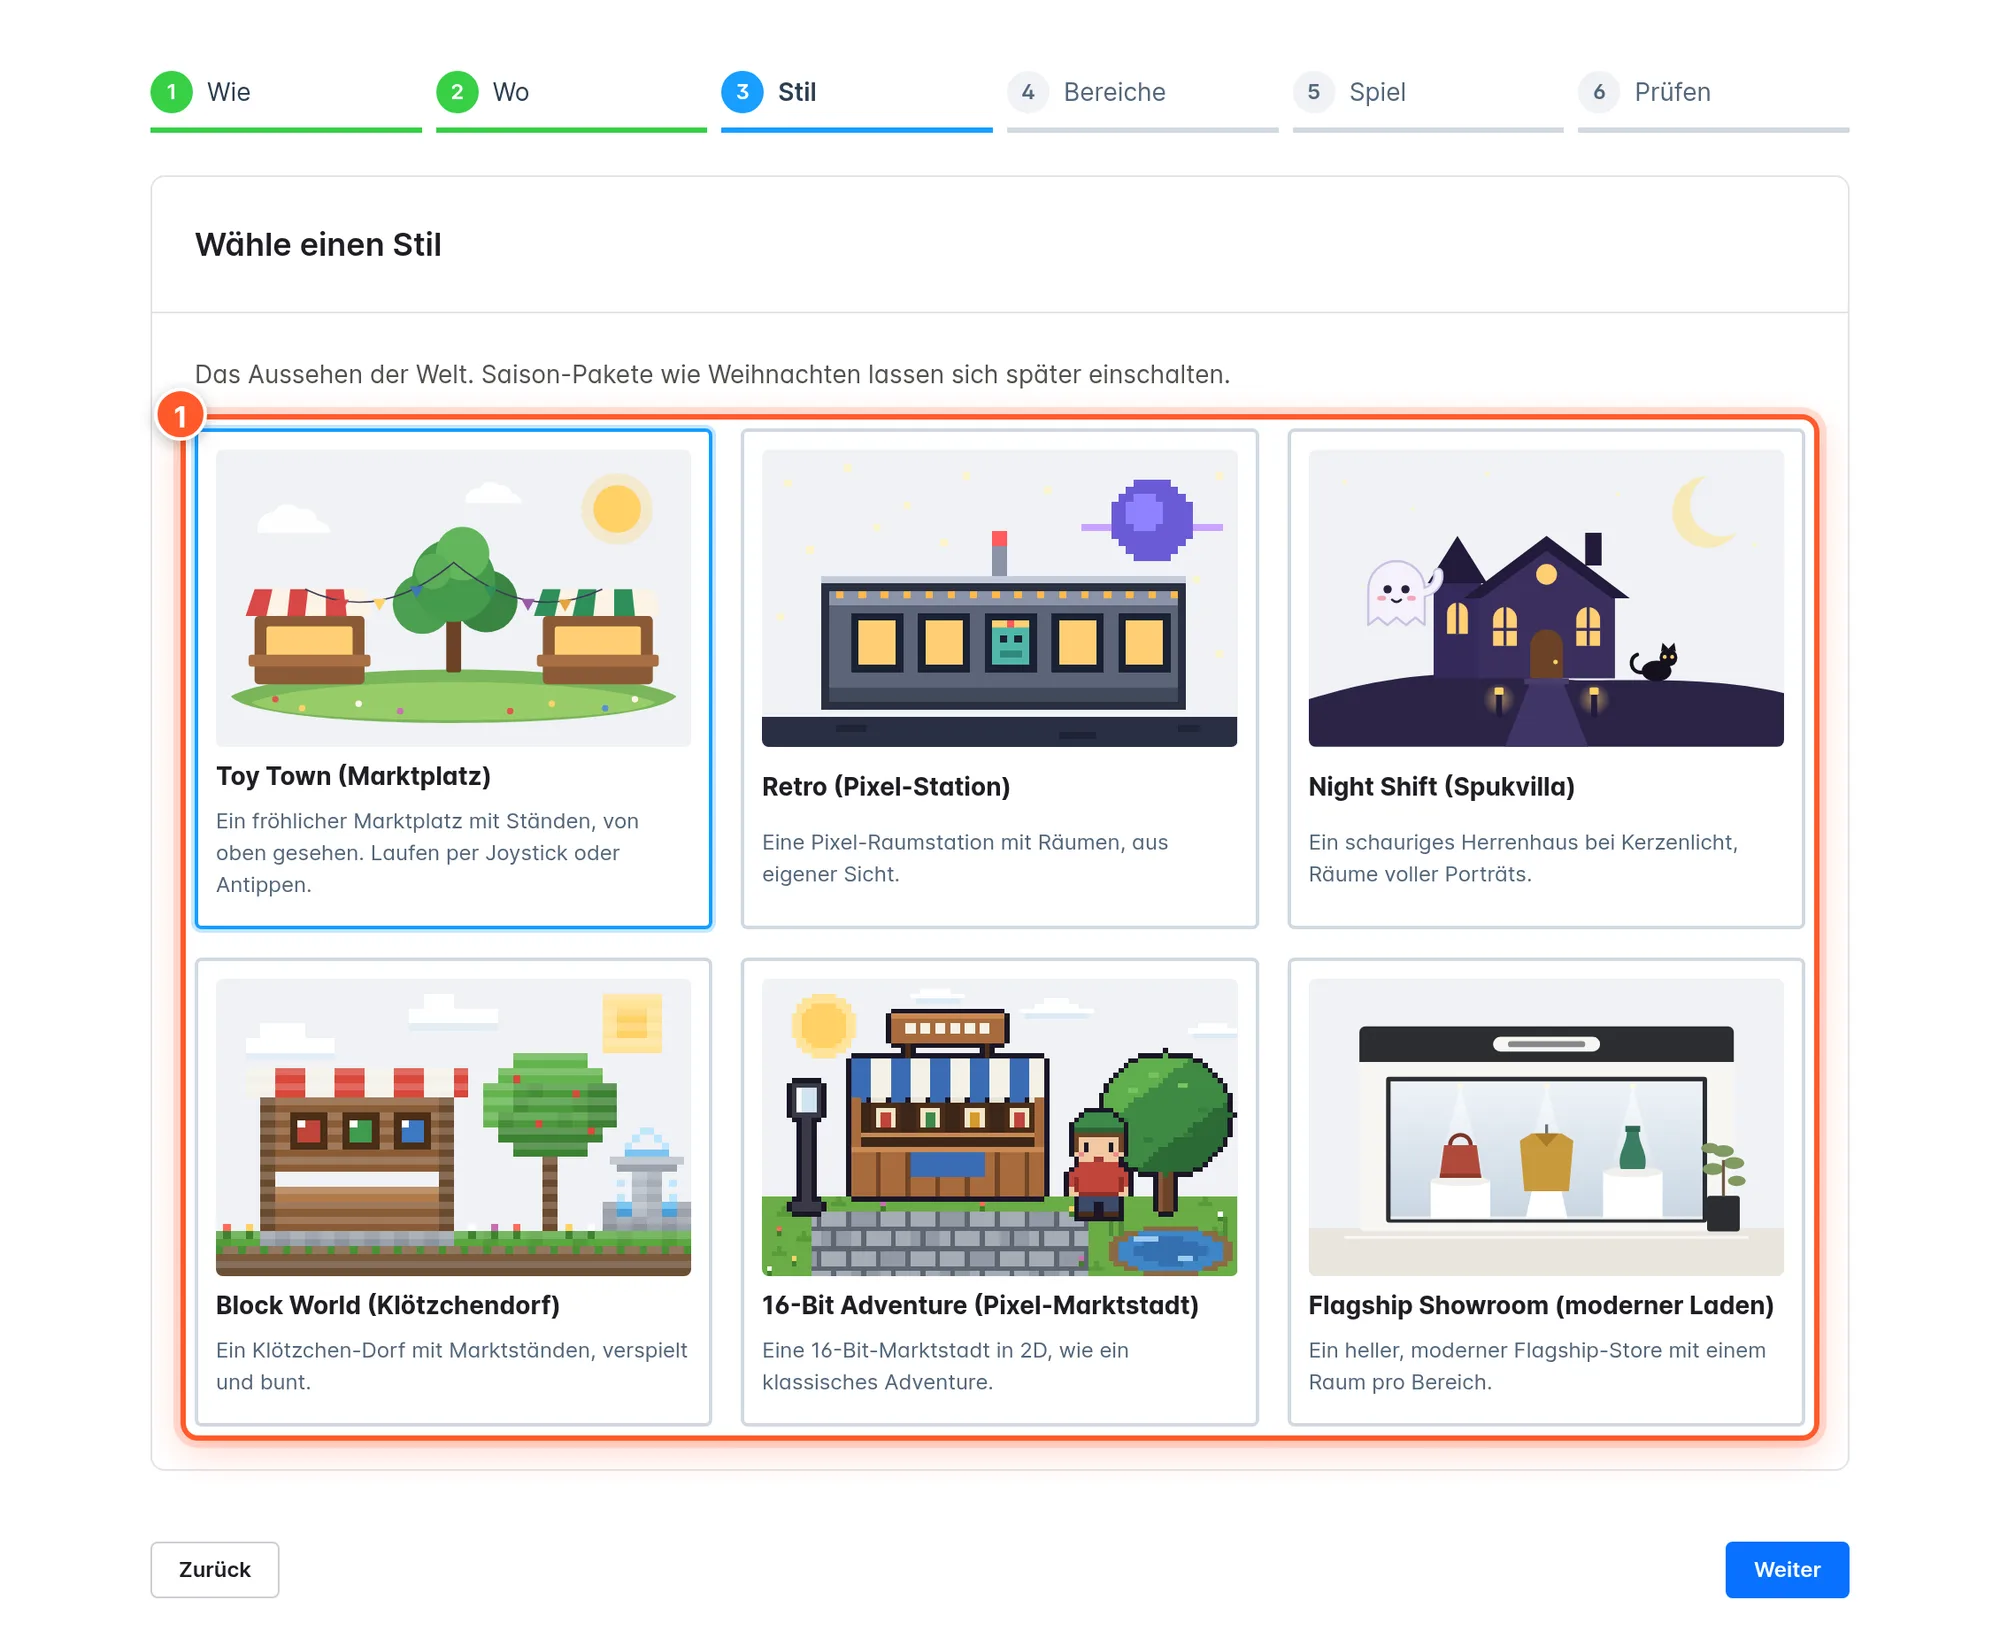
More about the styles and the Christmas pack under Styles and seasonal pack.
Step 4: Areas
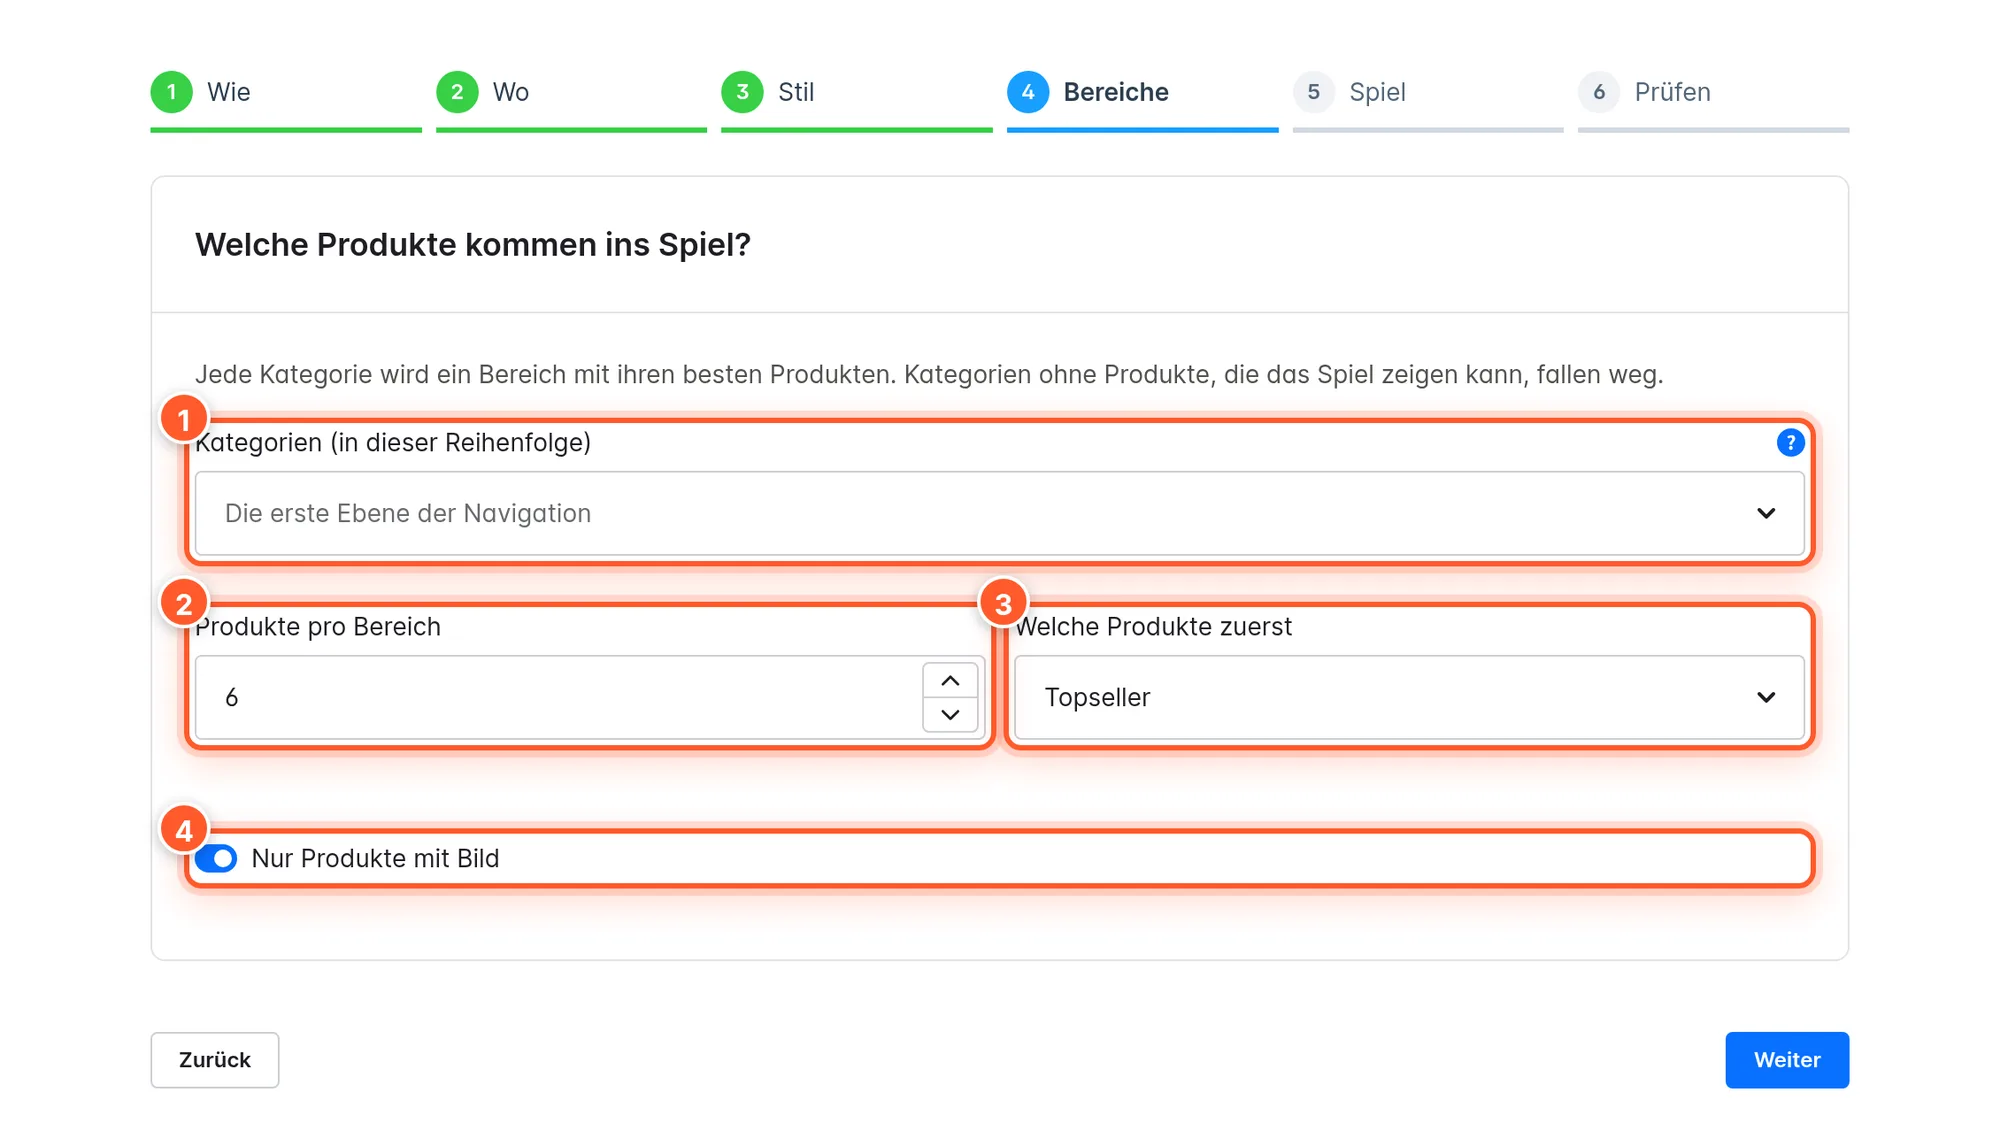
- Categories (in this order): The order is the lineup; visitors see the first areas first. If you leave the field empty, Shop Quest takes the first level of the sales channel’s navigation. A game has room for up to twelve areas. Categories without displayable products are left out.
- Products per area: 1 to 12.
- Which products first: top sellers, newest, lowest price or highest price.
- Only products with an image: recommended, products without an image look empty in the world.
Step 5: Game
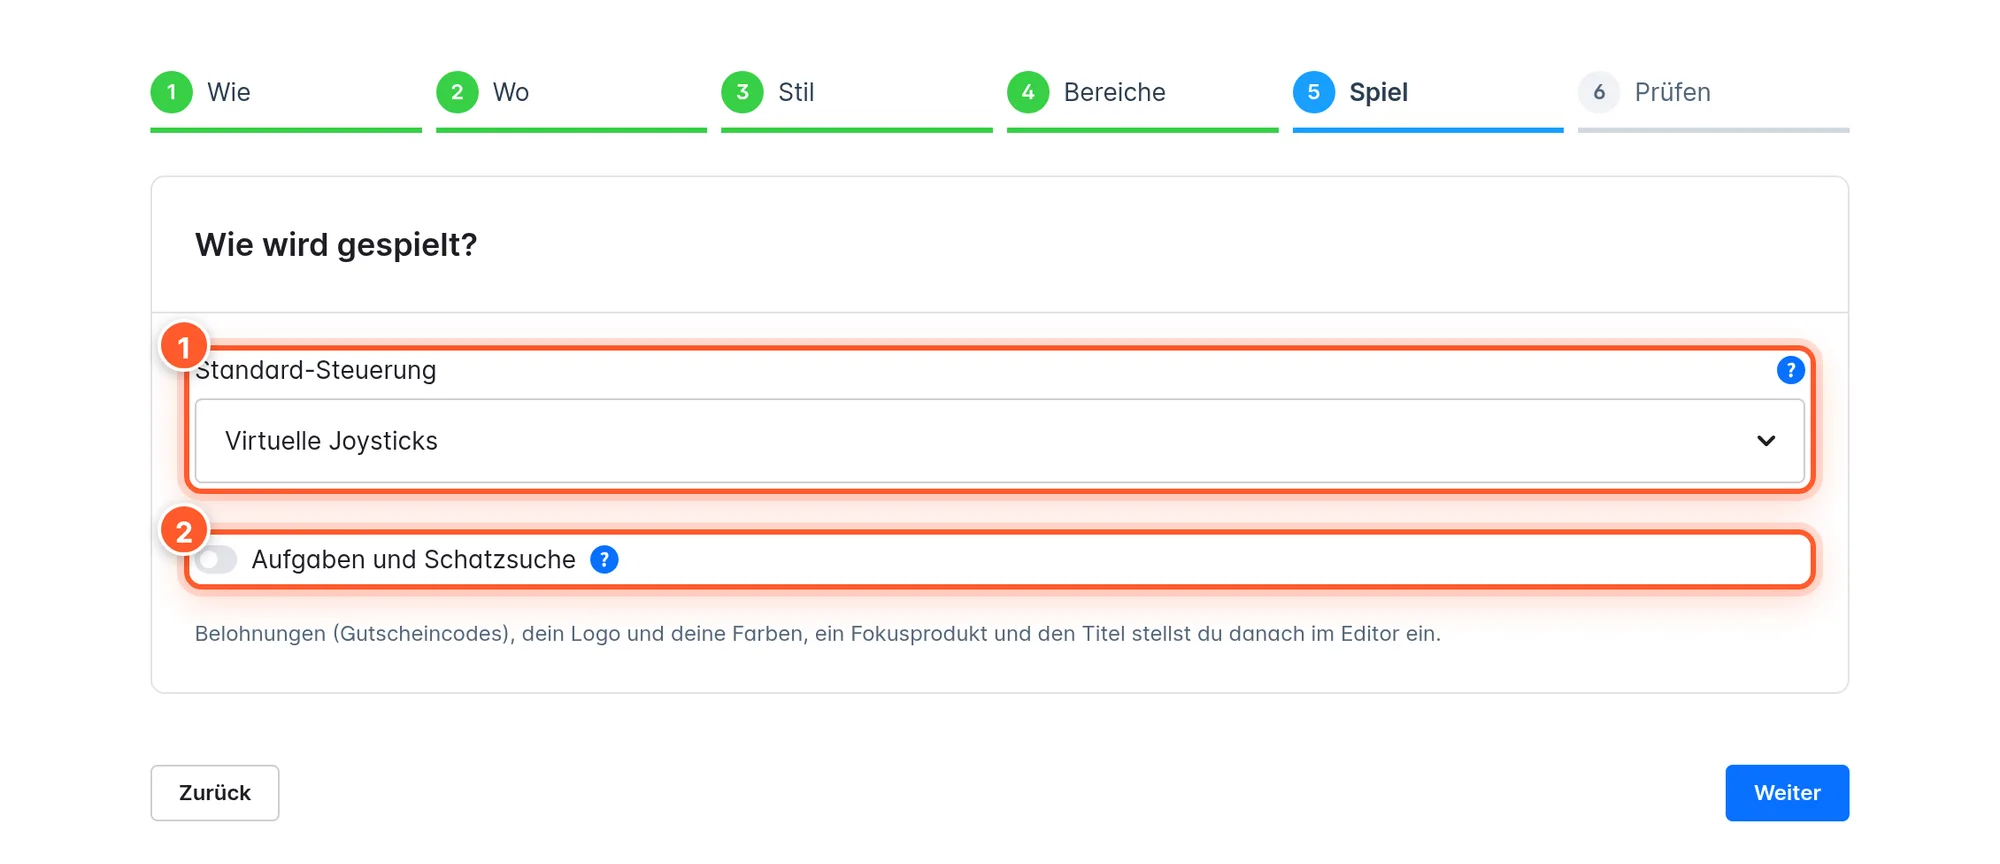
- Default controls: Virtual joysticks or Tap or click to walk. This only applies to smartphones and tablets; on a computer, visitors always walk with keyboard and mouse. Visitors can change it in the game.
- Quests and treasure hunt: off by default. When switched on, you choose the number of hidden items right here (3–8).
You set rewards, logo, colors, the featured product and the title in the editor afterwards.
Step 6: Review
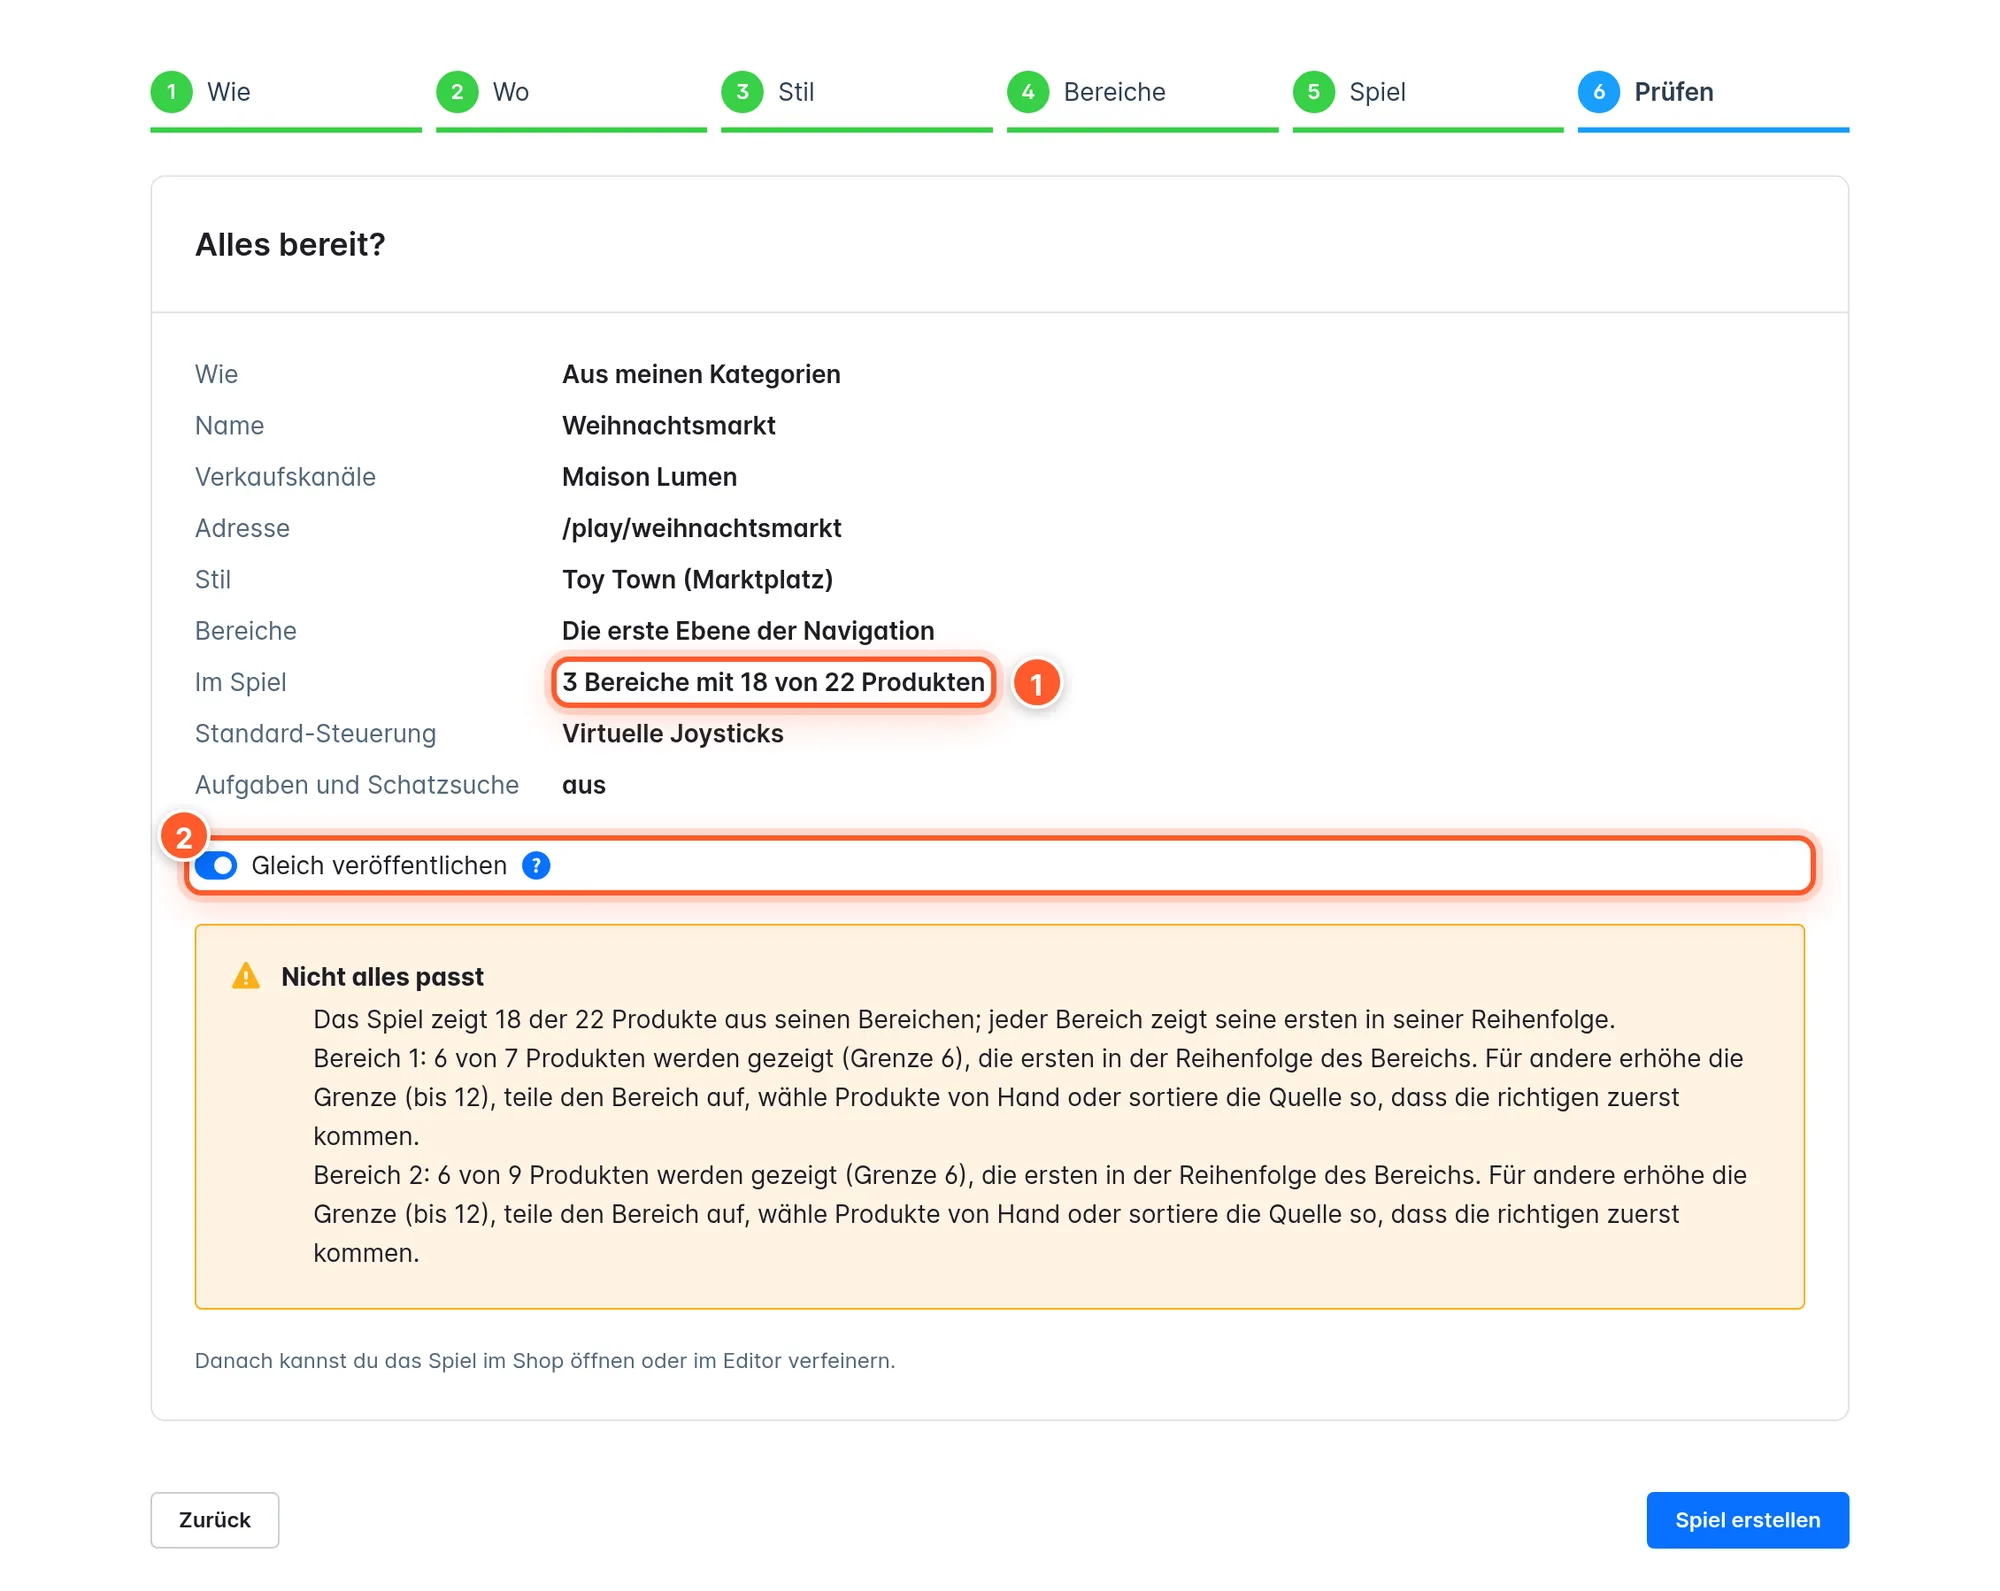
Before creating, the wizard calculates what fits into the world. Areas show their first products in their order; once the limit is reached, the note tells you exactly what you can do (raise the limit, split the area, pick products by hand, sort differently). Create game creates the game. Without Publish right away it stays a draft that you can look at via the preview.
Editing a game (editor)
A click on a game in the list opens the editor. At the top you’ll find AI Architect, Preview, Save and Publish.
Save only saves the draft. Visitors only see changes after Publish. Every publication is saved as a new version that you can put live again at any time.
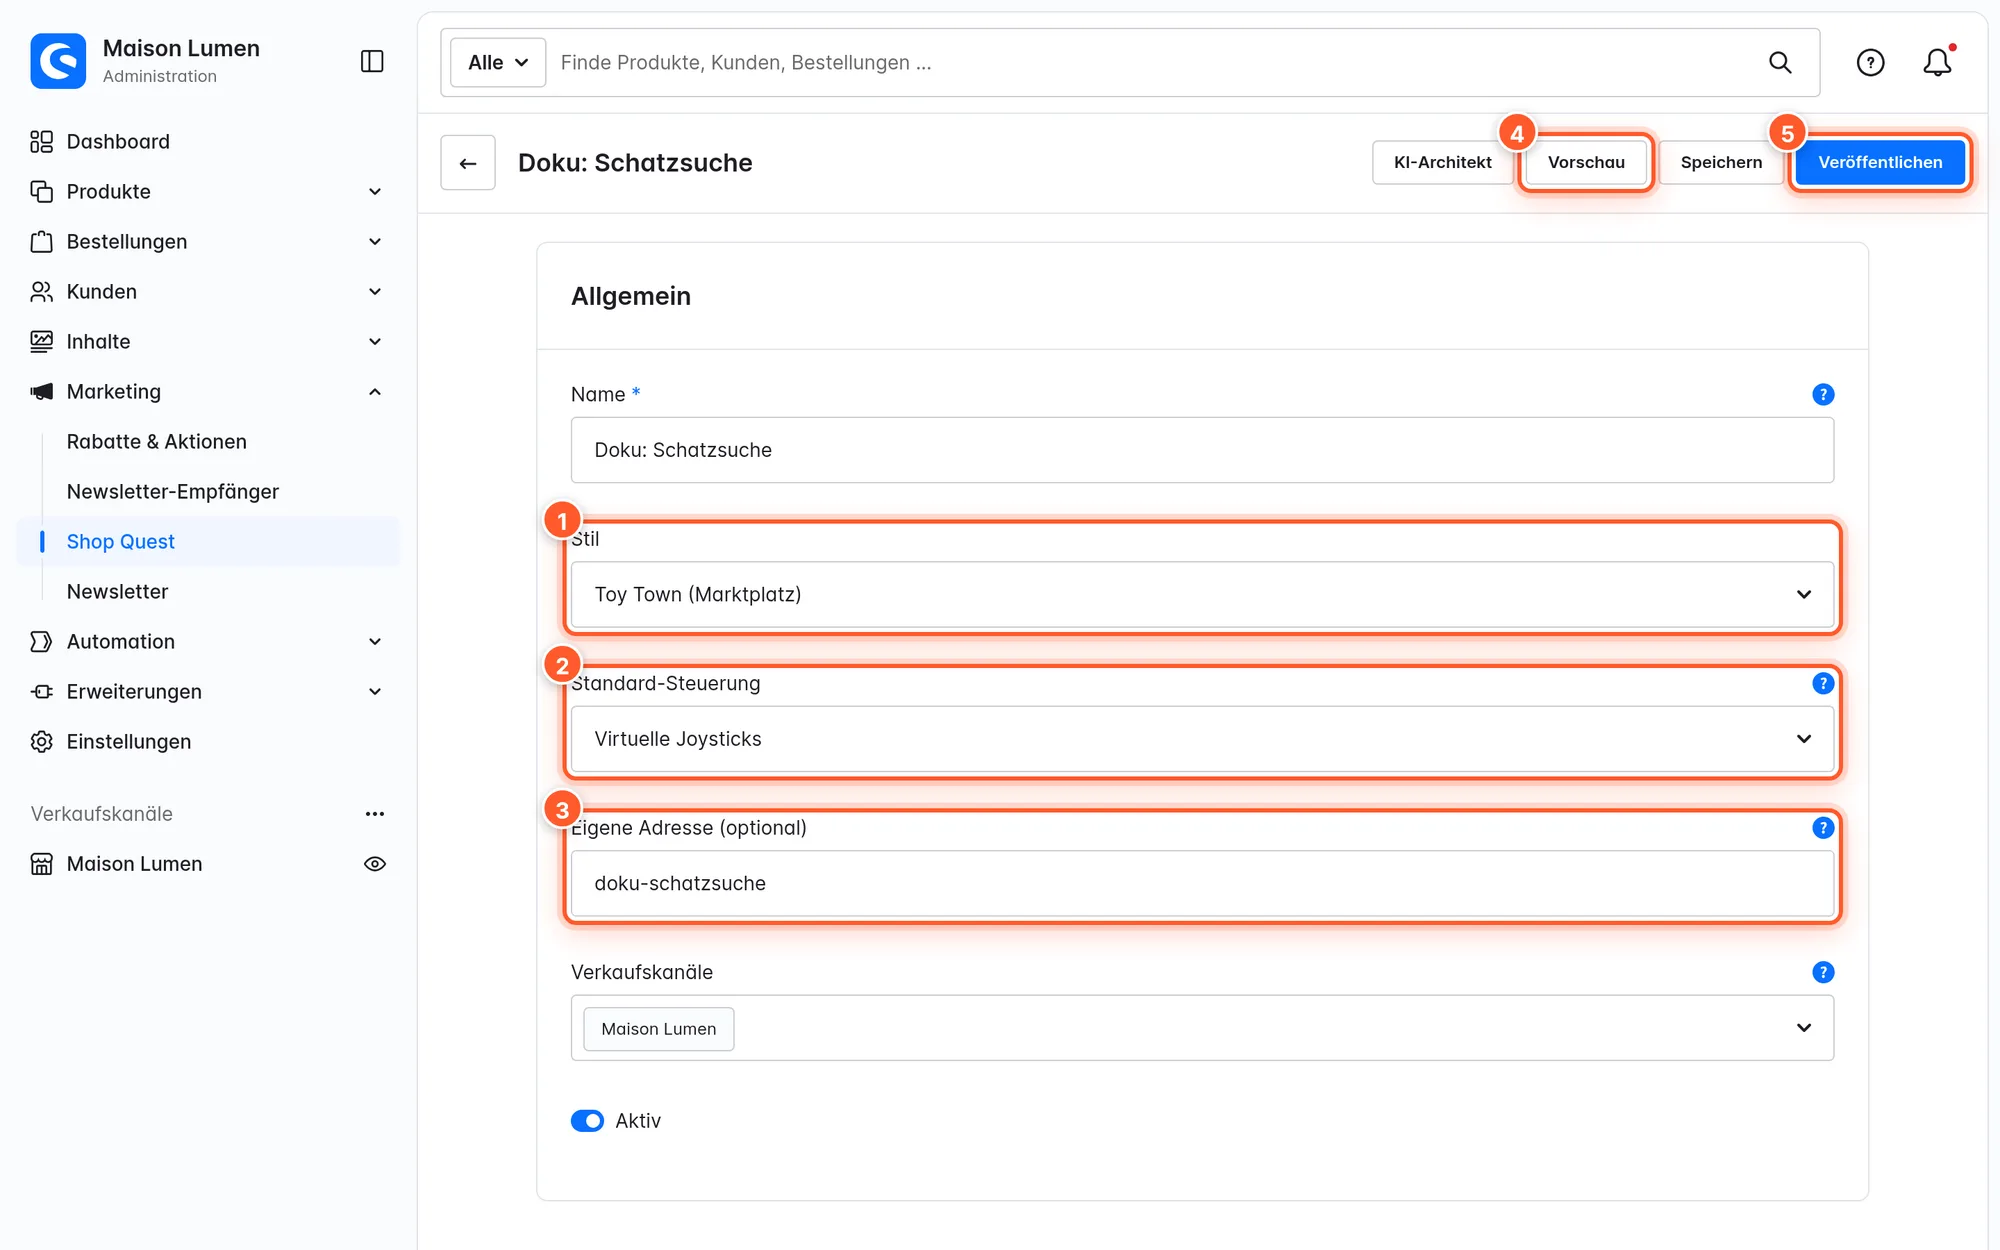
General
| Field | Meaning |
|---|---|
| Name | Only visible to you in the Administration. |
| Style | One of the six styles. Switching keeps all areas. |
| View | Block World only: Third person (behind the character) or First person (through the character’s eyes). |
| Default controls | Virtual joysticks or Tap or click to walk (touch devices only). |
| Own address (optional) | Empty: the game is the main game at /play of its sales channels (with several main games, the oldest applies). With an address: reachable at /play/<address>. |
| Sales channels | Leave empty for all sales channels. |
| Active | Switched off, the game can’t be reached in the shop. |
Under Name of the world you set the title visitors see, per language (32 characters max.). If you keep the default title, Shop Quest adapts it automatically to the style and season, for example “Pixel Station”, “Night Manor” or, with the Christmas pack, “Winter Village”.
Areas (stalls or rooms)
Each area is a market stall or a room. The order is the lineup; use the ↑ ↓ arrows to reorder. A game has up to 12 areas with up to 12 products each, and a world shows at most 64 products in total.
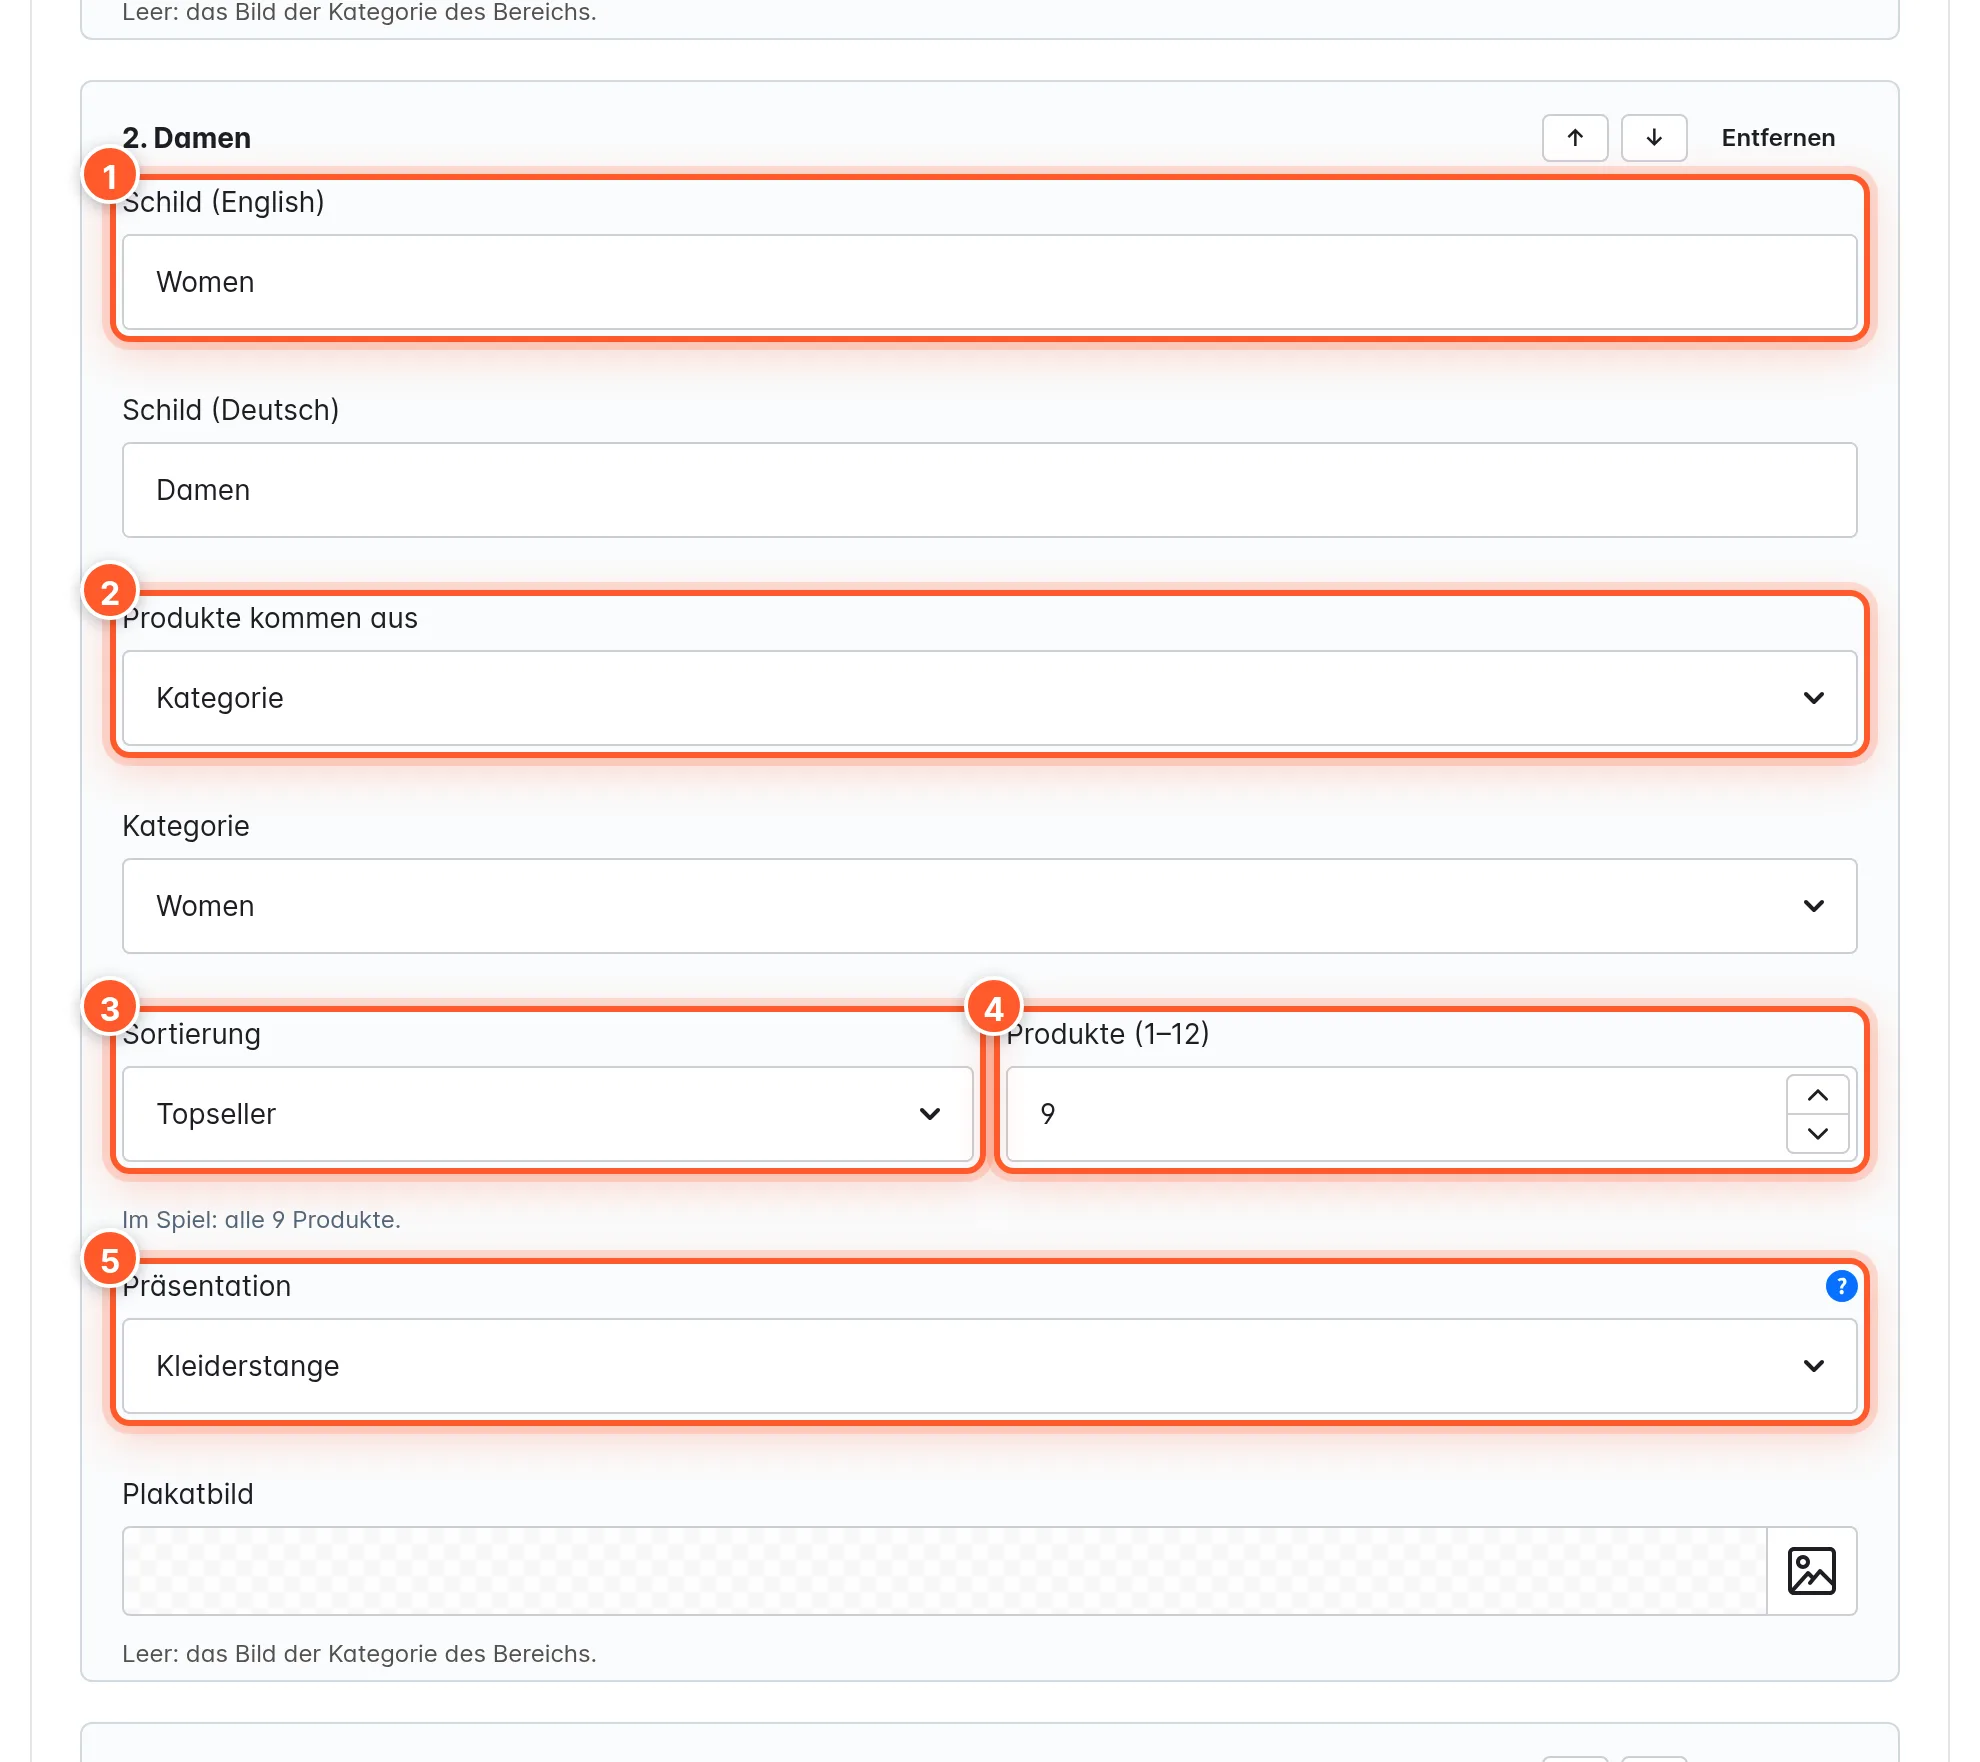
- Sign: the text above the stall or on the room door, per language. Up to 16 characters read best, 24 are allowed. The editor shows you the character count.
- Products come from:
- Category
- Dynamic product group
- Selected products (hand-picked, in your order)
- Rule (top sellers, new, on sale), optionally only from one category
- Sorting: top sellers, newest, price ascending, price descending.
- Products (1–12): Below the field it says how many products actually make it into the game (“In the game: 7 of 9 products”).
- Display: Automatic (based on the area name and products: size variants go on the clothes rack, highlight products on pedestals), Clothes rack, Table (small items), Pedestals (showpieces) or Easels.
- Poster image: If empty, Shop Quest uses the image of the area’s category.
At the top of the card you switch Only products with an image on or off for the whole game.
If an area only shows part of its category, the game links to the rest (“See all … in the shop”). So visitors don’t miss anything.
Brand
The world shows your shop: the logo on banners and signs, the brand colors on bunting and frames, category images as posters. By default, everything comes from your storefront theme.
- Show the shop logo, optionally with Own logo for this world (empty: the theme’s logo).
- Own brand colours for this world with Primary colour and Secondary colour. Off: primary and secondary color from the theme.
- Category images as posters: Each area shows its category’s image (or its poster image) at the counter or on the room wall.
The brand settings belong to the game and are versioned and published with it.
Layout and versions
In the Layout card you see whether the world is generated automatically from the areas or has its own layout from the Level Studio. Open Level Studio takes you there.
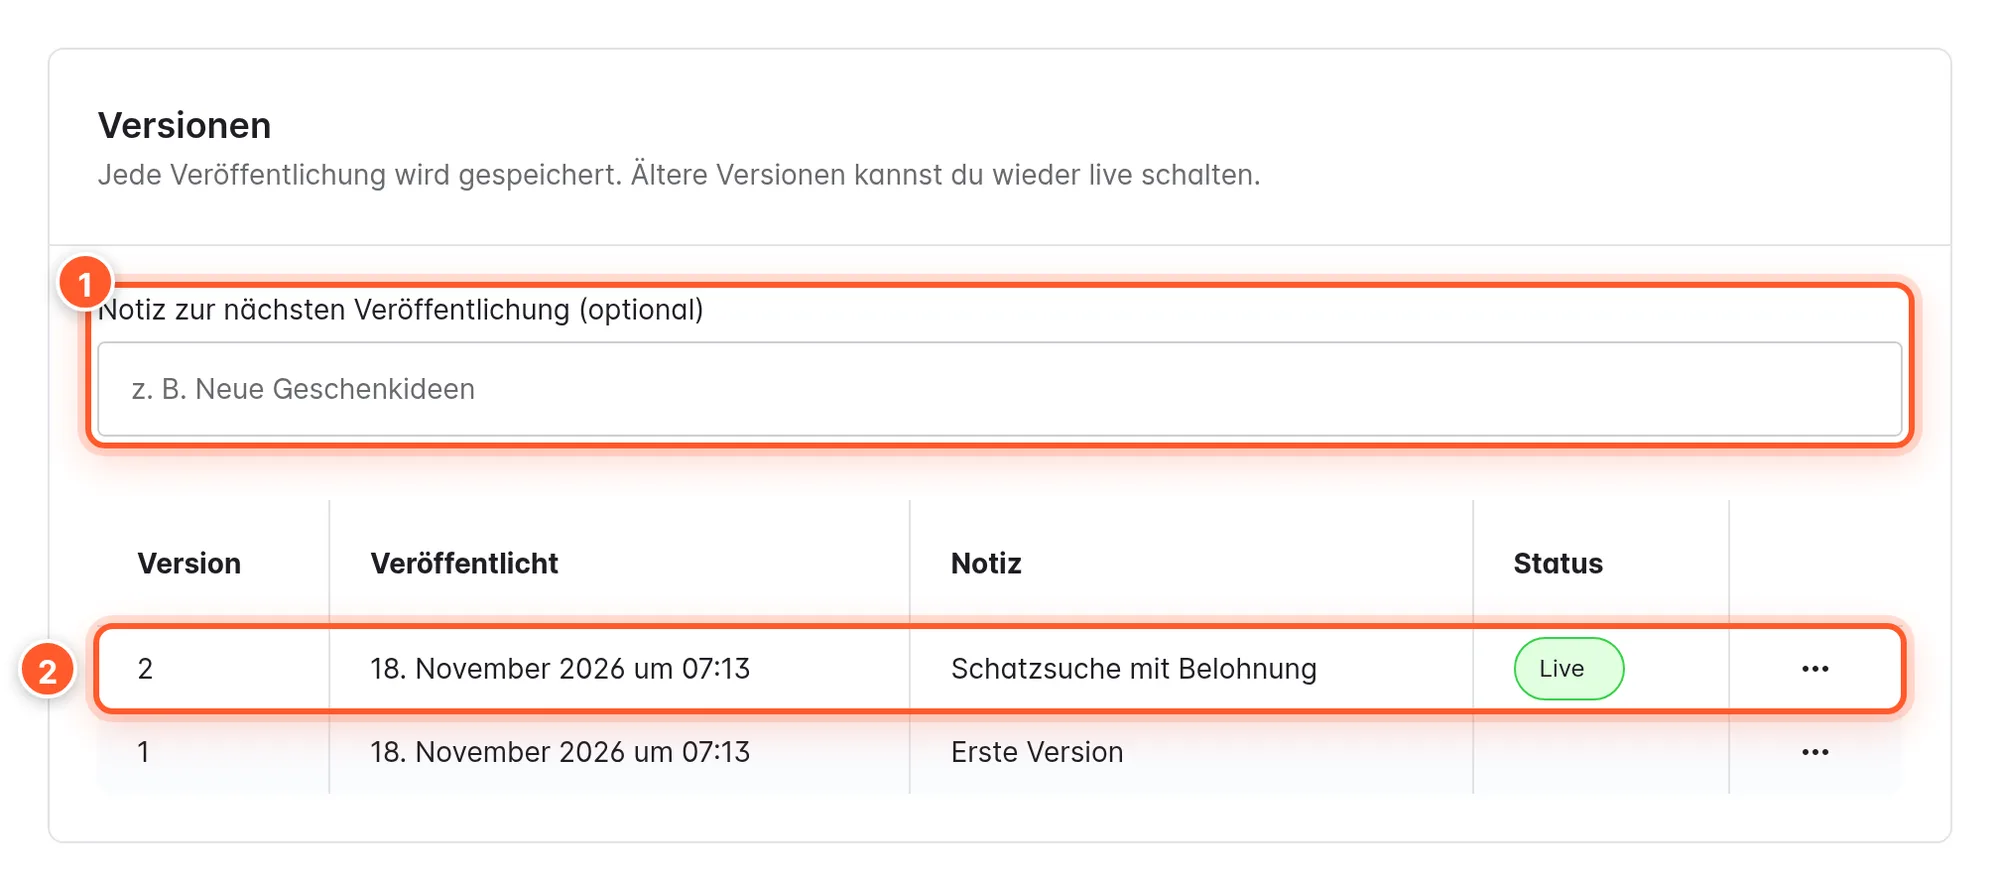
- Preview: opens the version (or, at the top, the draft) via a preview link in the shop. Previews don’t count in the statistics.
- Put live: makes an older version visible again immediately. Ideal if something isn’t right after a change.
- Copy into the draft: loads a version for further editing. Don’t forget to Save afterwards.
Styles and seasonal pack
| Style | World | View |
|---|---|---|
| Toy Town | a cheerful market square with stalls | from above, your own character walks along |
| Retro | a pixel space station with rooms | first person |
| Night Shift | a candlelit manor, rooms full of portraits | first person |
| Block World | a blocky village with market stalls | third person or first person (selectable in the editor) |
| 16-Bit Adventure | a 2D pixel market town | from above, also runs without WebGL |
| Flagship Showroom | a bright, modern store with one room per area | first person |
In Toy Town, Block World and the 16-Bit Adventure, visitors see their own character. Logged-in customers with the salutation “Mr” or “Mrs” get a matching character, everyone else a neutral one (can be switched off in the settings).
Christmas seasonal pack: The pack is included with the plugin and gives every style its Christmas look, illustration, texts and soundscape. Toy Town, Block World and the 16-Bit Adventure become a snowy Christmas market (“Winter Village” instead of “Market Square”), Retro a decorated space station, Night Shift a manor on Christmas Eve and the Flagship Showroom a festive store. Without the pack, every style shows its all-year look.
You switch the pack on in two ways:
- permanently in the Settings under Seasonal pack, or
- only for a period via an entry in the Season calendar (recommended – then you don’t have to think about anything after Christmas).
Level Studio
In the Level Studio you arrange the world yourself: move stalls, rooms and decor, swap areas, rearrange an area. You open it in the editor via Layout → Open Level Studio. The game has to be saved once for this.
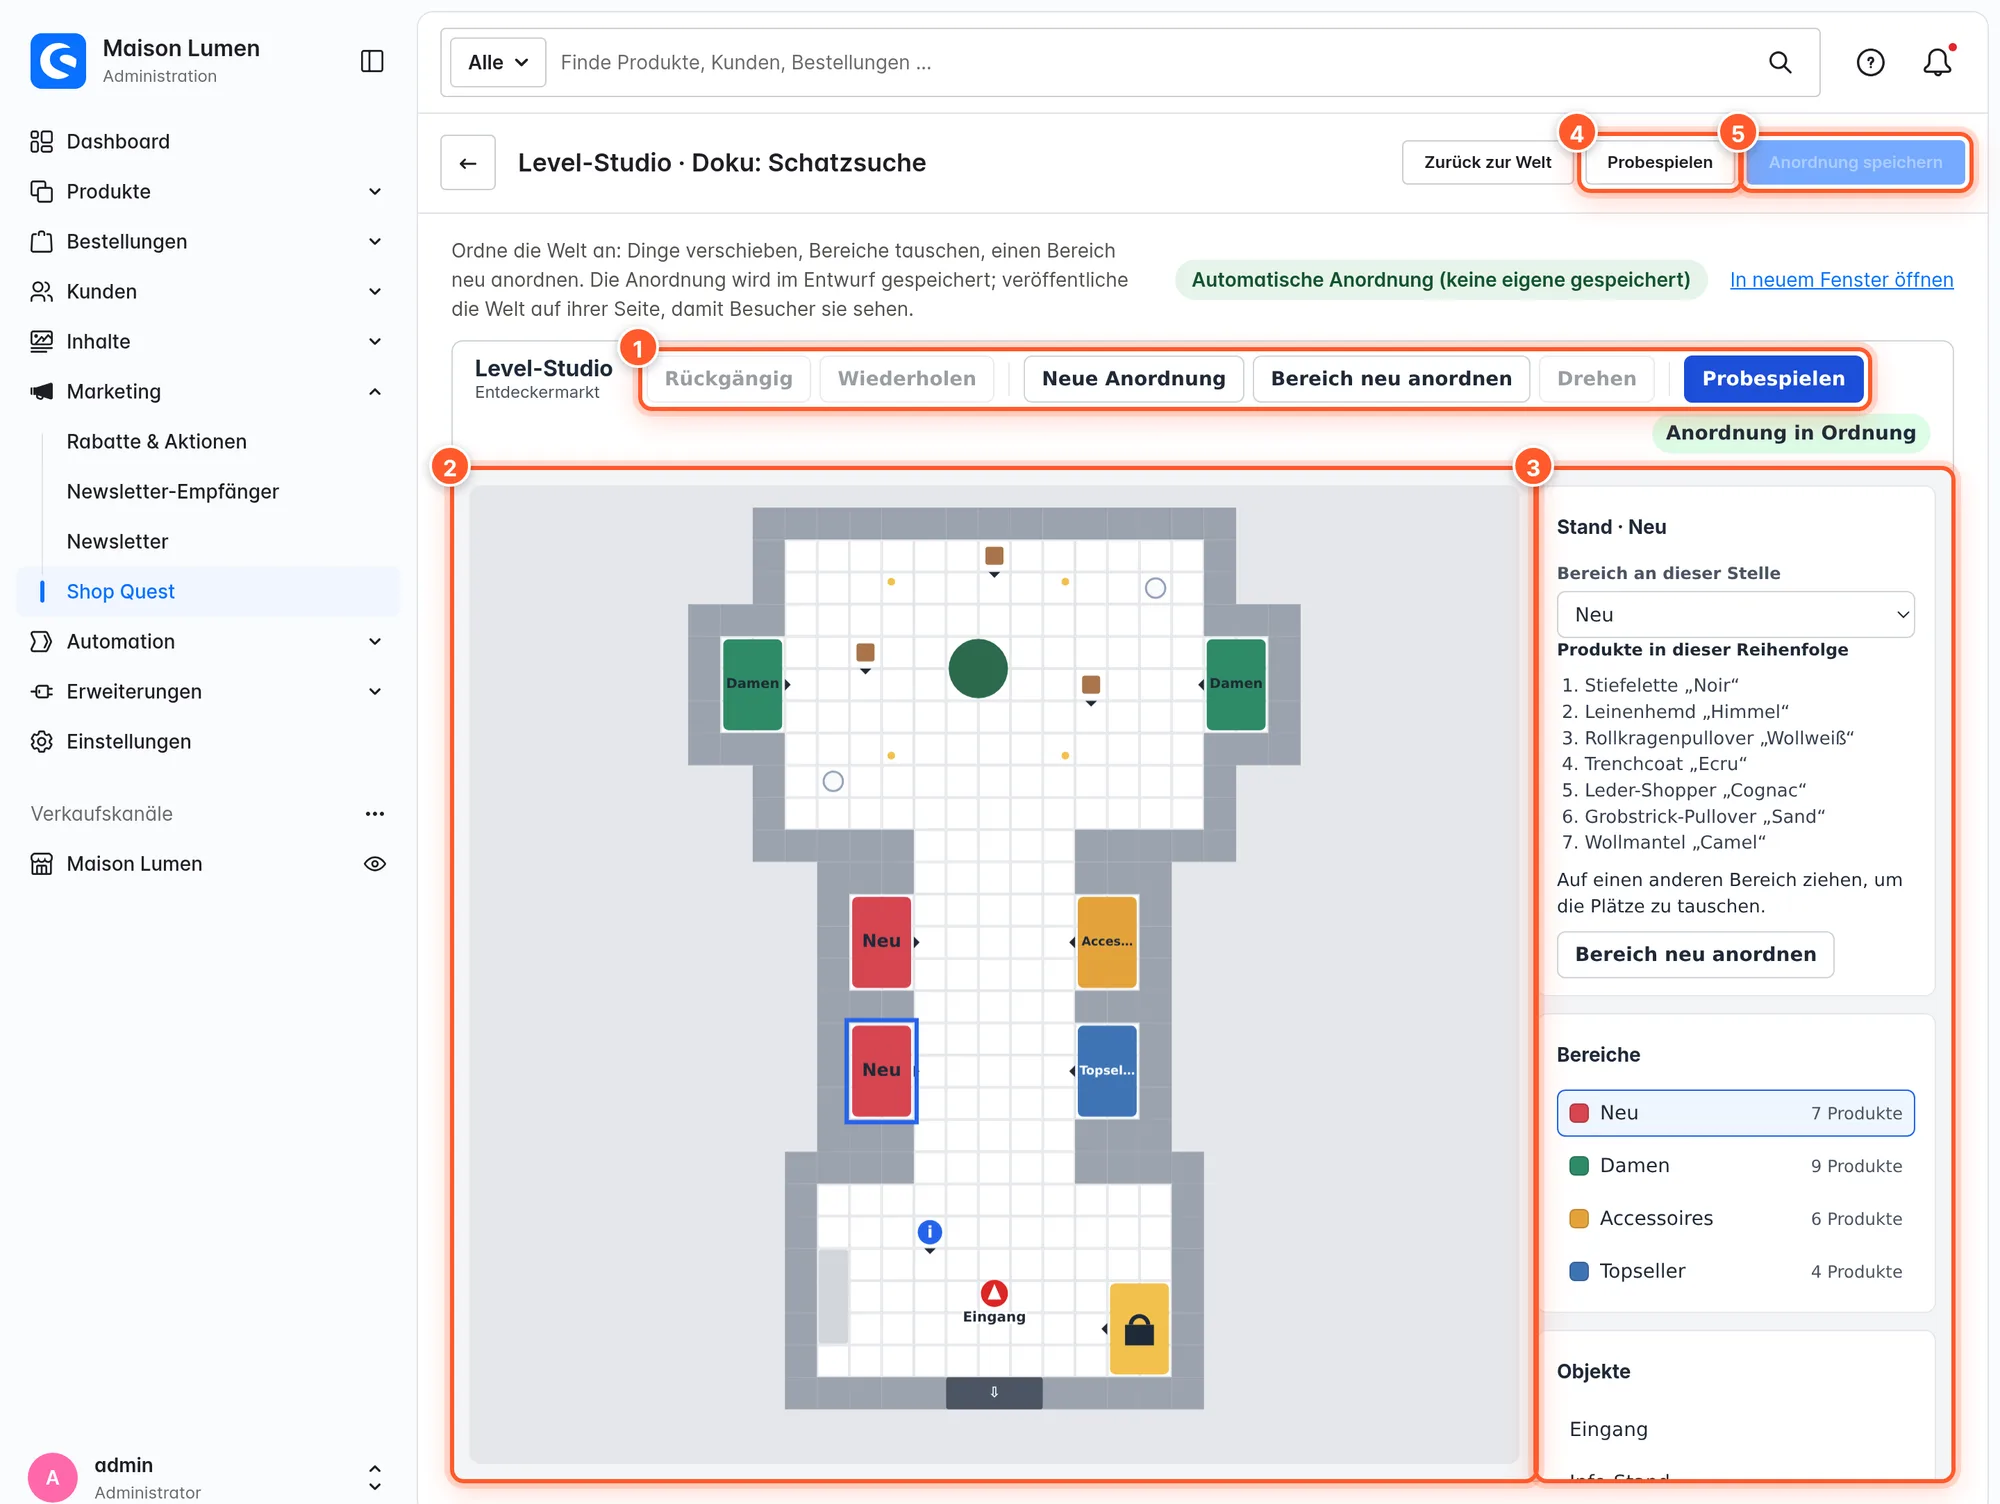
How to work in the studio:
- Click something on the map to select it. Drag it to move it.
- Drag one area onto another to swap places.
- Rearrange area shuffles the arrangement of one area, New layout the whole world.
- With Play-test you walk through the world the way visitors see it. Nothing is saved. Back to editing takes you back.
- Save layout stores it in the draft. Visitors only see the new layout after Publish in the editor.
Keyboard shortcuts: arrow keys move the selection, R rotates, Ctrl+Z undoes, Ctrl+Y redoes, Esc clears the selection.
The studio prevents invalid layouts and tells you why, for example “it would block a stall, the cashier or the exit” or “visitors could no longer reach every part”. With Remove own layout the draft goes back to the automatic layout; published versions keep their layout until you publish again.
If you add or remove areas after saving a layout, the editor points this out. Then open the Level Studio and save the layout again, otherwise visitors may see the automatic layout.
Quests, treasure hunt and rewards
Small quests guide visitors through the world. At the end there’s a badge and a little celebration, optionally a coupon code too. No quest requires a purchase. You switch everything on in the editor in the Quests and treasure hunt card (off by default).
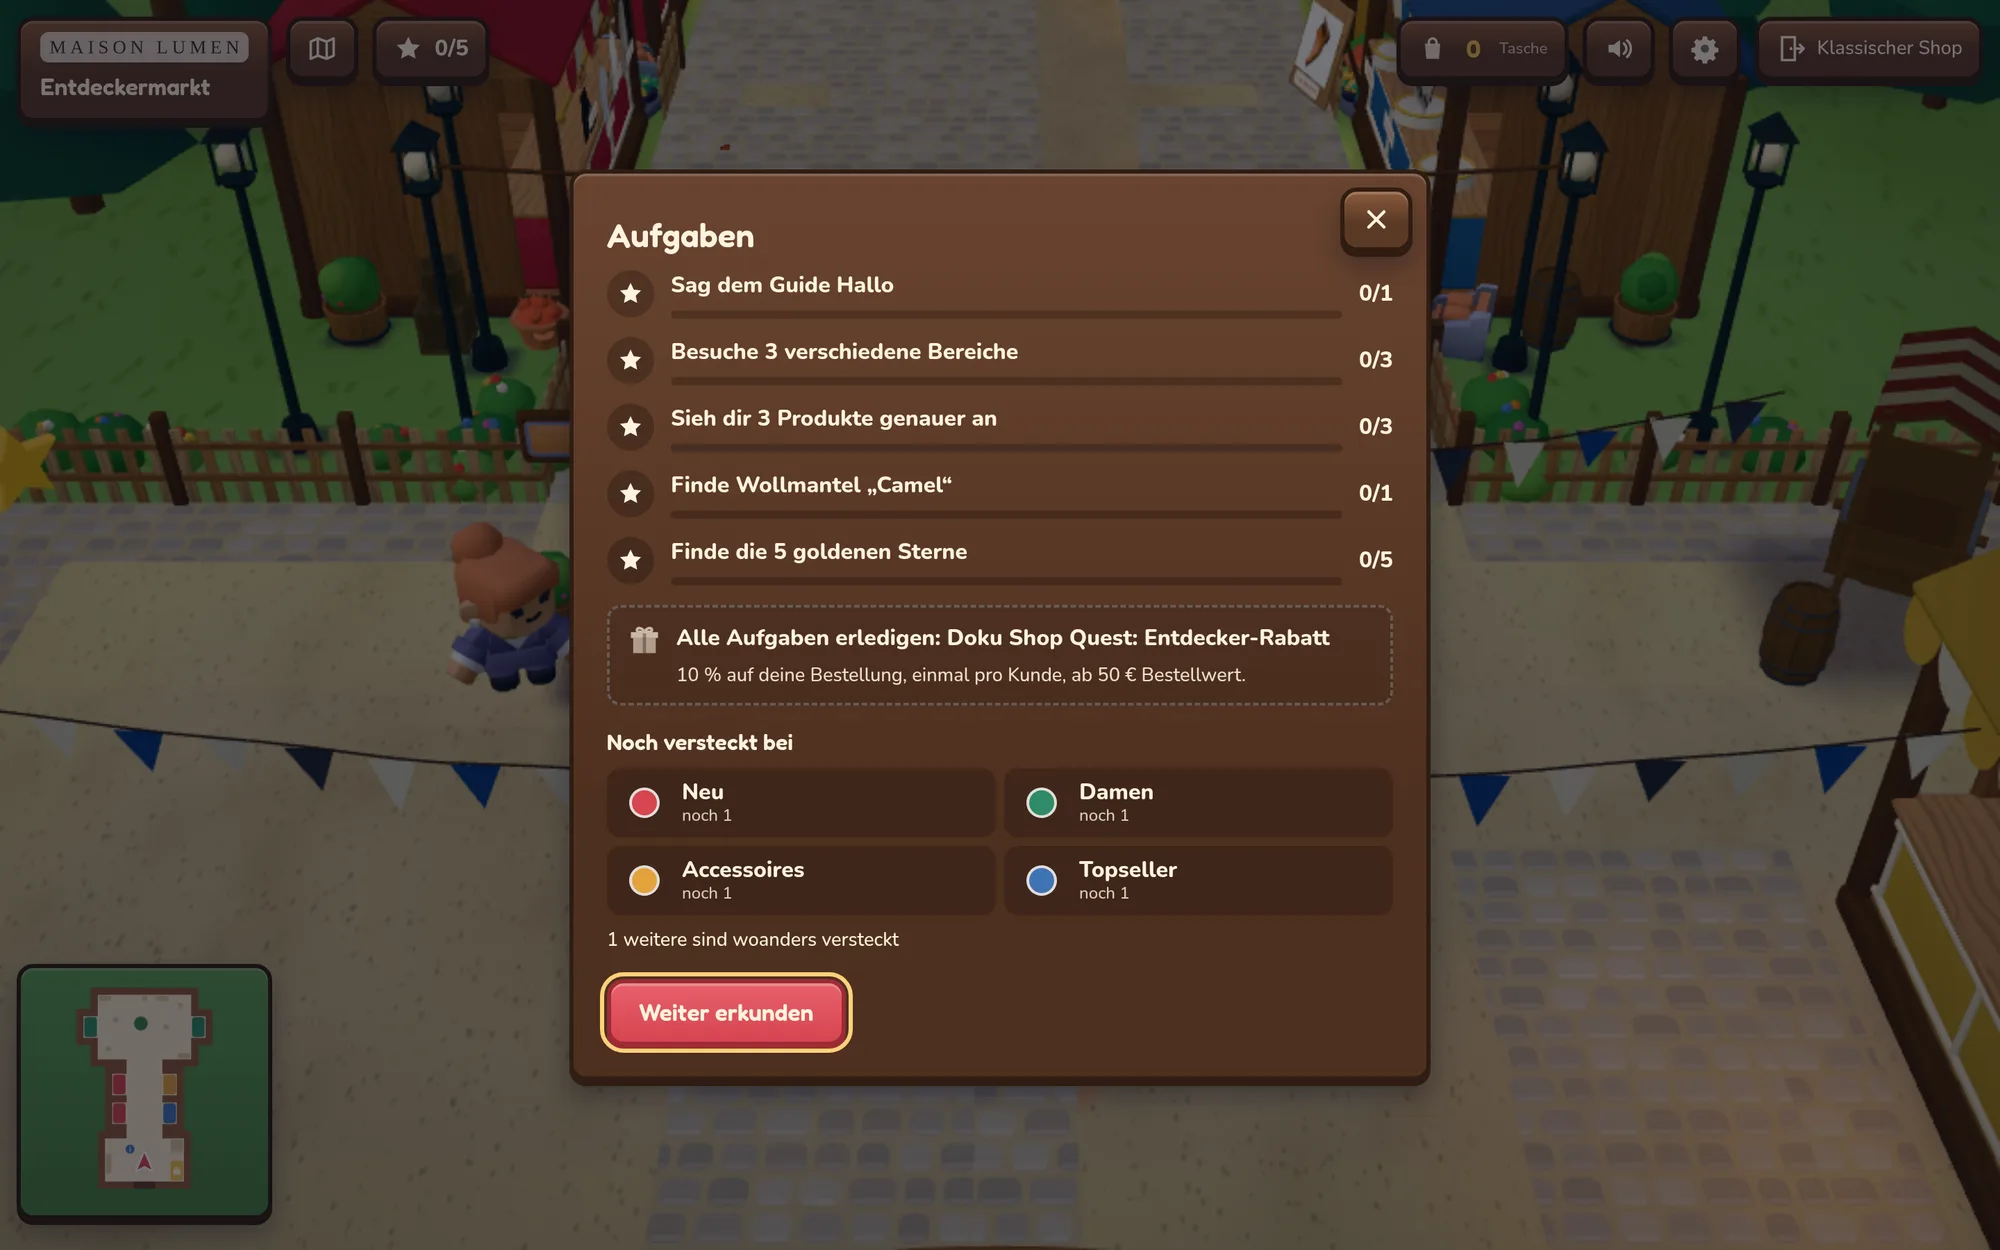
The quests in the game:
| Quest | When it appears |
|---|---|
| Say hello to the guide | if the world has an info stand |
| Visit 3 different areas | always (fewer with fewer areas) |
| Take a closer look at 3 products | always |
| Find product | only with a Featured product, and only if the product is in an area |
| Treasure hunt | 3 to 8 hidden items |
Each style hides its own things: golden stars (Toy Town), energy cells (Retro), keys (Night Shift), presents (Block World), gingerbread hearts (16-Bit Adventure) or golden shopping bags (Showroom).
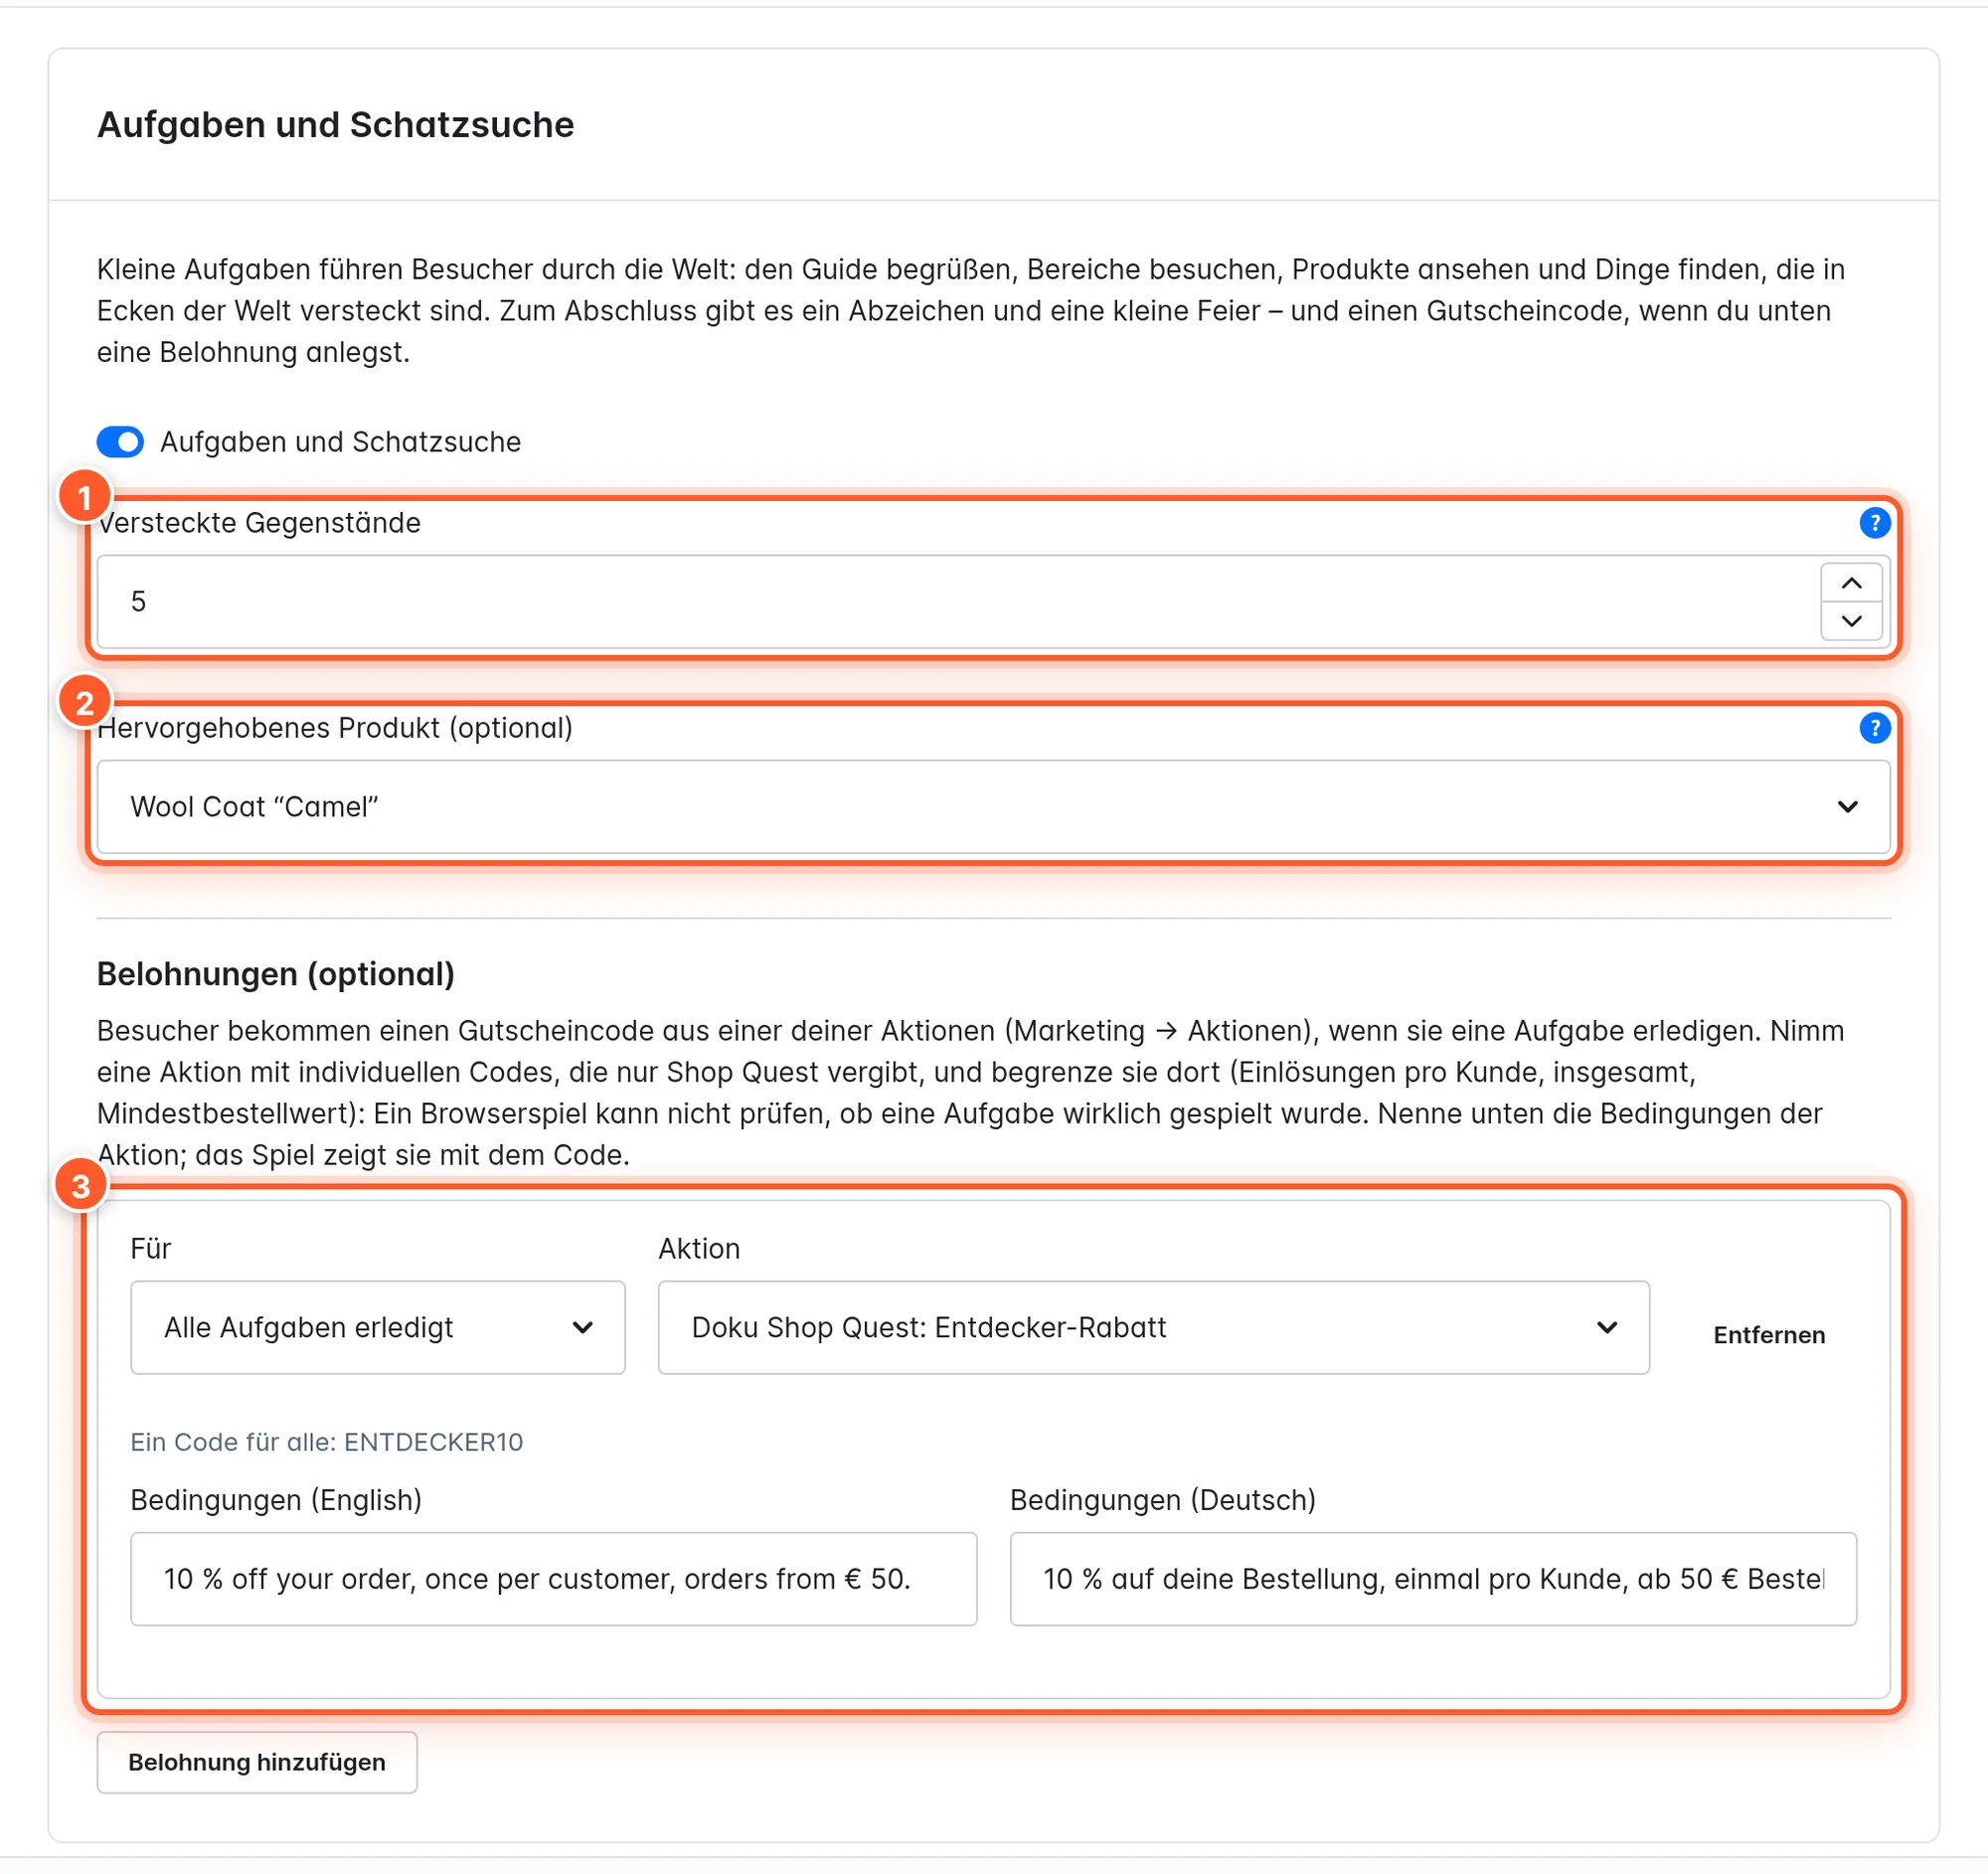
Rewards (optional)
Visitors get a coupon code from one of your promotions (Marketing → Promotions) when they complete a quest.
- Create a promotion and switch on the promotion codes there.
- In the editor, click Add reward.
- Under For, choose the quest: Talking to the guide, Visiting the areas, Looking at products, Finding the featured product, The treasure hunt or All quests done. Each quest can have one reward.
- Choose the Promotion and write the Conditions (up to 200 characters per language). The game shows them together with the code.
- Save and publish.
Below the reward, the editor shows the promotion’s state: “Same code for everyone: …” or, for individual codes, how many are free, given out in the game and redeemed. If the promotion currently can’t provide a code (inactive, expired, not started yet, without a promotion code, not in all of the world’s sales channels, codes used up), you’ll see a note there, and the game doesn’t offer a code.
A browser game can’t verify whether a quest was really played. So use a promotion with individual codes that only Shop Quest hands out, and limit it in the promotion (redemptions per customer, in total, minimum order value). Shop Quest additionally hands out individual codes with a limit per IP address.
In the game, the visitor can copy the code or put it straight into the bag with Redeem code. If the bag is still empty or the conditions aren’t met yet, the code is saved and applies as soon as it fits. In the preview, the game shows a sample code; real codes only exist in the live game.
In the game
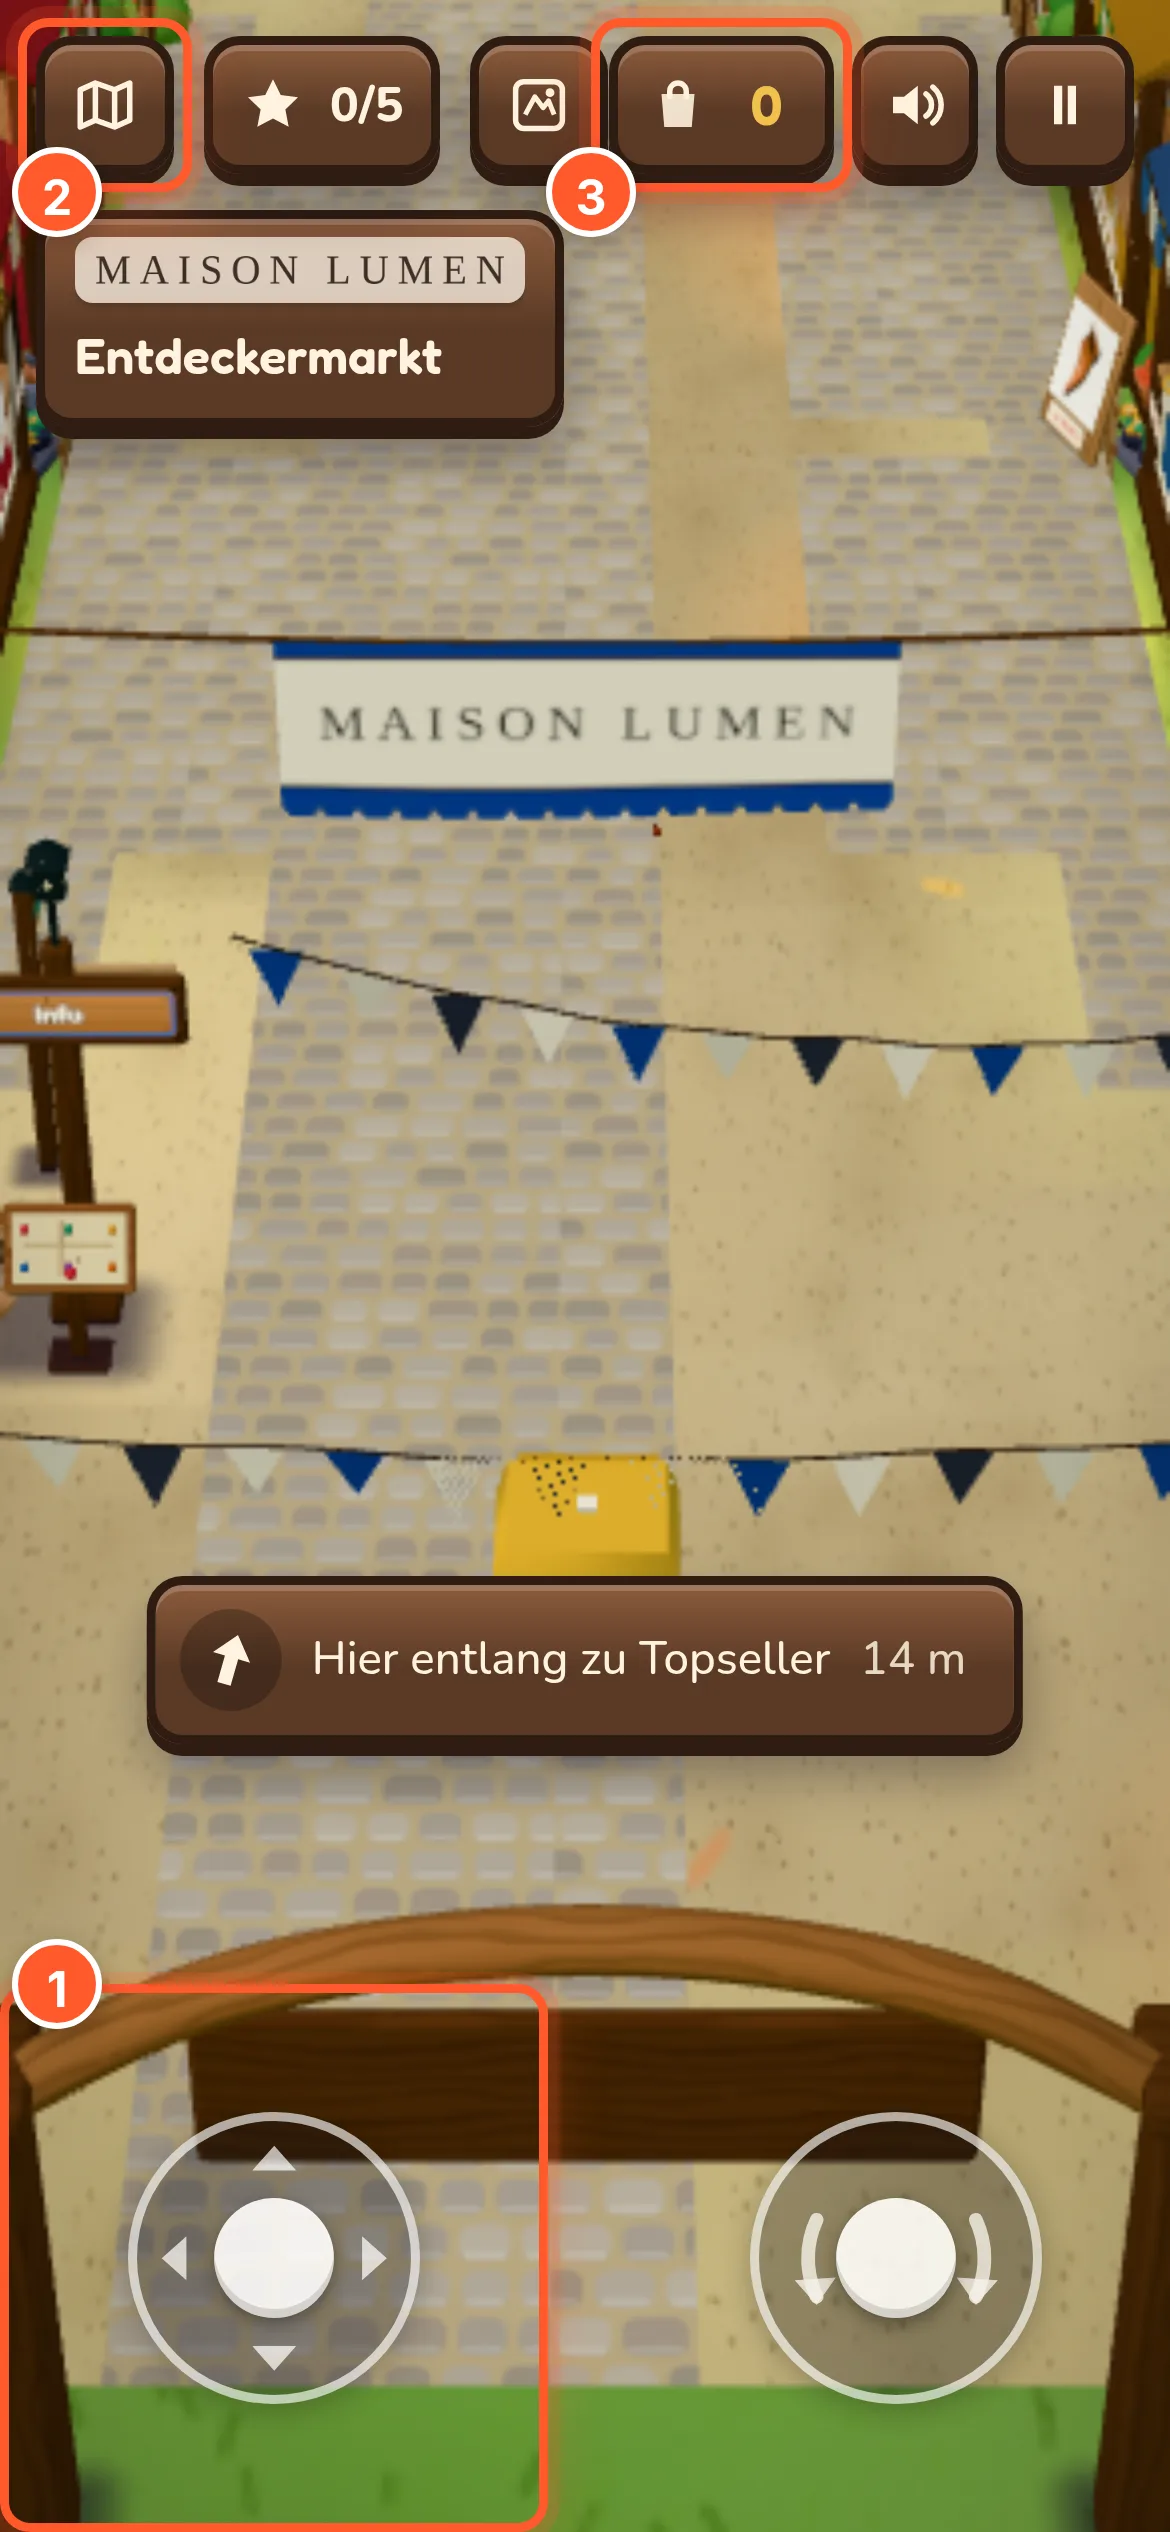
This is how visitors move through the world. At the start, a title card shows the controls for the device, and after that hints in the world help until the first purchase.
| Device | Controls |
|---|---|
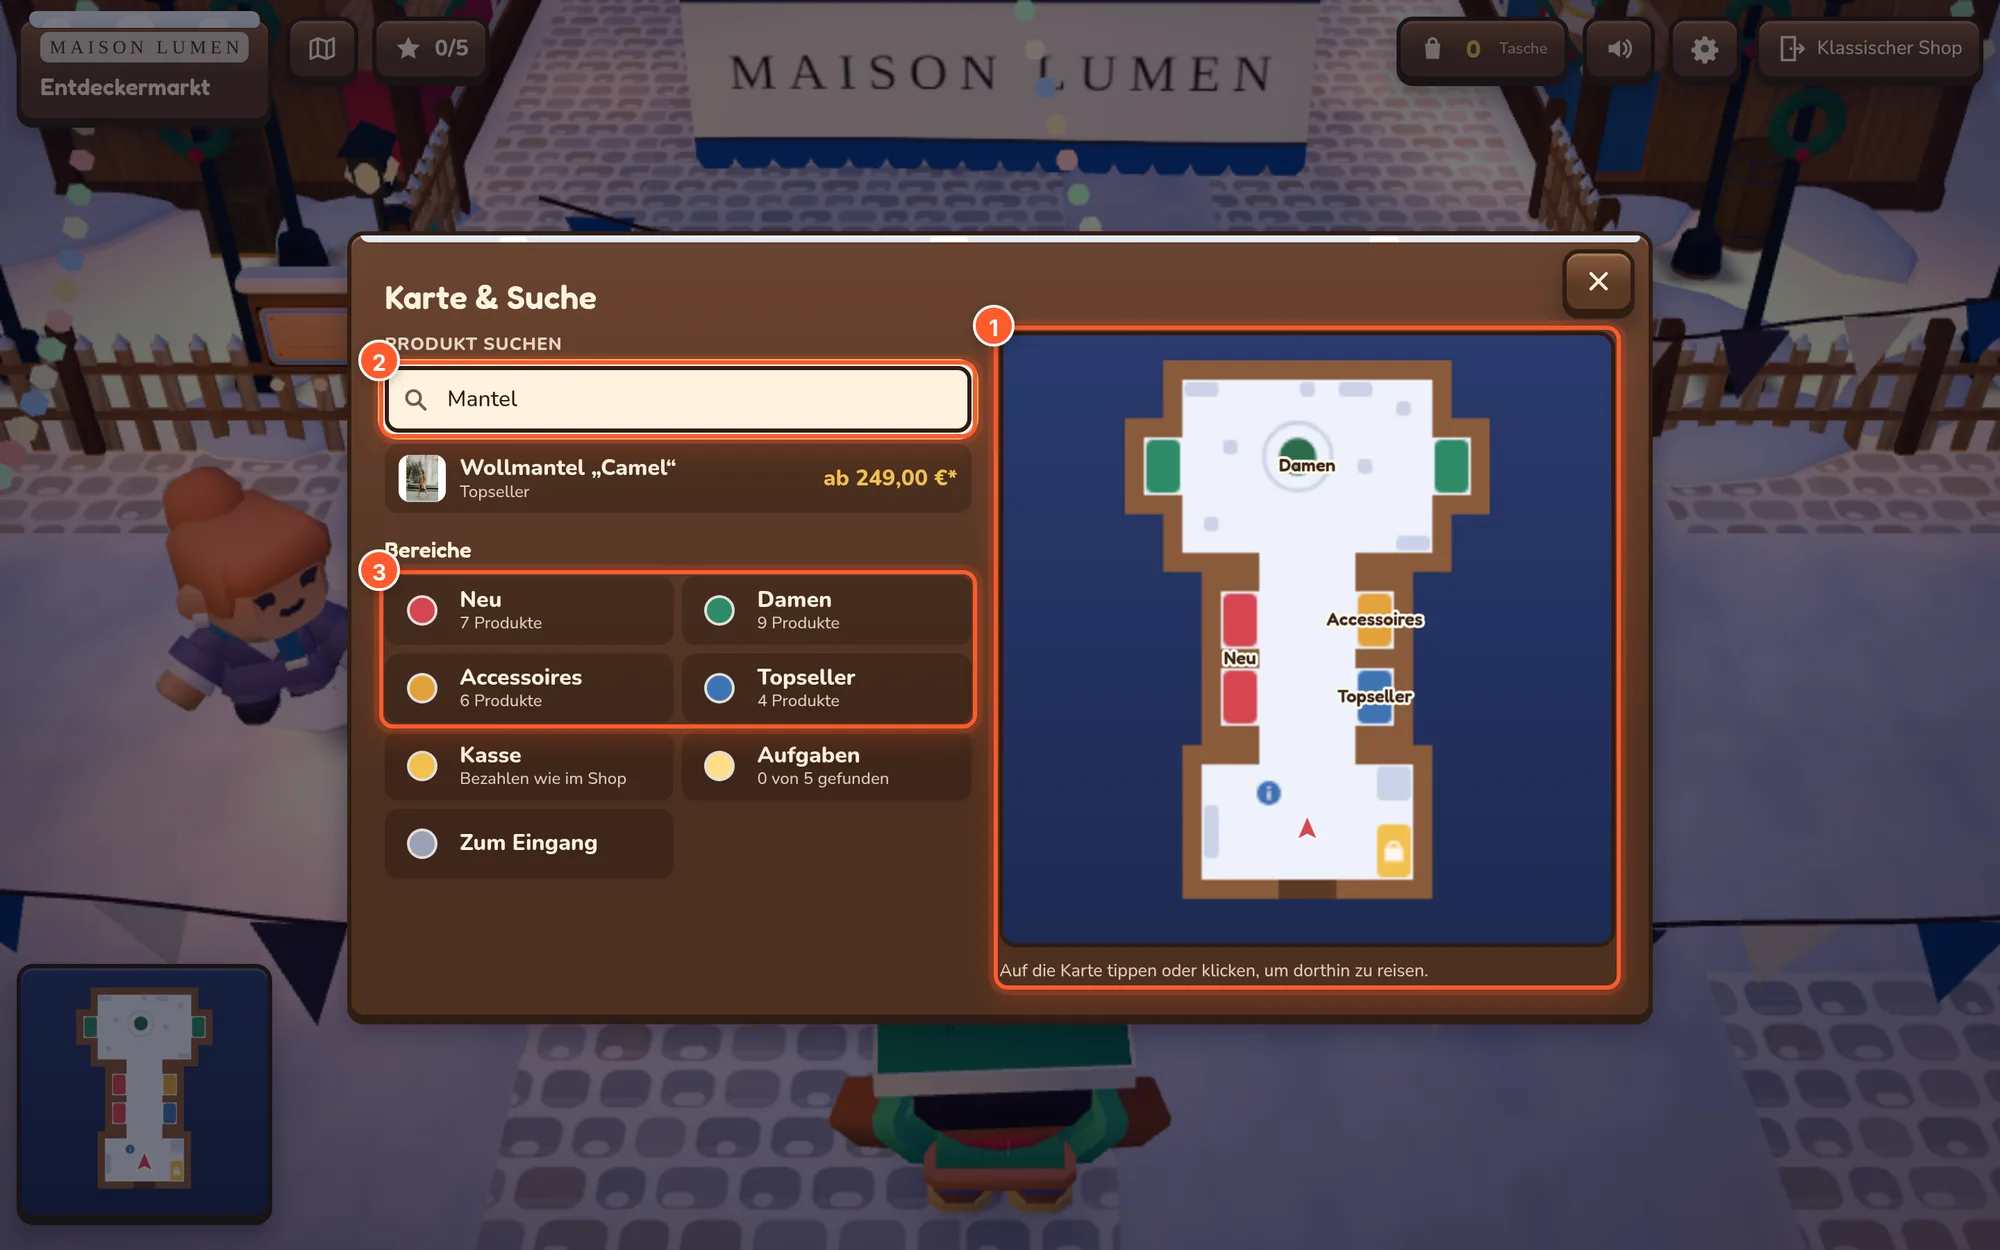
| Keyboard and mouse | WASD or arrow keys walk, Shift runs, a click on the floor walks there, E (or Enter/Space) looks at a product, M map and fast travel, F or / product search, J quests, Esc menu or release the mouse |
| First person (Retro, Night Shift, Showroom, Block World in first person) | click into the picture first, then look around with the mouse; Esc releases the mouse and opens the pause menu |
| Touch | tap the floor to walk, tap a product to look at it, or virtual joysticks; the map button at the top left takes you anywhere |
| Gamepad | left stick walks, right stick looks around or turns the camera, A look, B back, X bag, Y map, shoulder buttons run, Start menu |
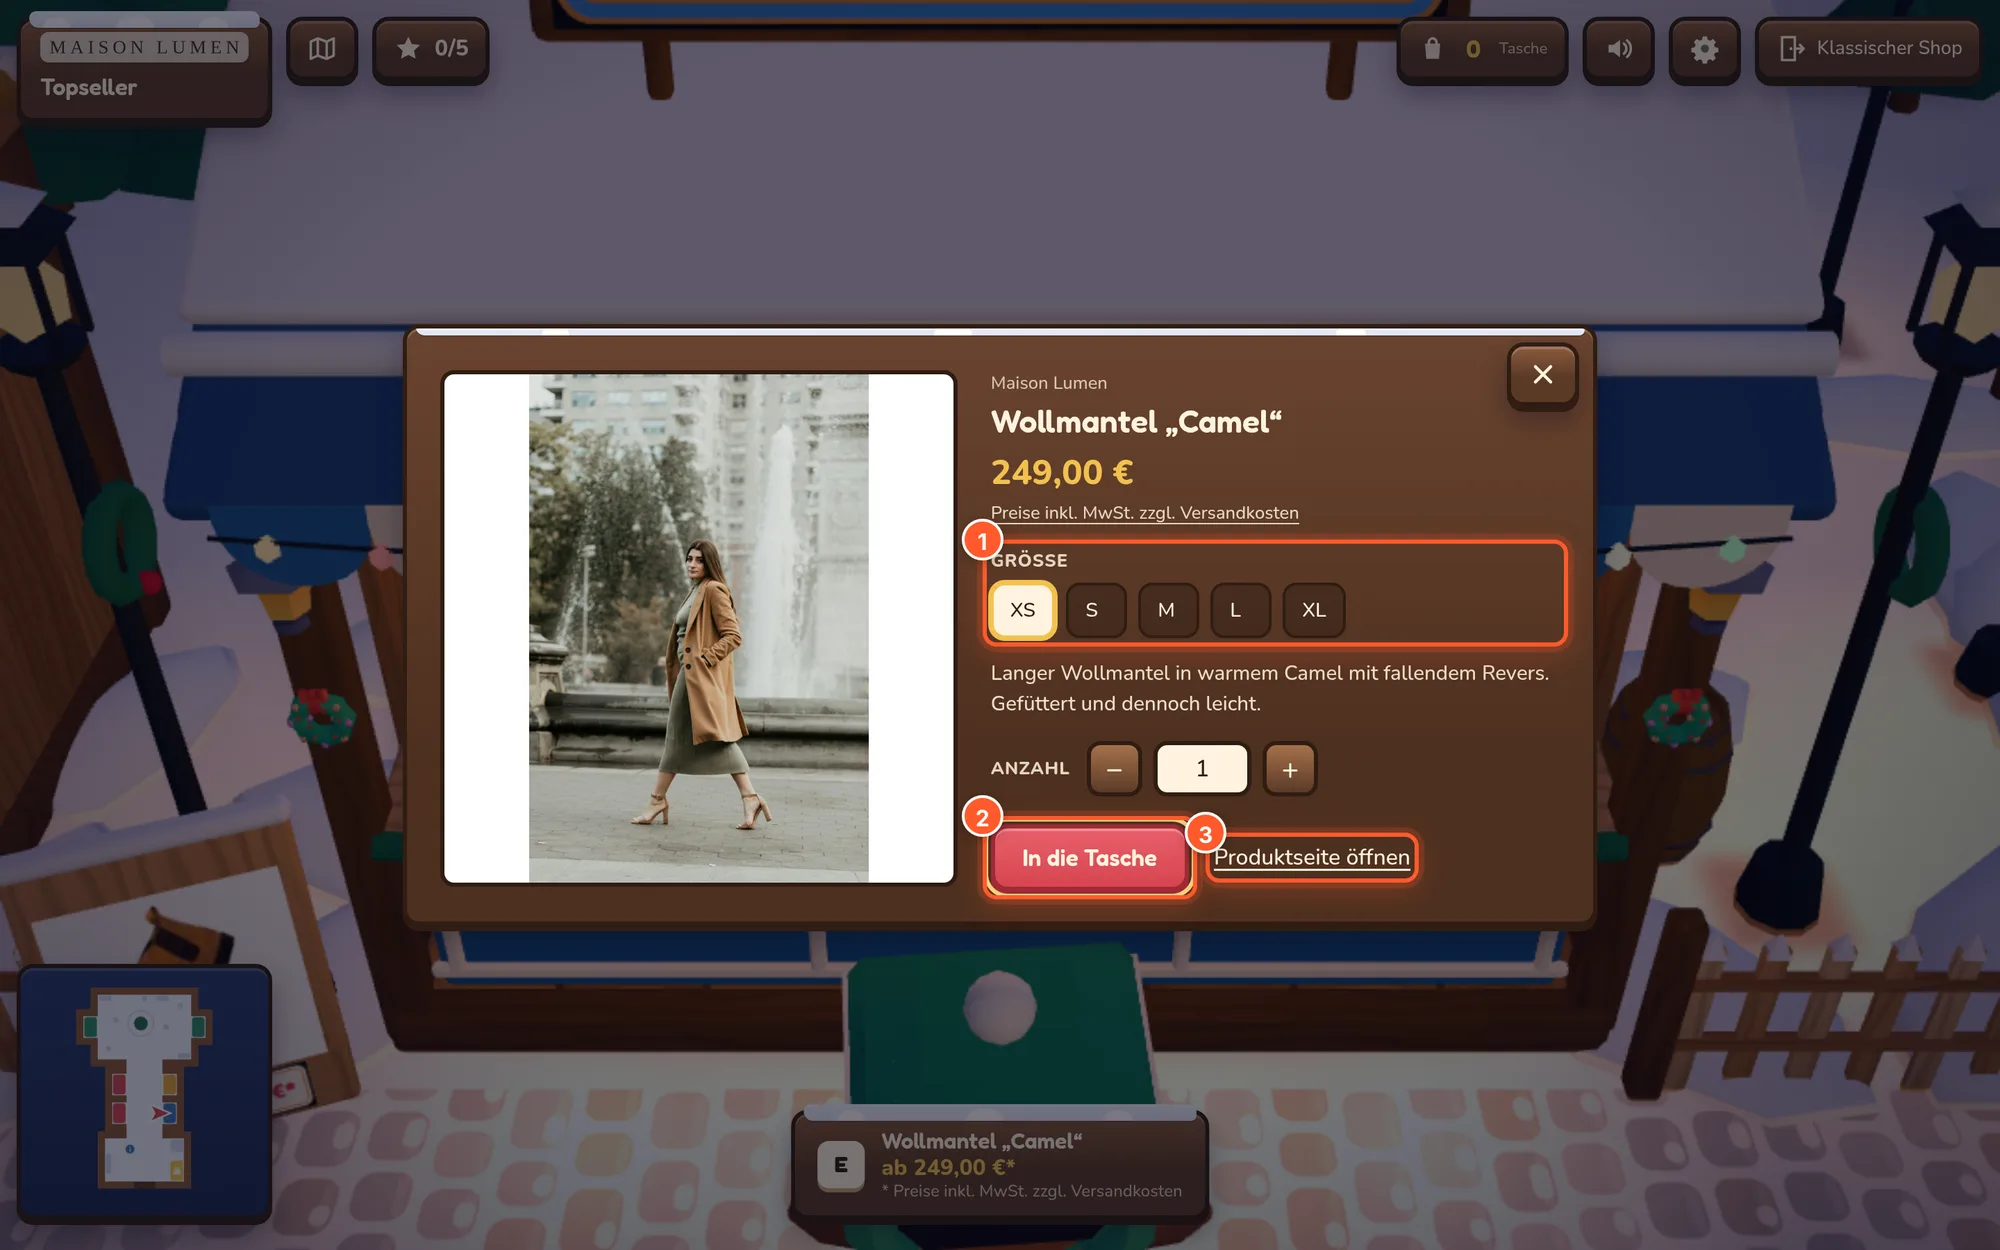
In the product dialog, visitors choose variants and quantity and put the product in the bag – it visibly flies in. At the Checkout in the world they see their bag and go to your normal checkout with Go to checkout. On cart and checkout pages, a Back to the Market Square link (or one matching the style) appears so they can keep browsing.
Season calendar
With the season calendar you plan periods like Advent, Easter or a summer sale. While an entry is running, the game world is open, with that entry’s world, style, seasonal pack and entry points. Outside of it, the season period from the settings applies. You open it via Season calendar in the game list and create entries with New date.
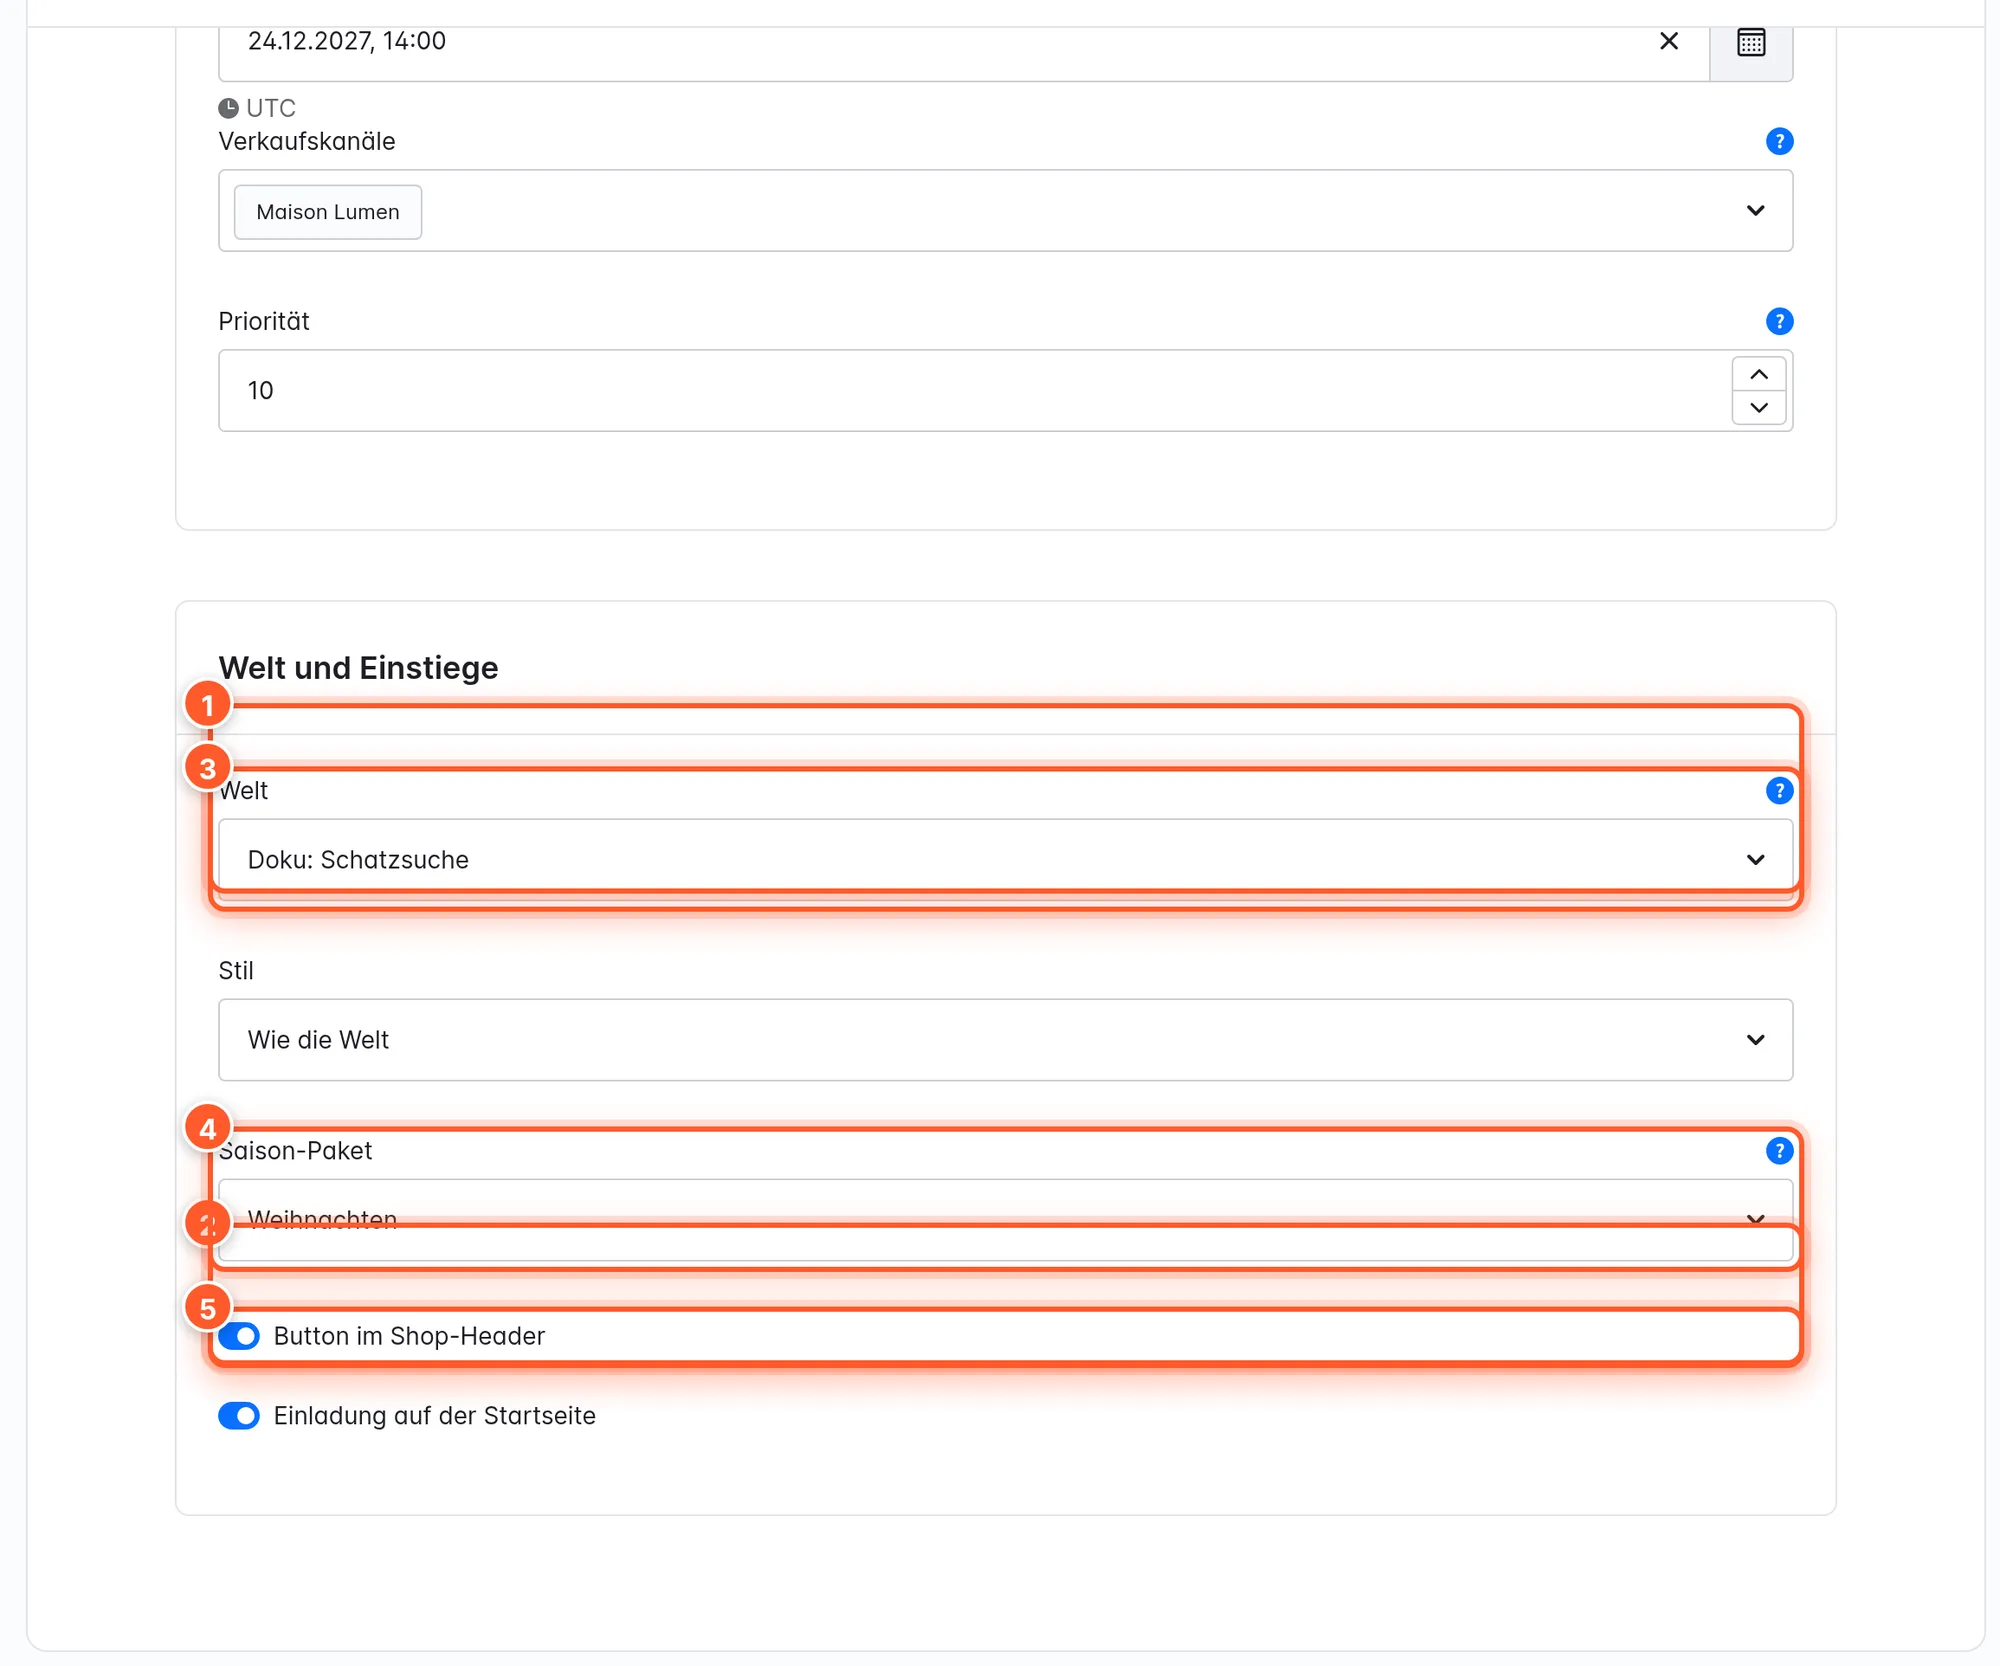
| Field | Meaning |
|---|---|
| Name, Active | Name and switch of the entry. |
| Start, End | Period with time. |
| Sales channels | Leave empty for all. |
| Priority | If several entries run at the same time, the one with the highest priority applies. |
| World | The game during the entry. Empty: the sales channel’s default world. |
| Style | As the world or a different style just for this period. |
| Seasonal pack | As in the plugin settings, All year or Christmas. |
| Button in the shop header, Invitation on the homepage | Entry points during the entry. |
The list shows each entry’s status: Upcoming, Running, Past or Inactive.
Analytics
Under Analytics you see how the game world is used, filtered by period (7, 30, 90 or 365 days), sales channel and world.
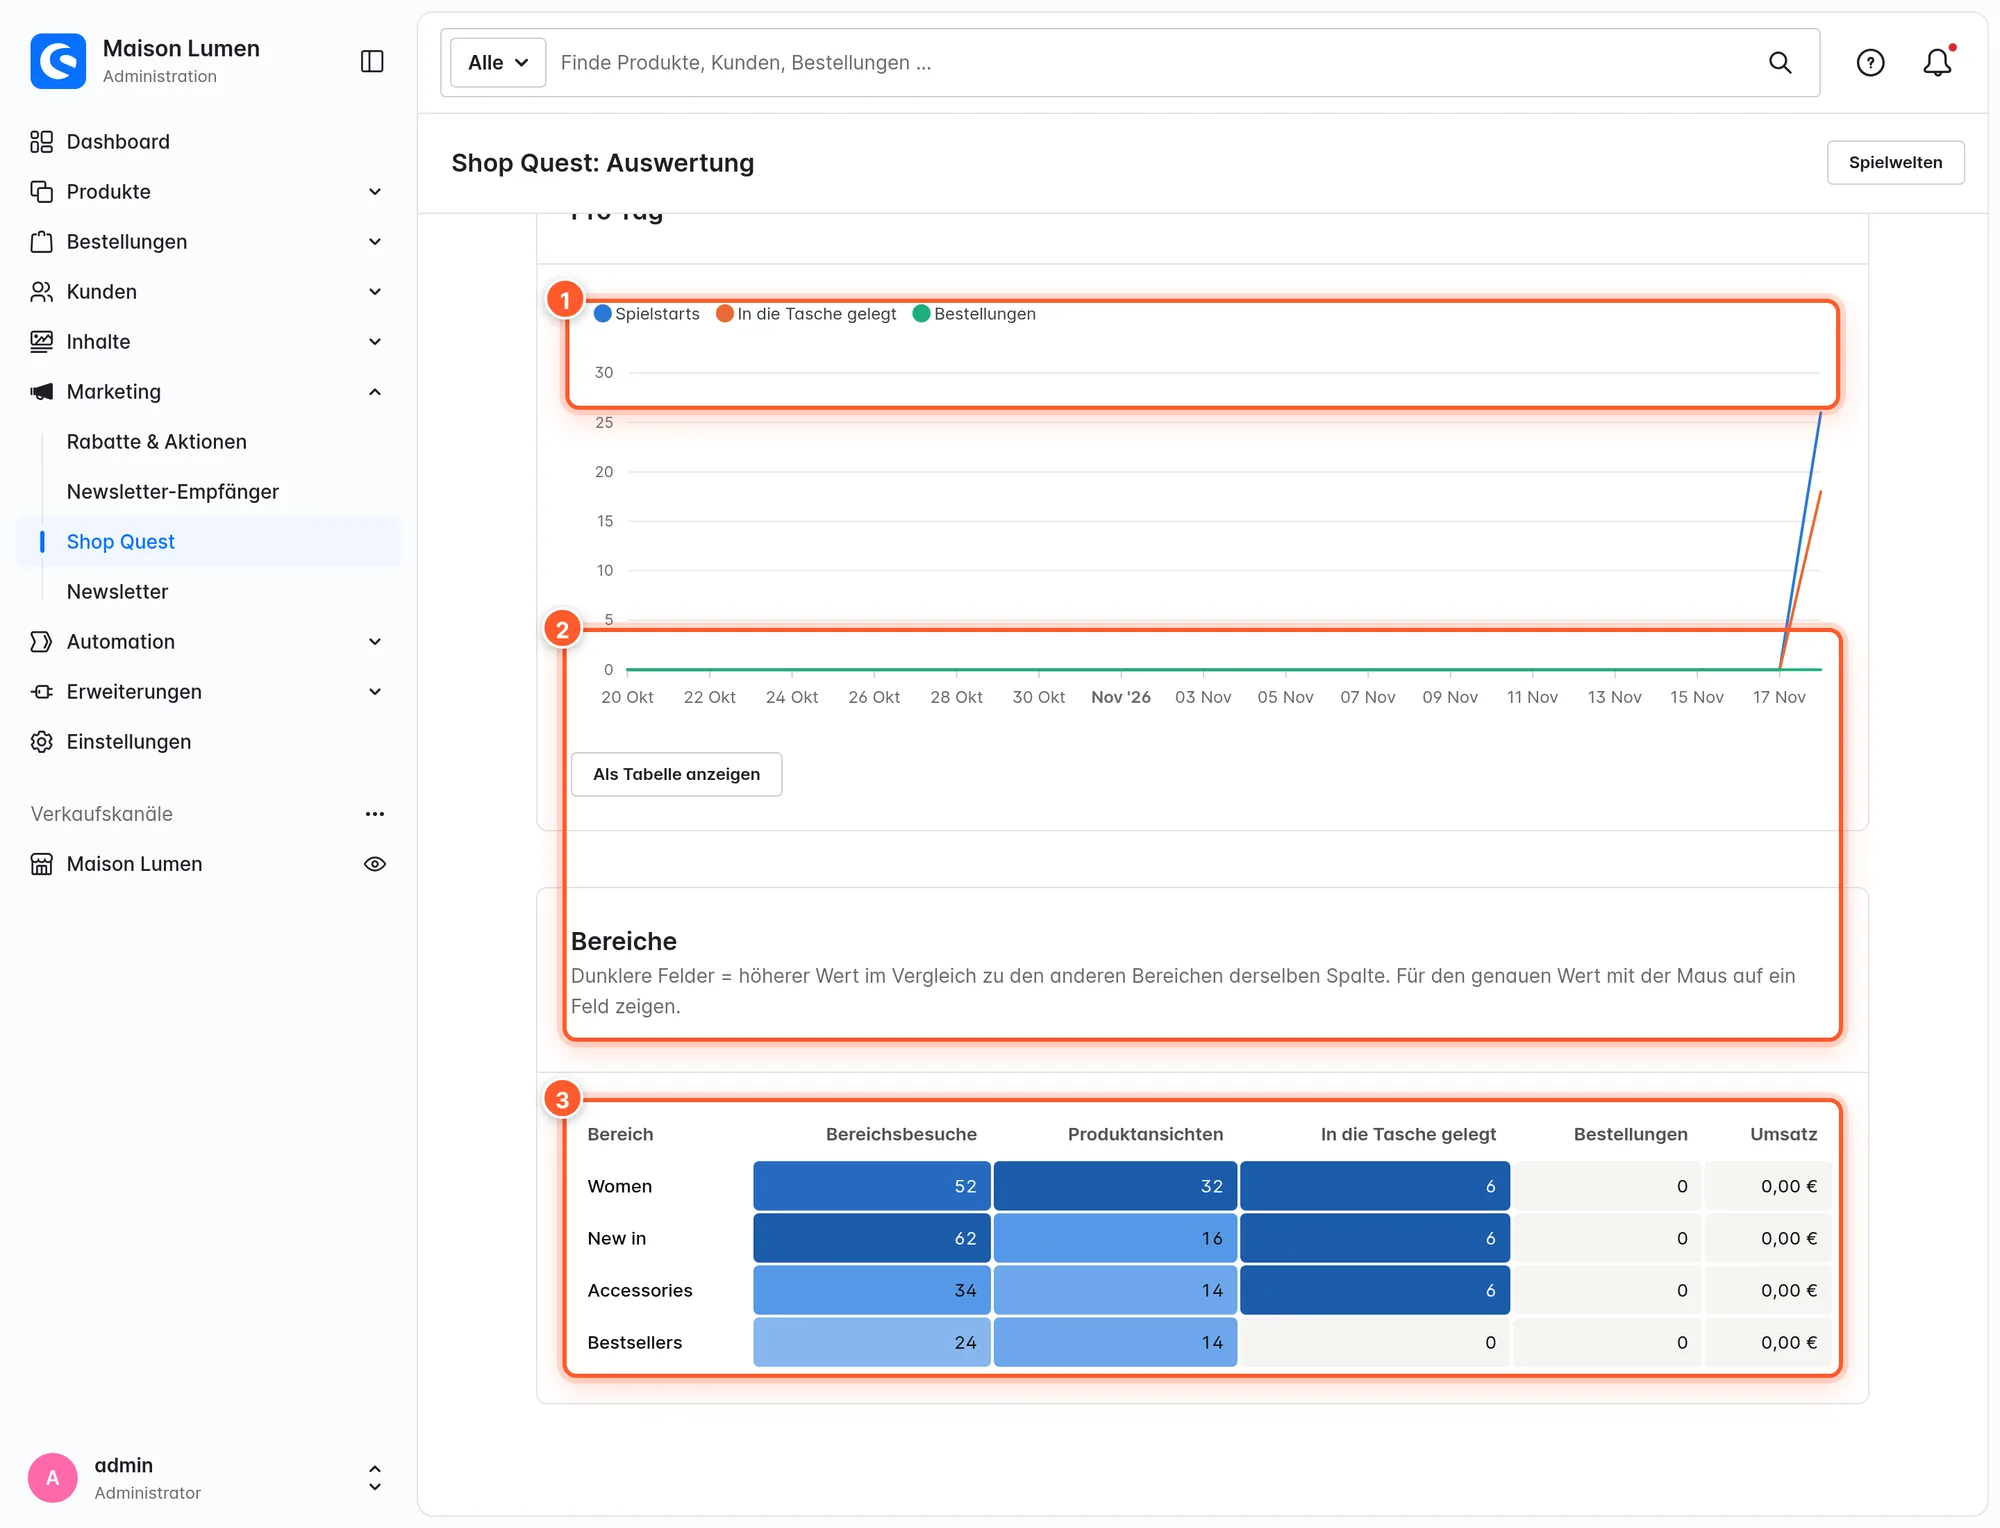
The key figures: Game starts, Area visits, Product views, Put in the bag, Cashier visits, To checkout, Orders, Order items, Revenue, Orders per game start, Treasure hunts finished, All quests done and Reward codes given out. Below that there’s the Per day history (as a chart or with Show as table) and the area heatmap; hover over a cell for the exact value.
These are anonymous counters without cookies and without personal data. Previews don’t count. Every order with at least one product put in the bag in the game counts as an order; the revenue is the revenue of these products in the default currency, excluding canceled orders.
For the console there’s the bin/console flink-shop-quest:stats report with the options --days (default 30), --sales-channel and --world.
AI Architect (optional)
The AI Architect is an optional in-app purchase (monthly subscription in the Shopware Store with a quota of AI worlds and chat changes; the booking dialog shows the price). You open it in the wizard (With the AI Architect) or in the editor via AI Architect.
- You describe your idea in a few words (optional), the AI looks at categories, best-sellers and prices and suggests three concepts. Build right away skips the choice.
- The chosen world is built live in the preview. Afterwards, the AI rates images of its world and improves what it notices.
- Changes via chat, for example “Move the scarves to the front” or “A gift corner under €30”.
- Sign texts are translated into all your shop’s languages.
Everything the AI builds stays a draft until you publish it. Without the AI Architect, worlds are created for free from your categories.
Settings
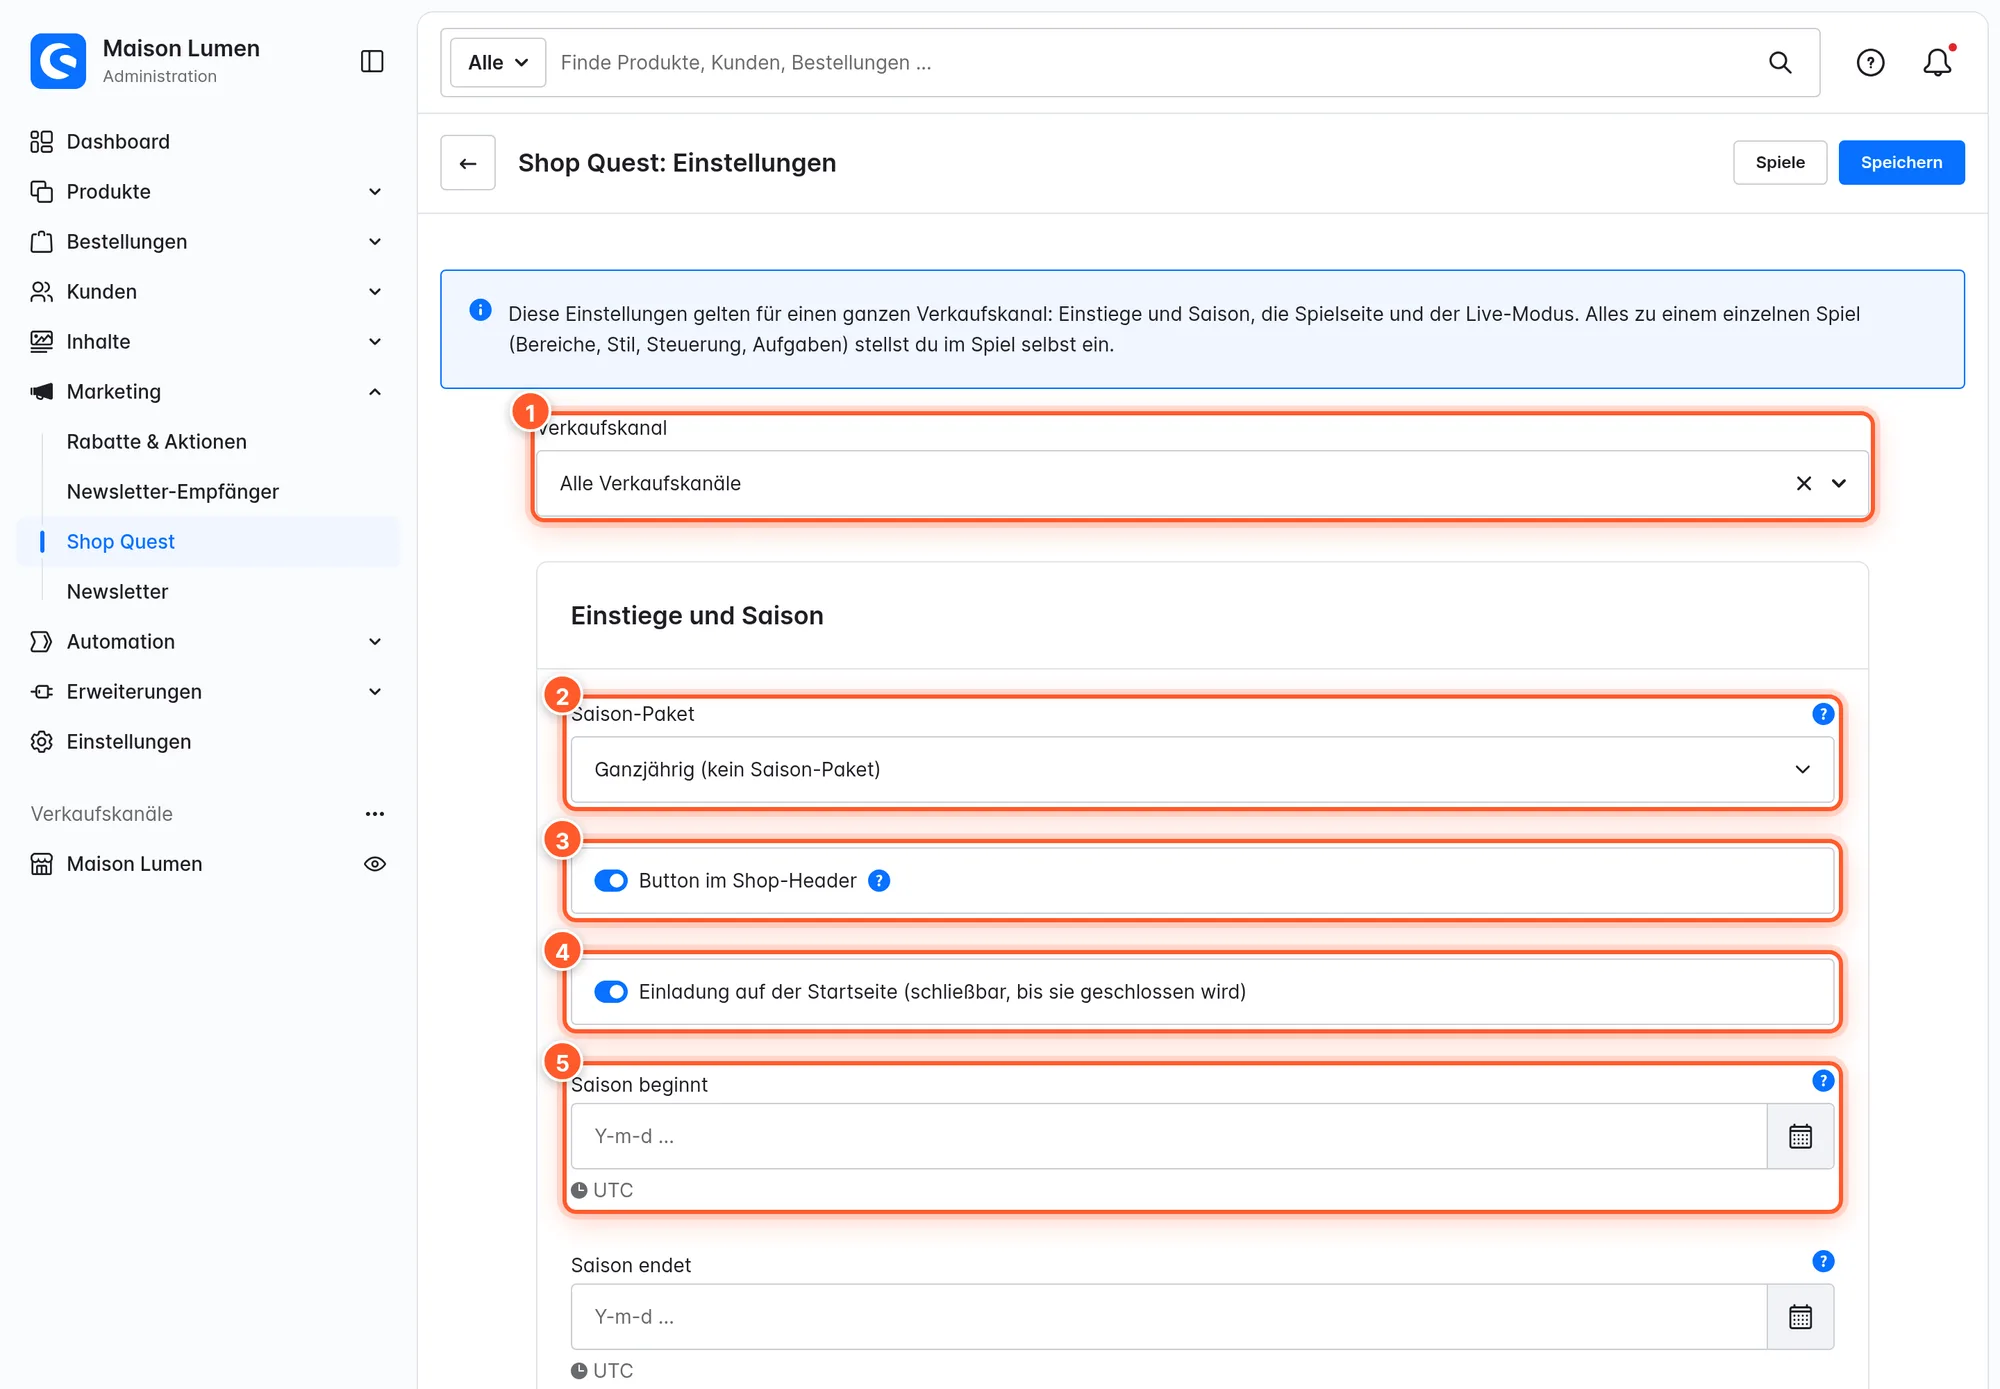
You open the settings via Settings in the game list. They apply to a whole sales channel; everything about a single game (areas, style, controls, quests) is set in the editor.
Entry points and season
| Setting | Meaning | Default |
|---|---|---|
| Seasonal pack | All year (no seasonal pack) or Christmas. Entries in the season calendar can switch the pack on for their period. | All year |
| Button in the shop header | Leads to /play, the sales channel’s main game. Without a main game, the shop shows no entry points. | on |
| Invitation on the homepage (can be closed, shown until closed) | Small invitation at the bottom of the home page. | on |
| Season starts | From this time on, the entry points are shown. Empty: right away. | empty |
| Season ends | After this, the entry points disappear; /play stays reachable as long as the main game is published and active. | empty |
Game page
| Setting | Meaning | Default |
|---|---|---|
| Products configured on the product page | For products with options the game can’t show (e.g. personalized products), the game links to the product page (“Configure in the shop”) instead of putting them in the bag. | empty |
| The visitor’s figure follows the customer’s salutation | In Toy Town, Block World and the 16-Bit Adventure: male or female character for logged-in customers with the salutation “Mr” or “Mrs”, otherwise neutral. Off: neutral for everyone. Other visitors never see this choice. | on |
| Hide these elements on the game page | One CSS selector per line, e.g. for a chat bubble that covers the controls. Common chat widgets and trust badges are hidden anyway; the cookie banner always stays visible. | empty |
Live mode (other visitors)
| Setting | Meaning | Default |
|---|---|---|
| Show other visitors in the game world | Other visitors appear as characters, with a visitor count and emotes. Requires the Shop Quest relay server. Visitors can switch it off in the game. Please mention it in your privacy policy. | off |
| Relay URL, Key ID, Secret | The relay’s credentials (the address starts with wss://). | empty |
| Other visitors shown at the same time | 1 to 40. | 20 |
| Test connection | Checks the relay address, key ID and secret and tells you what’s wrong. | – |
Shopping Experience teaser
For home, category or landing pages there’s the Shop Quest: teaser Shopping Experience block (category Commerce): an illustration of the world with headline, text and a button into the game.
- Headline, Text, Button label: leave empty for the style’s default text (customizable under Settings → Snippets, search for
flinkShopQuest.teaser). - Appearance: Festive (the illustration’s sky), Light or Dark.
- Game world: As in the plugin configuration or a specific style (with a matching illustration).
- Show: Only during the season or Always, while Shop Quest is active.
If Shop Quest is deactivated or the season is over, the shop doesn’t show the teaser. So the block can stay in the layout all year.
Tips & hidden features
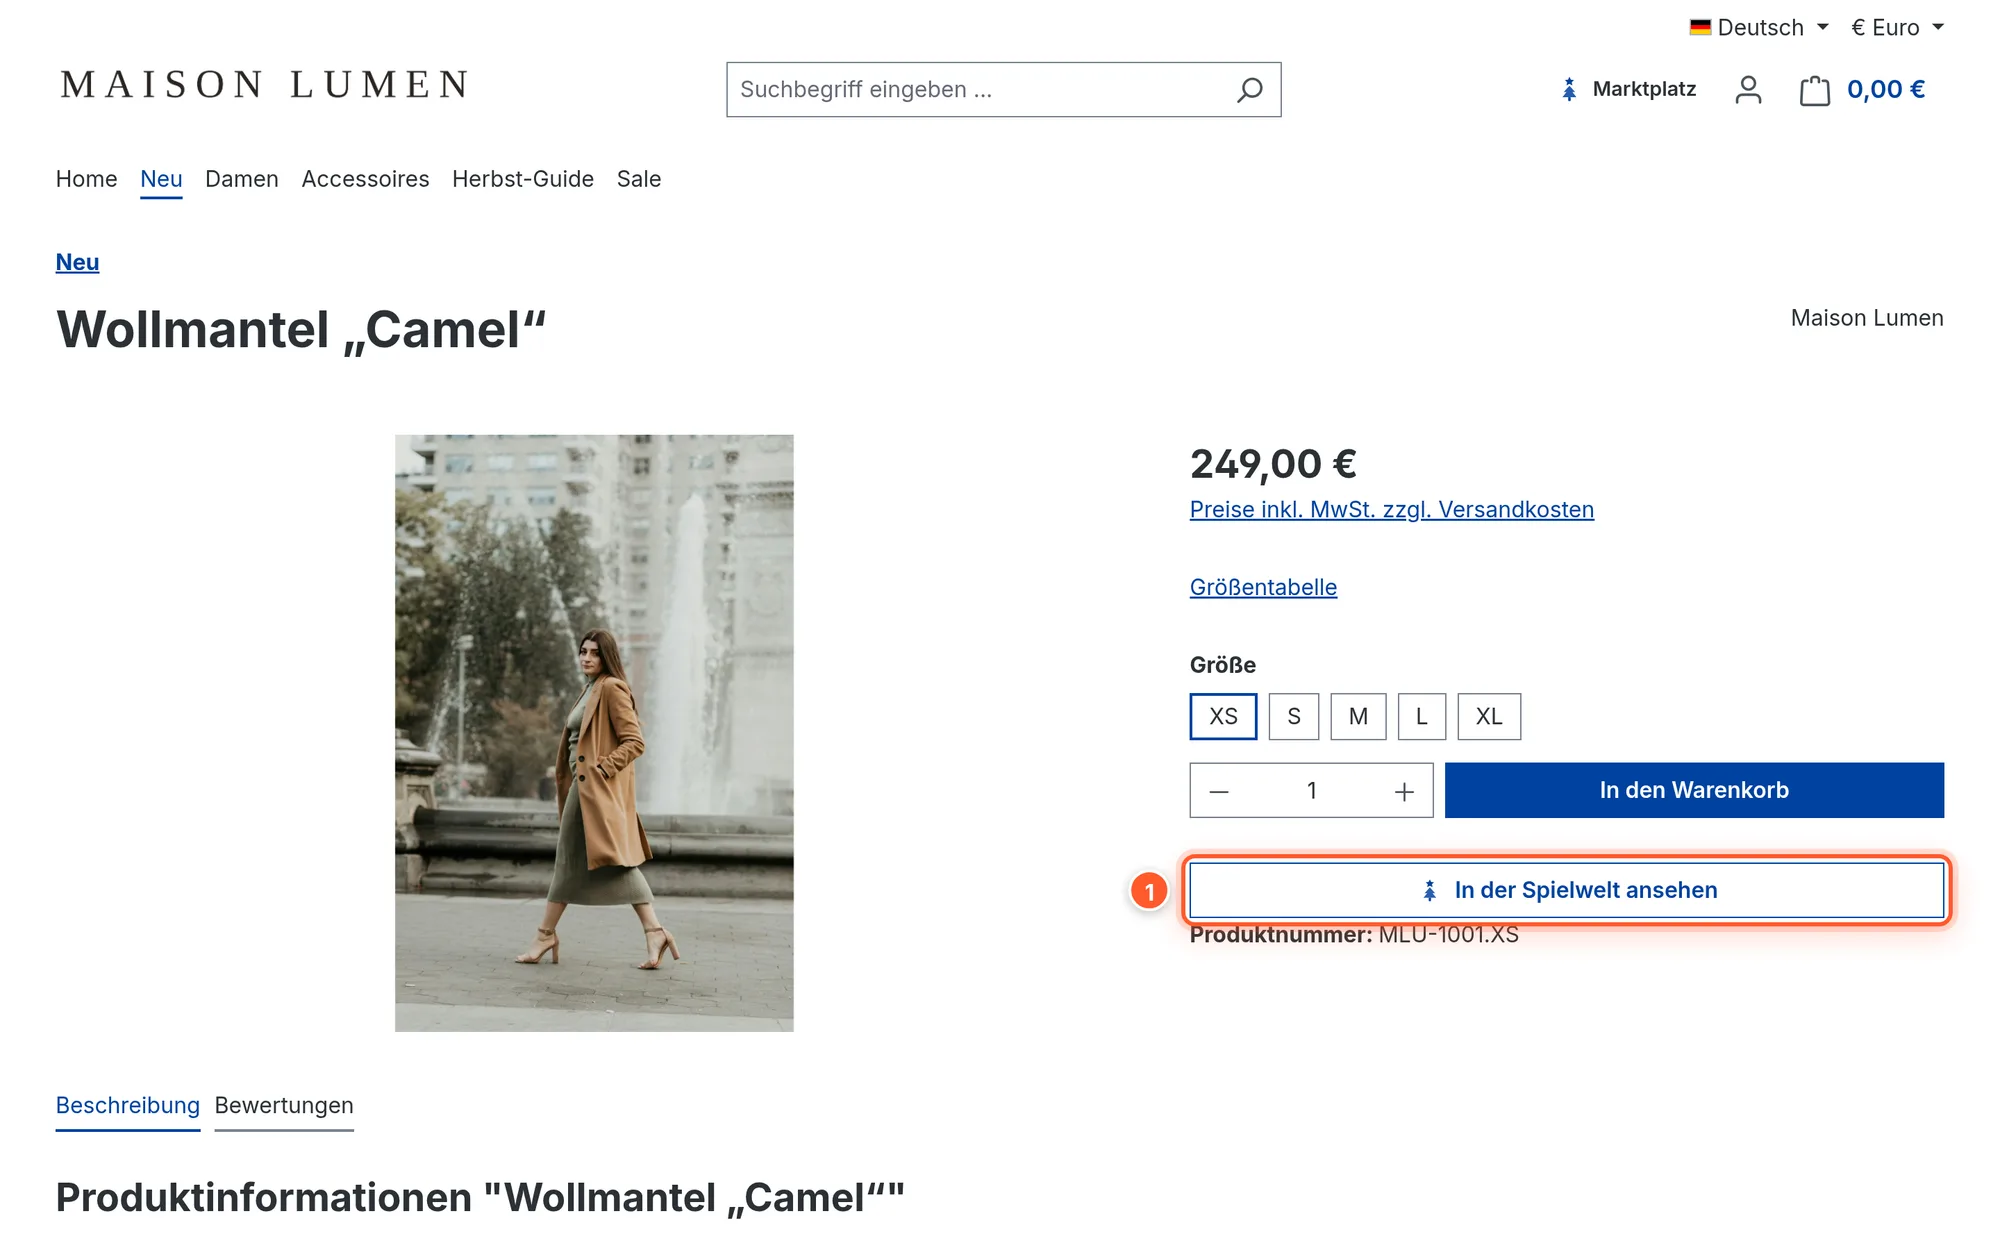
- “See it in the game world” on the product page: If a product (or its parent product) is in the world and the game is open, the product page gets a link below the buy button that takes visitors straight to the product in the world.
- Try a style or the Christmas pack via link:
/play?style=retroshows the world in a different style (toytown,retro,nightshift,blockworld,adventure,showroom),/play?pack=christmaswith the Christmas pack,/play?pack=standardwithout. Handy for social media links or for testing before the season without changing anything. - Simple view:
/play?view=simpleshows all areas and products as a list without 3D. Visitors also find it in the game menu under Settings → Simple view (no 3D); if it stutters, the game suggests it on its own. - Fast travel: With M (or the map button), visitors jump instantly to any area, the checkout or the entrance. F opens the product search directly.
- Camera: In Toy Town and Block World, Q and R turn the camera, +/− or the mouse wheel zoom (also in the 16-Bit Adventure).
- Emotes in live mode: With 1, 2 and 3 visitors wave, send a heart or a snowflake.
- Game settings for visitors: sound, volume, ambient sounds, background music (off by default), minimap, joysticks, field of view, look speed, invert up/down, camera distance, reduce motion, flickering light (Night Shift) and graphics quality.
- Two games at once: A main game at
/playand more games with their own address, for example a Christmas market at/play/christmas-marketfor the newsletter. - Customize texts: All texts in the shop and the game (invitation, button, world name, quests) are snippets with the prefix
flinkShopQuest.and can be changed under Settings → Snippets. - Test first: The Preview button in the editor opens the draft in the shop, even if the game isn’t published yet. Previews don’t count in the analytics.
Frequently asked questions
No button and no invitation appear in the shop. Why?
The entry points only appear if the sales channel has a published, active main game (a game without its own address) and the season is running (Season starts / Season ends in the settings, or a running entry in the season calendar). Also check Button in the shop header and Invitation on the homepage in the settings of the right sales channel. The invitation only appears on the home page and no longer after the visitor has closed it. After changes, clearing the shop cache helps.
I changed something, but it doesn’t show in the game.
Save only saves the draft. Only Publish makes the change visible to visitors. This also applies to layouts from the Level Studio.
How does the game world run on older devices and smartphones?
Shop Quest picks the graphics quality with a short test and adjusts it while playing, upwards again too. If a world doesn’t start fully on a device, a lighter, safe start follows the next time; after two unfinished starts, the visitor gets the simple view and the classic shop. Without WebGL, the 16-Bit Adventure still runs; the other styles then show the simple view. Such start problems are logged with step and graphics chip in the shop’s log (var/log/FlinkShopQuest-<date>.log), without visitor data.
Is the game page indexed by search engines?
No. The game pages are marked noindex, follow. Your normal category and product pages remain what counts for SEO.
Is there anything to watch out for with the HTTP cache?
The game pages aren’t cached, so prices, stock and cart are always up to date. The server prepares product images as sprite sheets so the game loads quickly; this happens automatically via a scheduled task. You can also trigger it manually with bin/console flink-shop-quest:prepare-images (options --sales-channel, --world, --force). After changes to the entry points (header button, invitation), clear the shop cache if the pages are cached.
A product is missing in the world.
An area only shows products that are visible and available in the sales channel and (with Only products with an image) have an image, and only as many as its limit allows. The editor shows “In the game: x of y products” per area and explains what you can do. A whole game shows at most 64 products.
What happens with products with variants or custom options?
Visitors choose variants directly in the product dialog. Products the game can’t configure (e.g. personalized products) go under Products configured on the product page; the game then links to the product page.
A chat widget covers the controls.
Enter the widget’s CSS selector in the settings under Hide these elements on the game page, one per line. Shop Quest already hides common chat widgets on its own.
Does Shop Quest work with multiple languages?
Yes. You maintain the world name, sign texts and reward conditions per language; all other texts come from the snippets (German and English are included). The AI Architect translates sign texts into all your shop’s languages.
What does Shop Quest store in visitors’ browsers?
Shop Quest adds an optional “Shop Quest game world” entry (Comfort features) to the cookie consent. Only with consent does the browser remember settings like sound, view, controls, the closed invitation and quest progress. Without consent, they only apply to the current page view. Nothing is sent to a server. Live mode transfers the position anonymously to the relay; visitors can switch it off in the game.
What happens on uninstall?
If you choose not to keep the data when uninstalling, Shop Quest removes its tables and data completely.