
Documentation
Size Charts
Version 2.4.0 · updated November 18, 2026
Overview
With Size Charts you manage your measurement tables centrally in the Administration and show them in a popup on the product page. A chart can have several tabs (e.g. “Body measurements” and “Lengths”) and is assigned automatically to all matching products – directly, via dynamic product groups, manufacturers or categories. In the popup, your customers can switch between cm and inches, highlight their size with a click and search or filter columns. That cuts wrong purchases and returns.
The plugin requires Shopware 6.7.
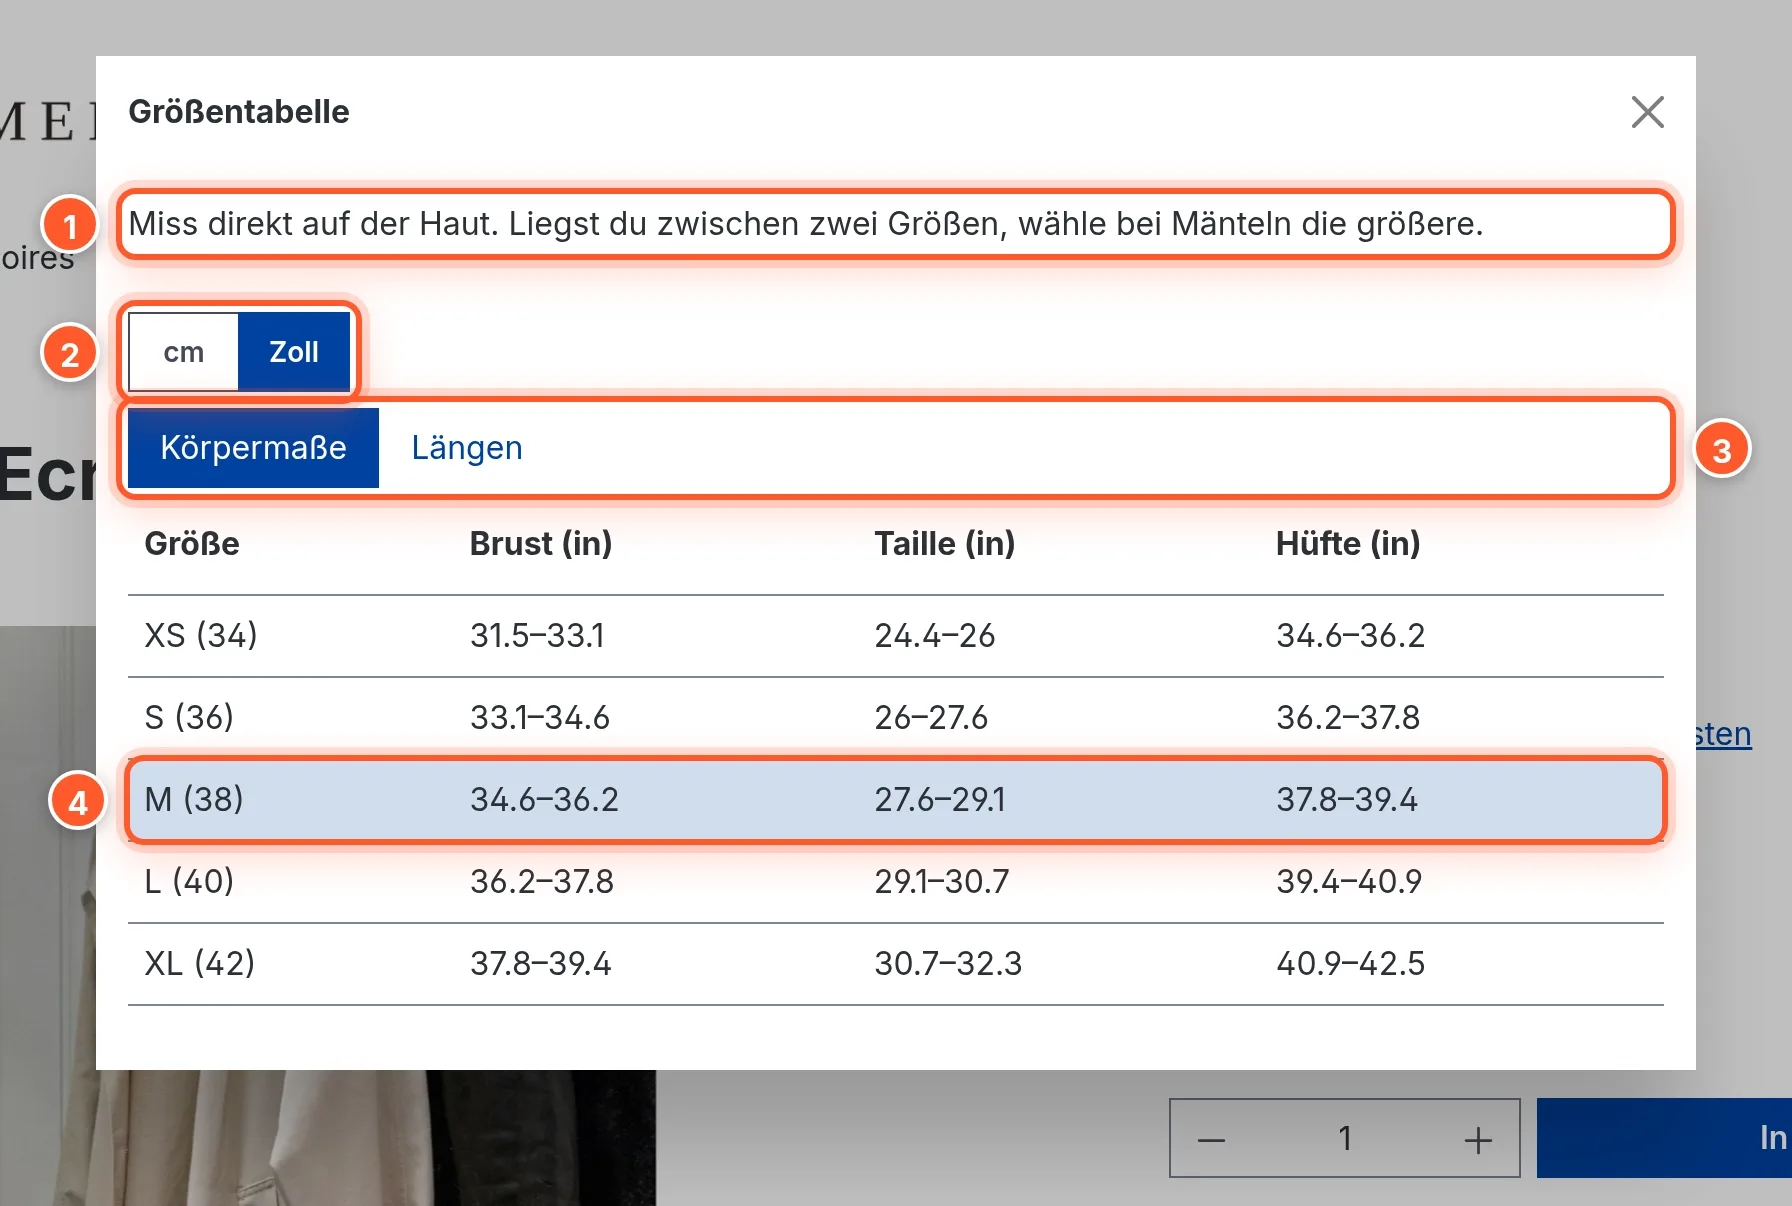
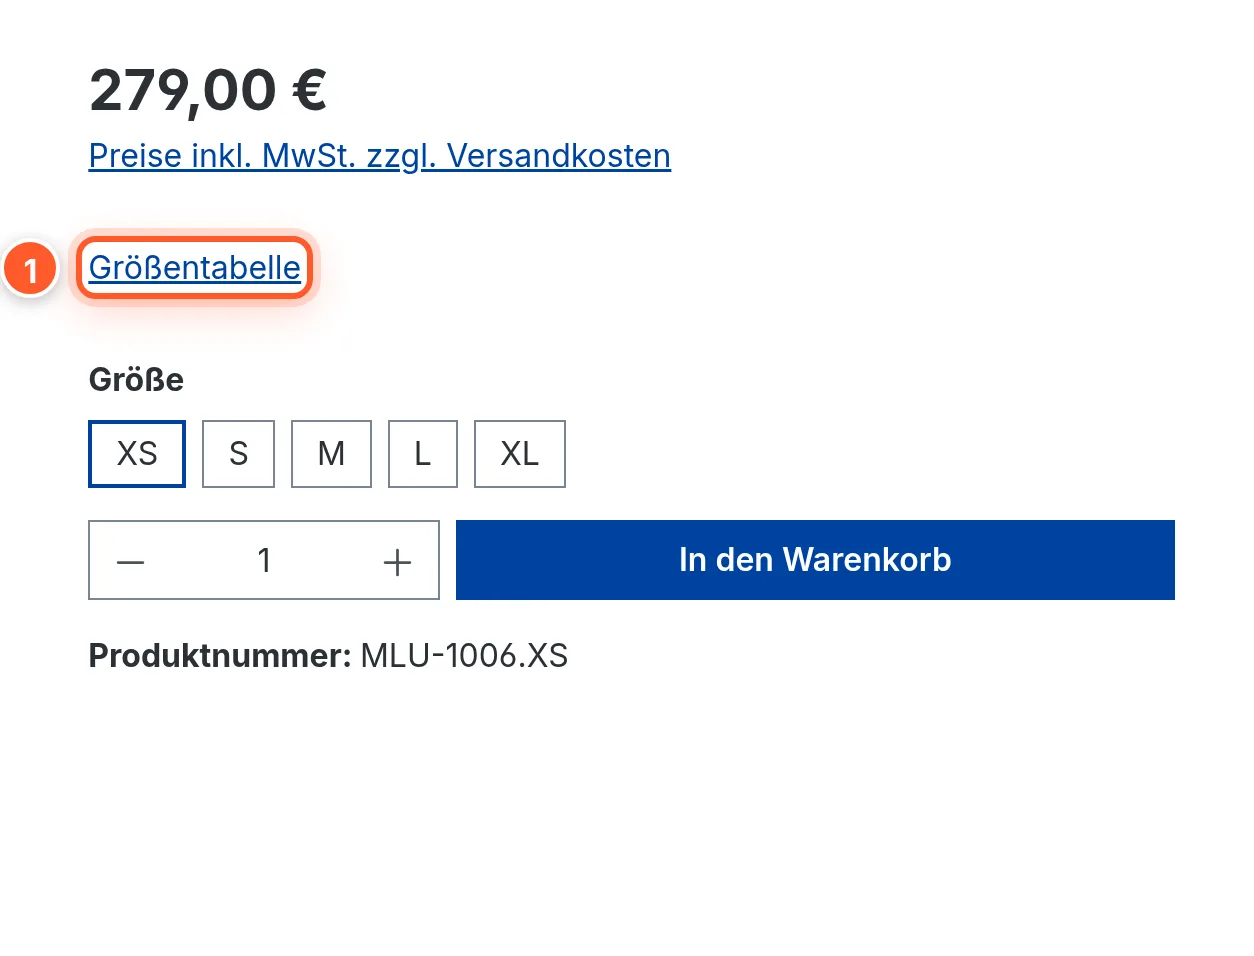
The chart opens via a link or button on the product page. Alternatively, you can show it directly on a page with the “Size chart” Shopping Experience element, e.g. on a size guide page.
Setup
- Install and activate the plugin under Extensions › My extensions.
- Open Products › Size charts and click “Add size chart”.
- Enter a Name (required, internal only) and a Display name. The display name is the popup’s title; without a display name it says “Size Chart”.
- Fill in the chart (see Edit the chart) and click Save.
- The assignment fields only appear in the “Size Chart Assignment” card after saving. For example, choose the category “Women” under “Assign by Category” and save again.
- Open a product from this category in the shop: the “Size Chart” link now appears below the price.
Managing size charts
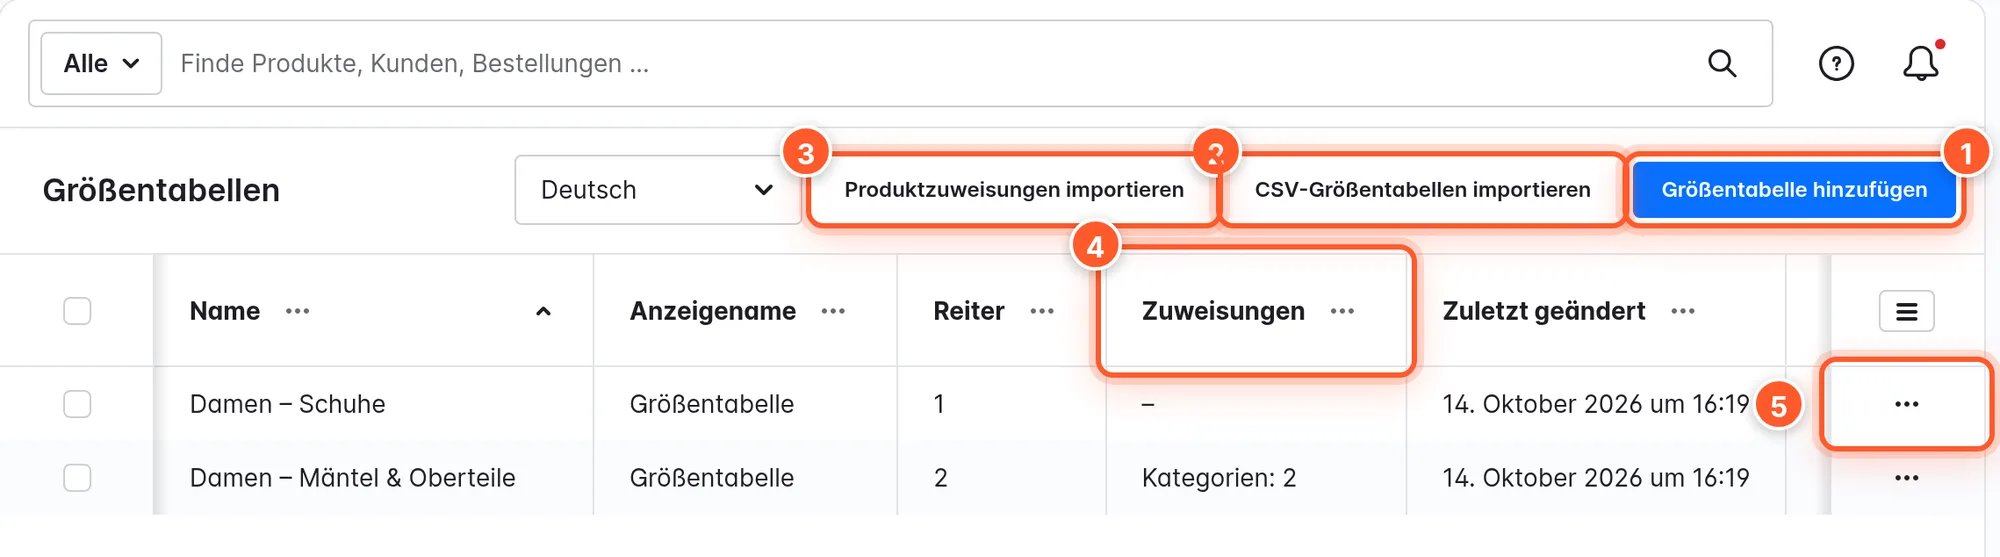
The overview shows each chart’s name, display name, number of tabs, a summary of the assignments 4 (product groups, brand rules, categories, property filter) and the date of the last change. Via the context menu 5 you duplicate a chart – handy when, for example, the men’s and women’s charts are built almost the same. The copy is called “
The two import buttons 2 and 3 are explained in the CSV import section.
Edit the chart
A size chart’s detail page has five cards: General, Size Chart, Chart layout, Text and image content and Size Chart Assignment.
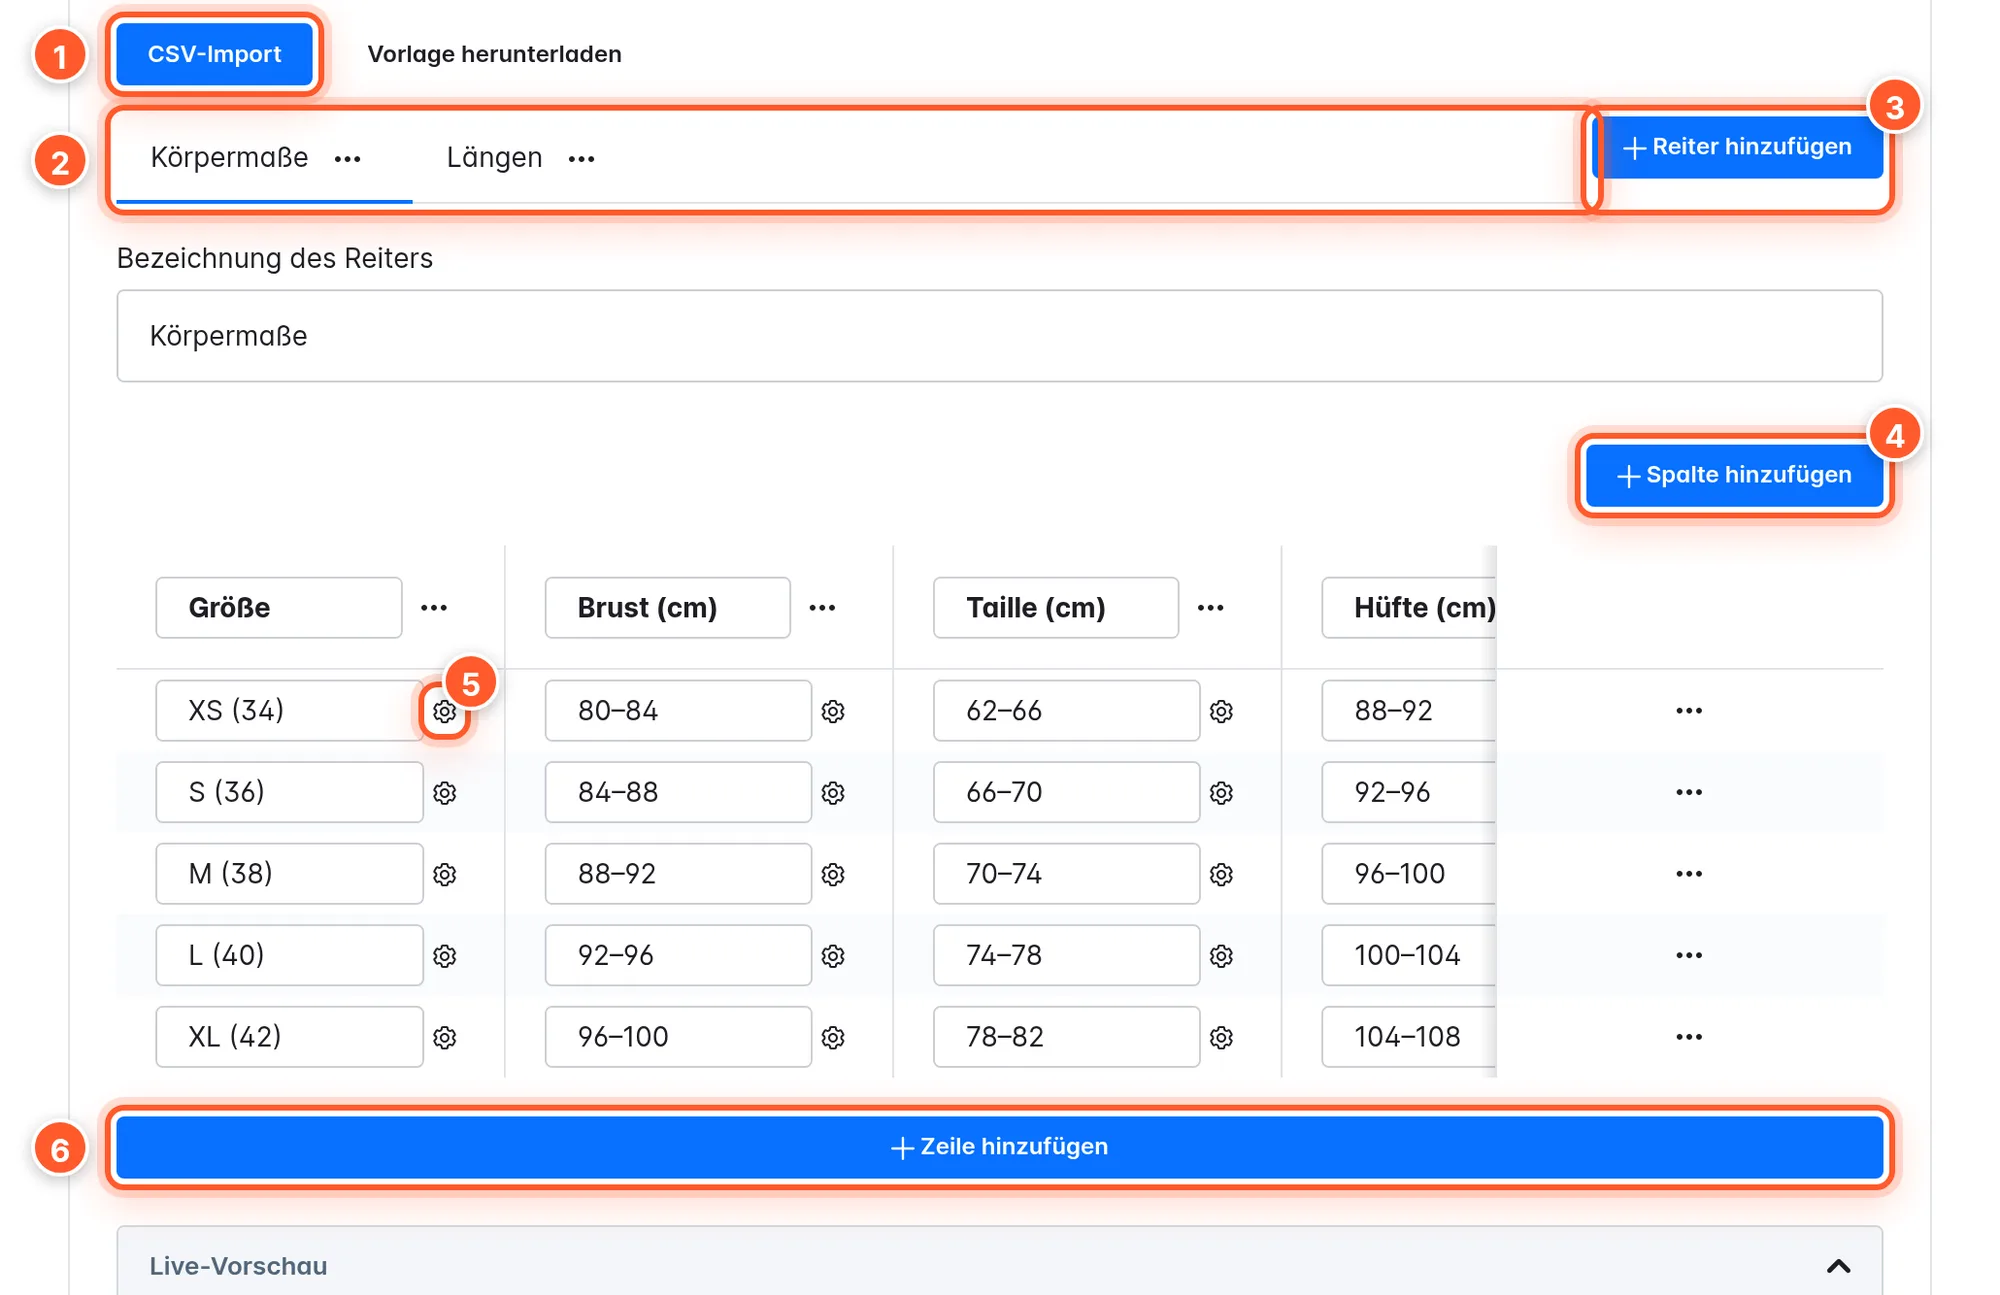
- Tabs 23: Each tab is a separate table with its own title (Tab name). Via the context menu (⋯) on the tab you move it left or right, sort all tabs alphabetically or delete it.
- Columns 4 and rows 6: The first row of input fields holds the column headings. Delete columns via the context menu on the heading, rows via the context menu at the end of the row.
- Format cell 5: The gear next to each cell opens a text editor (“Format table cell”). Use it to make a value bold, color it or add a link. You can recognize formatted cells by the colored gear; their input field is locked, and you keep editing them via the gear.
- CSV import 1: Replaces all tabs of this chart with the content of a CSV file. “Download template” gives you a sample file. Don’t forget to Save afterwards.
Below the editor, the Live preview shows the chart as it appears in the shop – including tabs and layout options. Every change is visible right away.
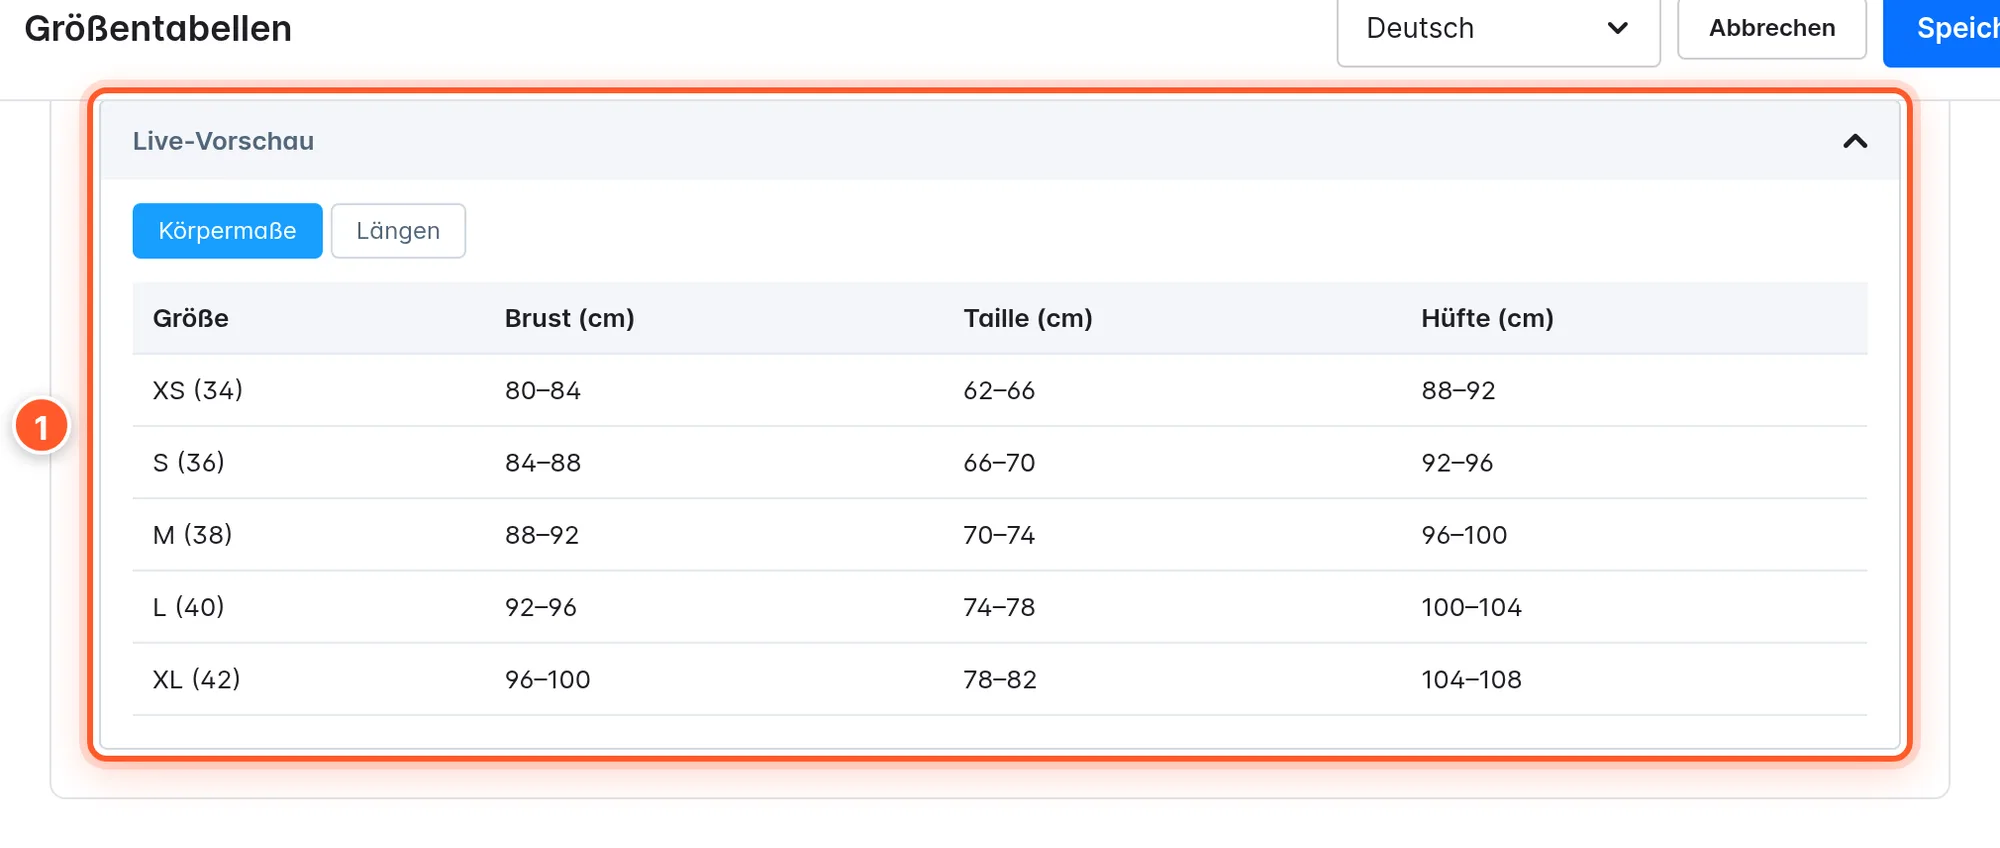
Chart layout
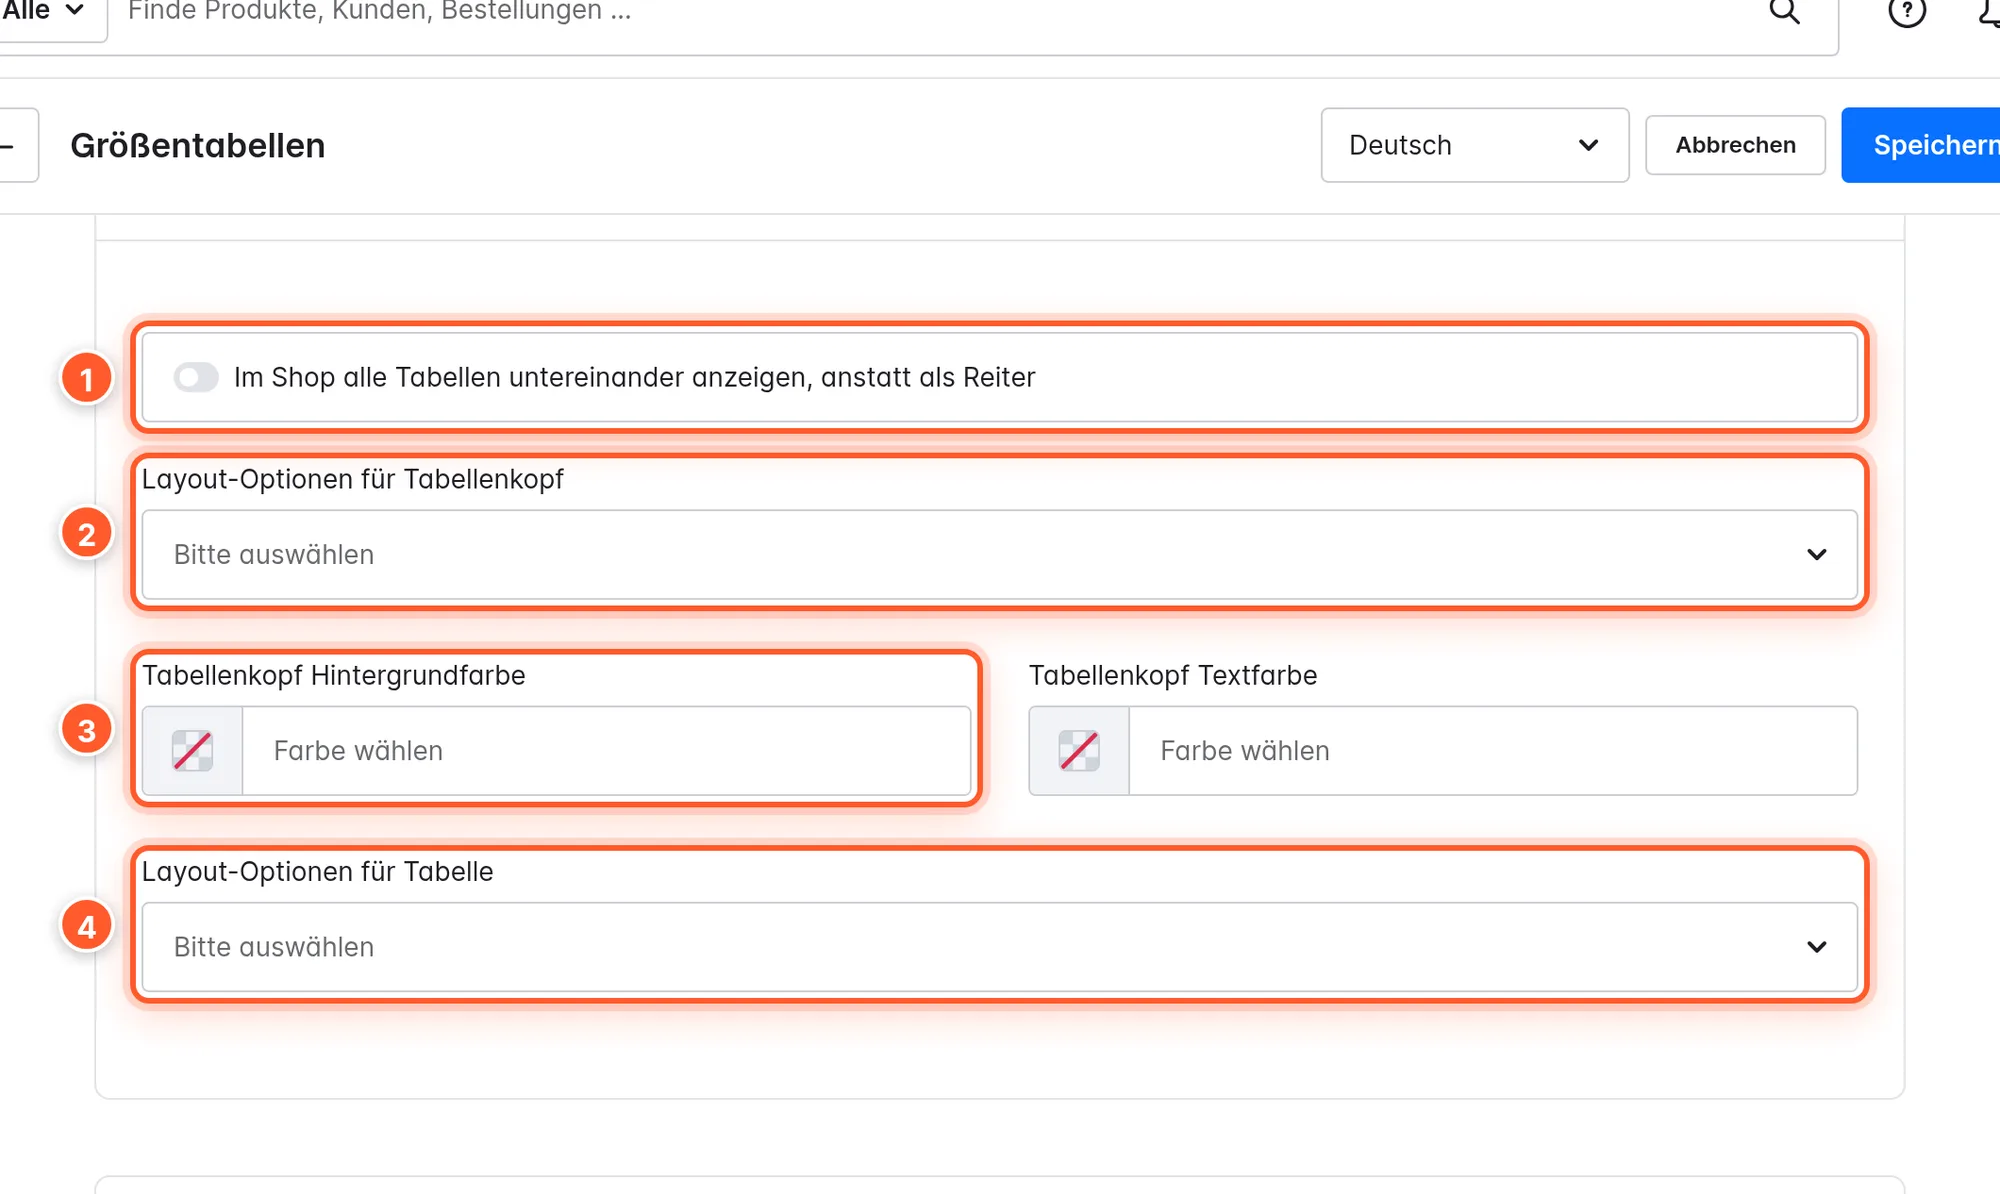
- Display all tables one below the other in the frontend instead of as tabs 1: All tabs are stacked, each with a title row. For these title rows you then set Table title background color and Table title text color.
- Layout options for table head 2: “Dark table head”.
- Table head background color / text color 3: Your own colors for the header row, e.g. in your brand color.
- Layout options for table 4: “Dark table”, “Condensed table rows”, “Bordered table”, “Striped table”, “Hover state on table rows” and “First table column sticky on scroll”. The latter is worth its weight in gold for wide tables on smartphones: the size column stays in place while the customer swipes to the right.
Colors and options only apply to this one chart. If several charts are on one page (e.g. in a Shopping Experience), they don’t affect each other.
Text and image content
In the Text and image content card you manage Text above chart, Image above size table, Text below chart and Image below size table. Typical use: a short measuring note above the chart and a “How to measure” graphic below it. In the popup, the content appears in this order: text above, image above, cm/inch switch, tabs, table, text below, image below.
If you need the same note on all charts, use the snippets instead (see Tips).
Translating
Choose a different language at the top right. The chart takes over the structure of the default language; the default language’s values appear in gray as placeholders in the fields. You only overwrite what changes – typically tab titles and column headings (“Brust” → “Bust”). Cells left empty are filled with the default language’s value when saving, so you don’t have to retype the numbers. Translate name, display name and texts as usual.
Assigning to products
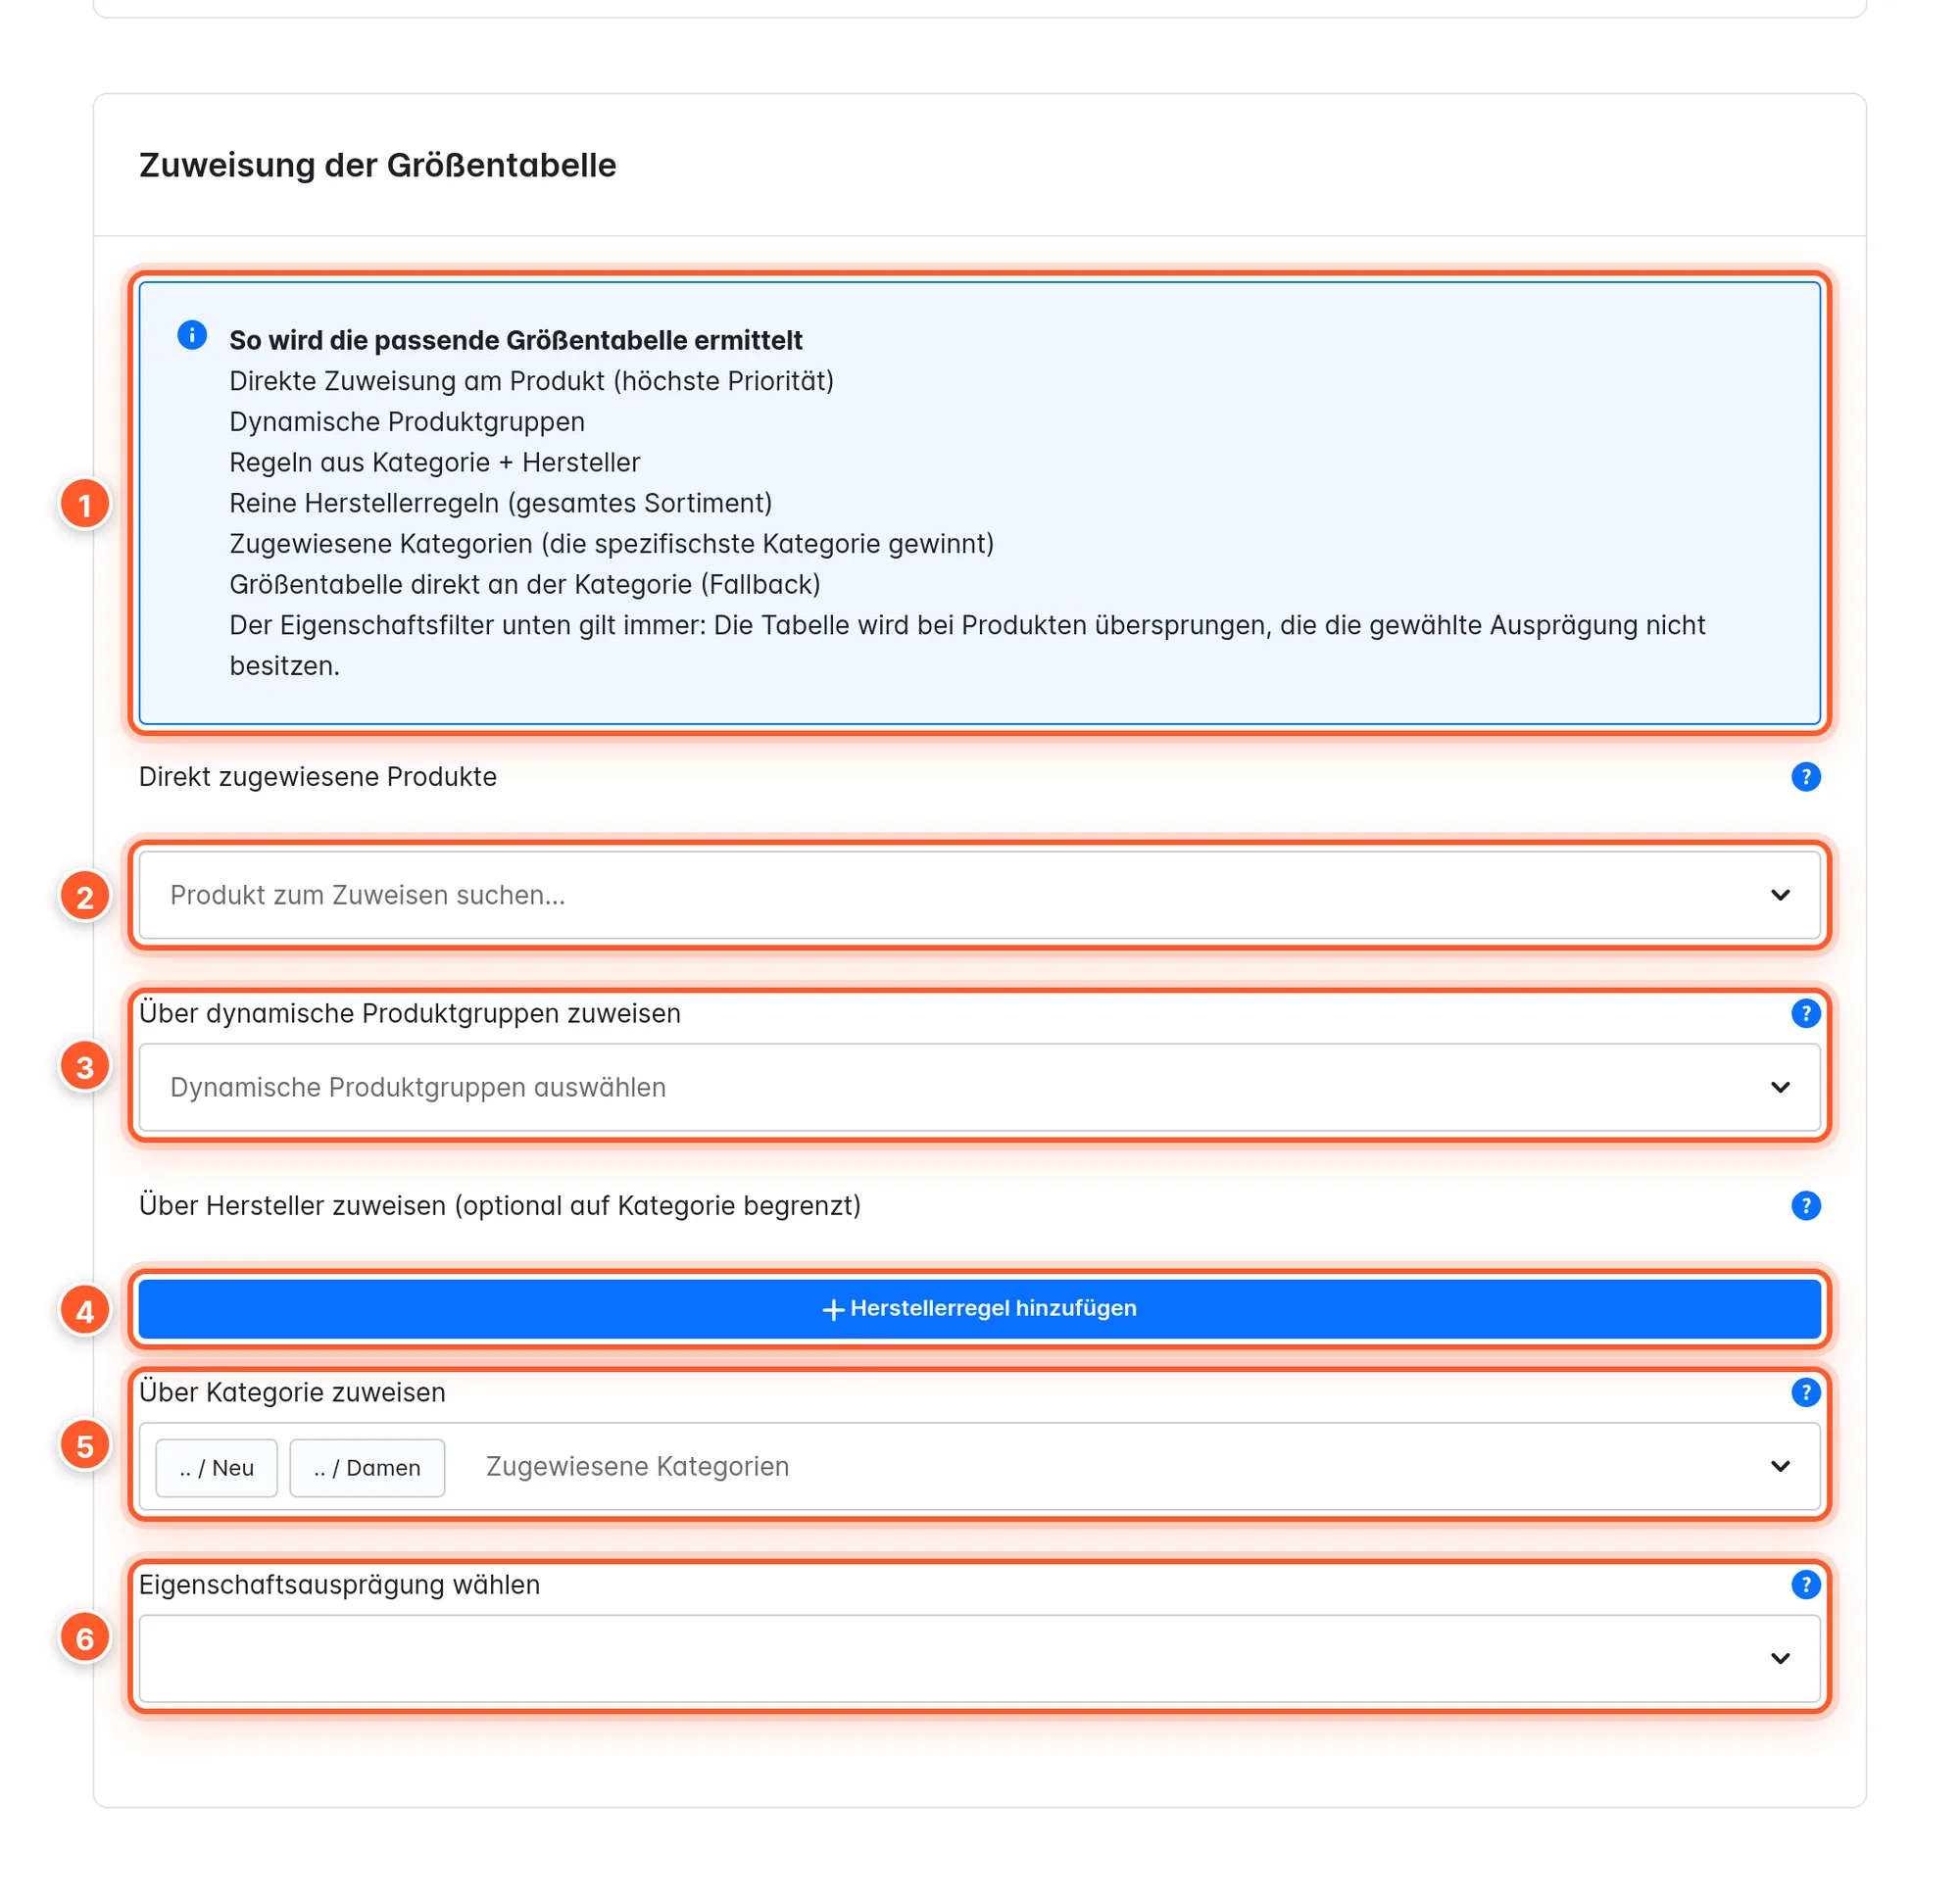
A chart can be assigned in several ways, also combined. If several charts match a product, the chart from the highest level wins:
- Direct assignment on the product 2 (highest priority): select the product via “Search for a product to assign…” – the assignment is saved immediately. The search shows main products; their variants inherit the chart. You’ll find the same assignment on the product in the Specifications tab (see Individual chart for a product).
- Dynamic product groups 3: The chart applies to all products that belong to at least one of the selected product groups. Ideal for rules like “all products with the property Fit = Slim”.
- Category + manufacturer rules 4: Via “Add manufacturer rule” you choose a manufacturer and optionally a category. With a category, the rule only applies to this manufacturer’s products in this category (including subcategories).
- Manufacturer-only rules 4: Without a category, the rule applies to the manufacturer’s whole range (“All categories (brand-wide)”) – perfect when one brand runs differently from the rest.
- Assigned categories 5: The chart applies to all products in the selected categories and their subcategories. If several charts match, the one from the most specific (deepest) category wins: “Women › Shoes” beats “Women”.
- Size chart set on the category itself (fallback): the “Assigned size chart” custom field in the “Flink Size Chart - Category” set on the category, meant for maintenance via Shopware import. Here too, the deepest category wins.
Property filter 6 (Choose property option): If an option is set, the chart only appears for products that have this option – no matter which way it’s assigned. That way you can put a women’s and a men’s chart on the same category, for example, and separate them via the “Gender” property. Within the same level, a chart with a property filter wins over one without.
The direct assignment also respects the property filter: if the product lacks the option or the assigned chart was deleted, the plugin automatically keeps searching through the remaining levels.
Example: The chart “Women – Coats & Tops” is attached to the category “Women”, the chart “Women – Shoes” is assigned directly to the two boots. All women’s products show the clothing chart, only the boots show the shoe chart – the direct assignment wins.
Individual chart for a product
If a single product runs differently, adjust the chart for just this product:
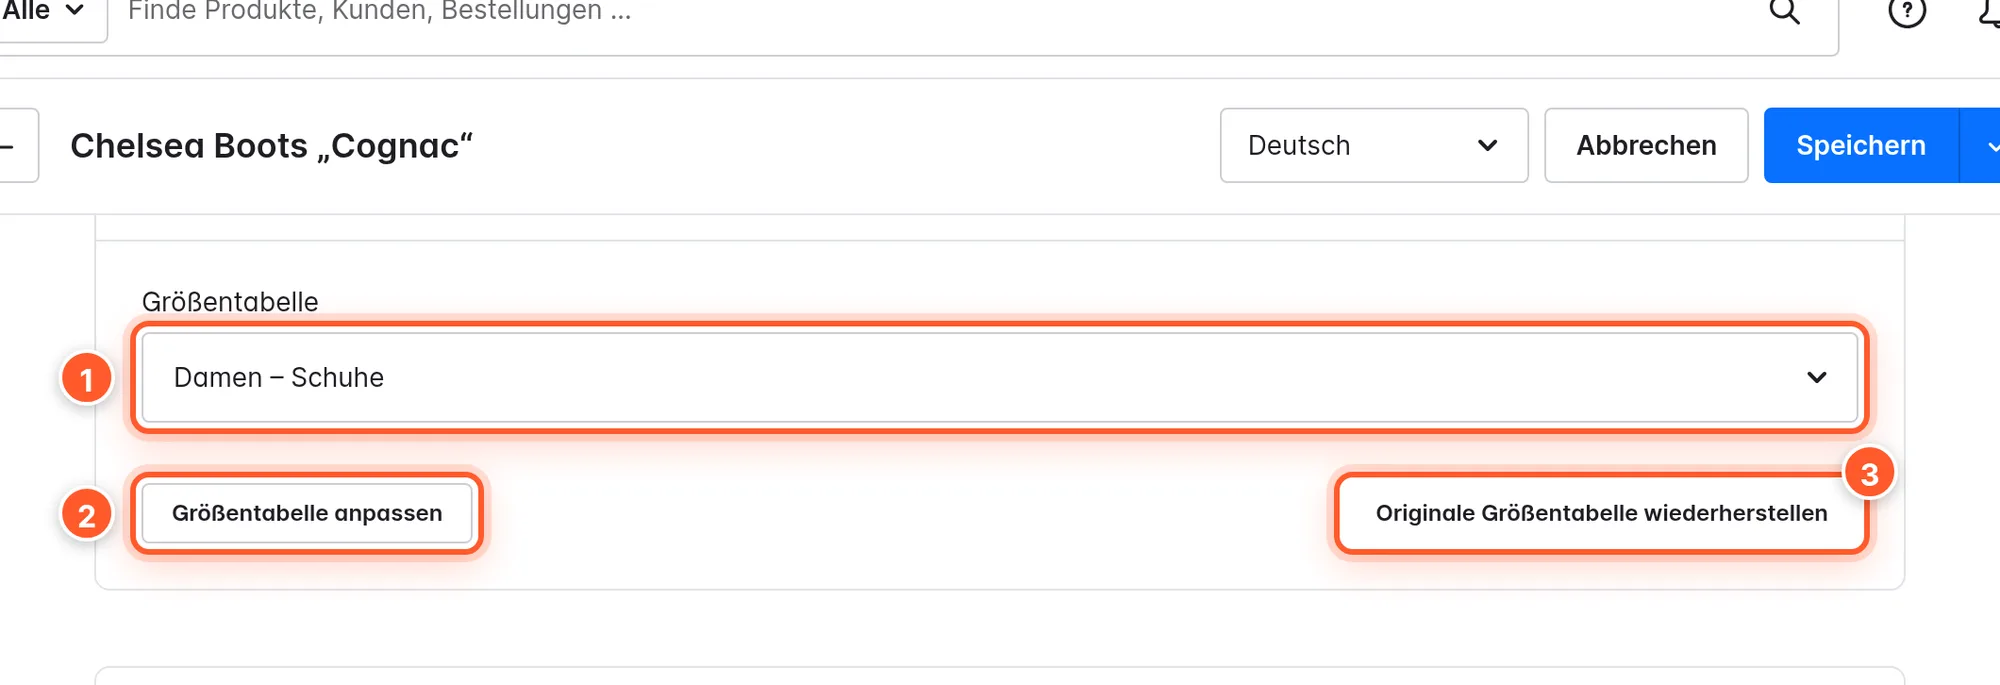
- Open the product and switch to the Specifications tab.
- In the Size chart 1 card, select the chart (that’s the direct assignment) and save the product.
- Click “Customize size chart” 2. The chart is taken over as a template; change the values and click Save. Next to the button it then says “Size chart has been customized”.
- “Restore original size chart” 3 discards the customization, and the product shows the central chart again.
Good to know:
- “Customize size chart” is only active if a chart is assigned to the product directly.
- In the customization you only change values. Adding or deleting tabs, columns and rows only works in the central chart.
- The customization applies to the main product and all its variants. Texts, images and layout still come from the central chart.
- Variants inherit the direct assignment. Via the inheritance symbol in the card, you can assign a different chart to a variant.
In the shop
Link or button
By default, a “Size Chart” text link below the price opens the popup. In the plugin configuration you turn it into a button, choose color, size and position – or place it right next to the size selection:
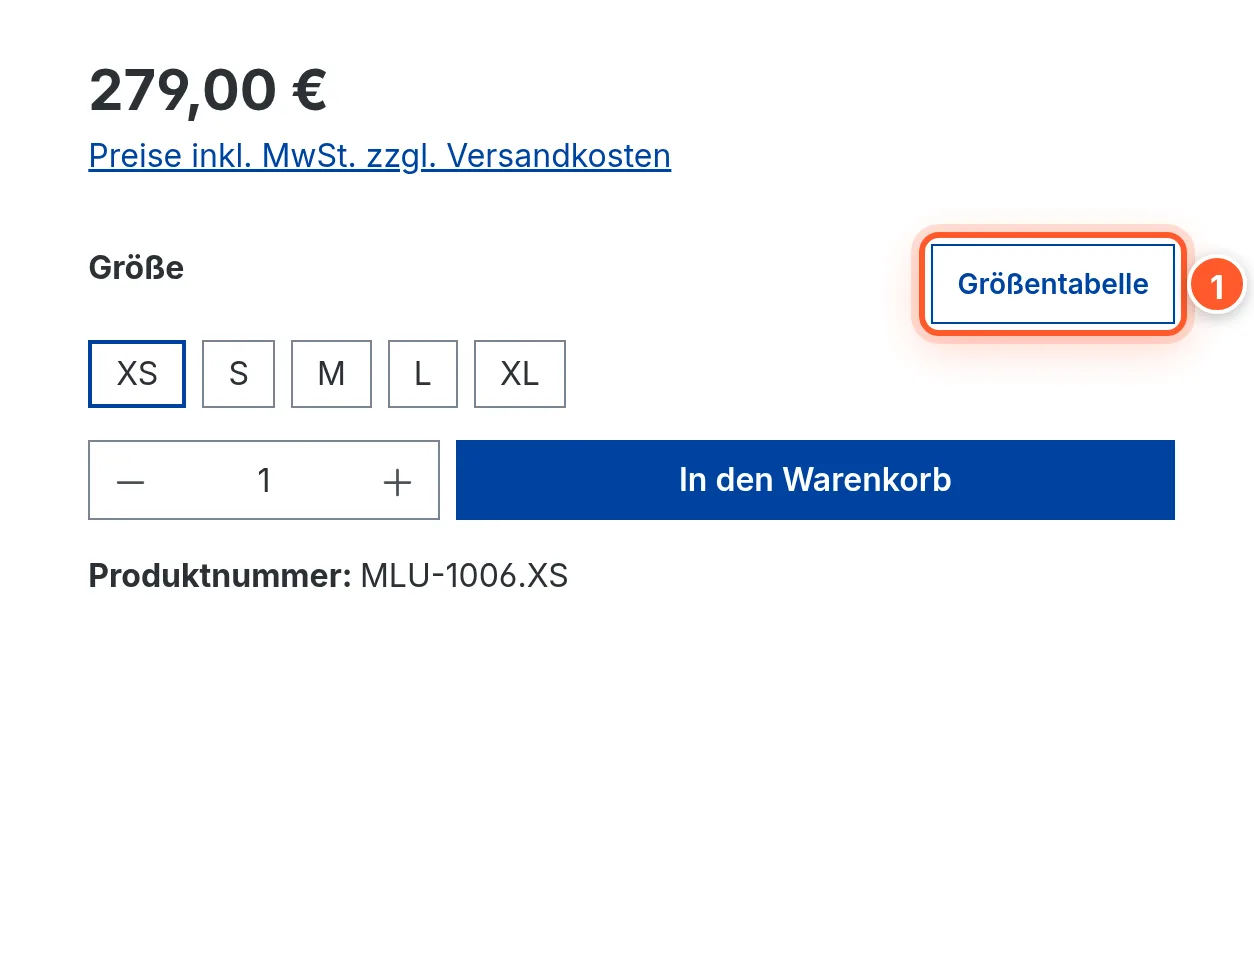
Under Show button/link next to product property (if available) you choose one or more properties, e.g. “Size” and “Shoe size”. If the product has variants with this property, the button sits next to their heading – exactly where the customer is thinking about their size. Products without these variants keep showing the button at the position from Position of the size chart modal link.
With Use the size table’s display name for the button label the button carries the chart’s display name, e.g. “Convert shoe sizes” instead of “Size Chart”.
Tools for customers
You switch on four helpers in the configuration under Size chart appearance:
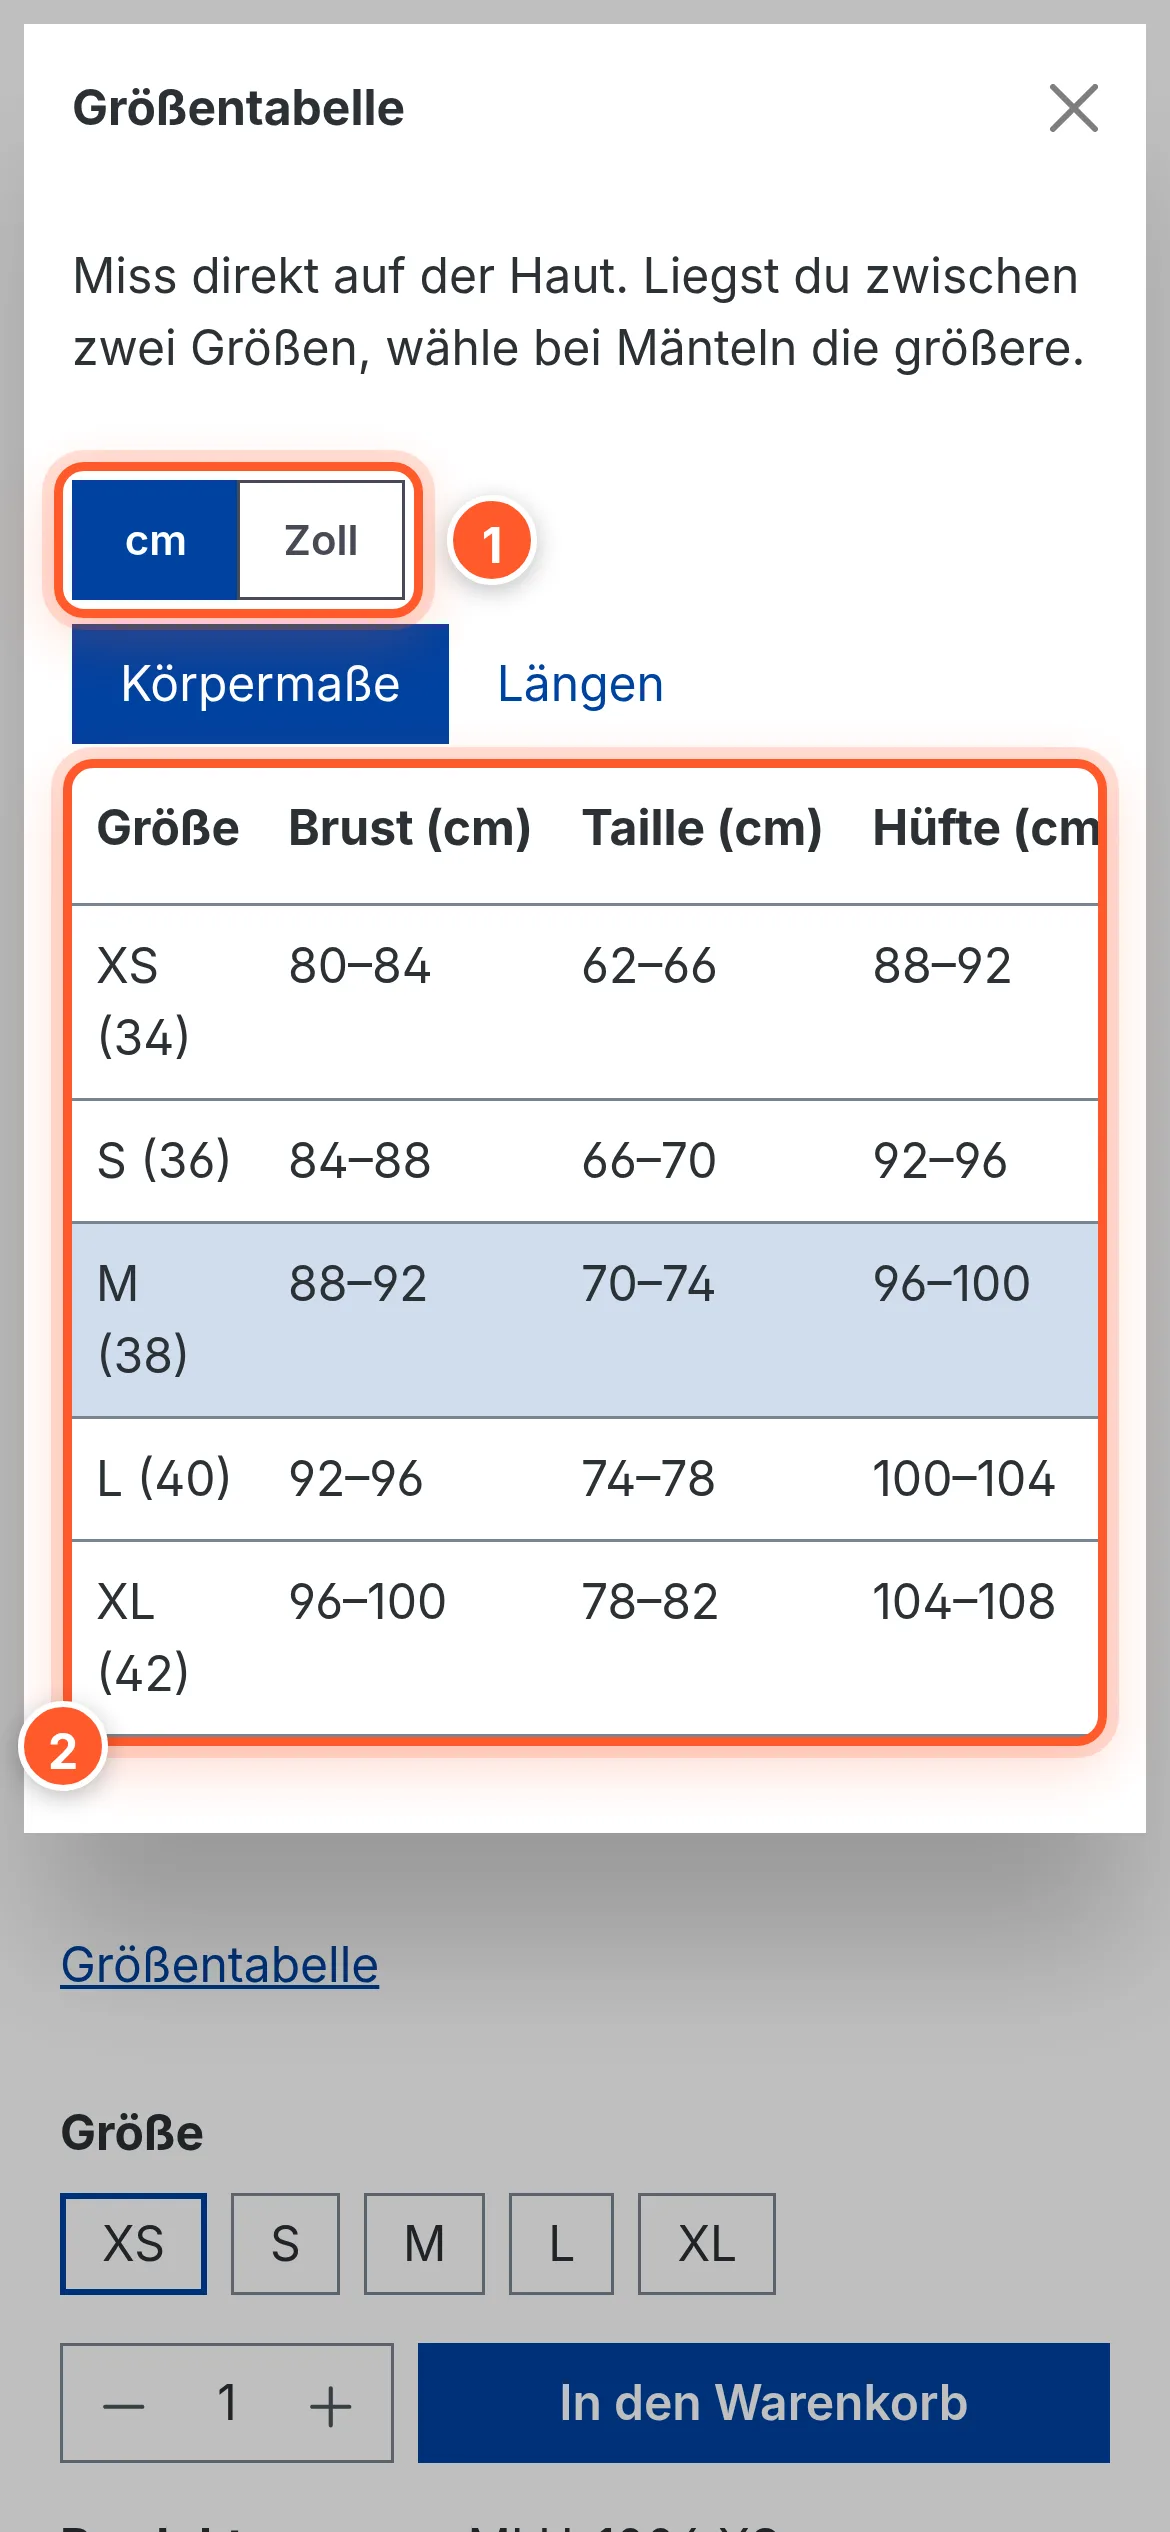
- cm/inch switch: The buttons “cm” and “inch” appear above the table. Converted are columns whose heading contains “cm” (e.g. “Chest (cm)”), and columns where at least half the values have a cm unit (e.g. “80 cm”). Ranges like “80–84” are converted completely, the result is rounded to one decimal place and “cm” in the heading becomes “in”. Columns like “EU” or “UK” stay unchanged.
- Highlight row: A click on a row highlights it, a second click removes the highlight. Several rows at once are possible, e.g. to compare two sizes. On by default.
- Column search: A search field sits below each heading. It only shows rows whose value contains the search term.
- Column filter: A filter icon on each heading opens a list of all the column’s values to tick, with “Select All”, “Apply” and “Clear”.
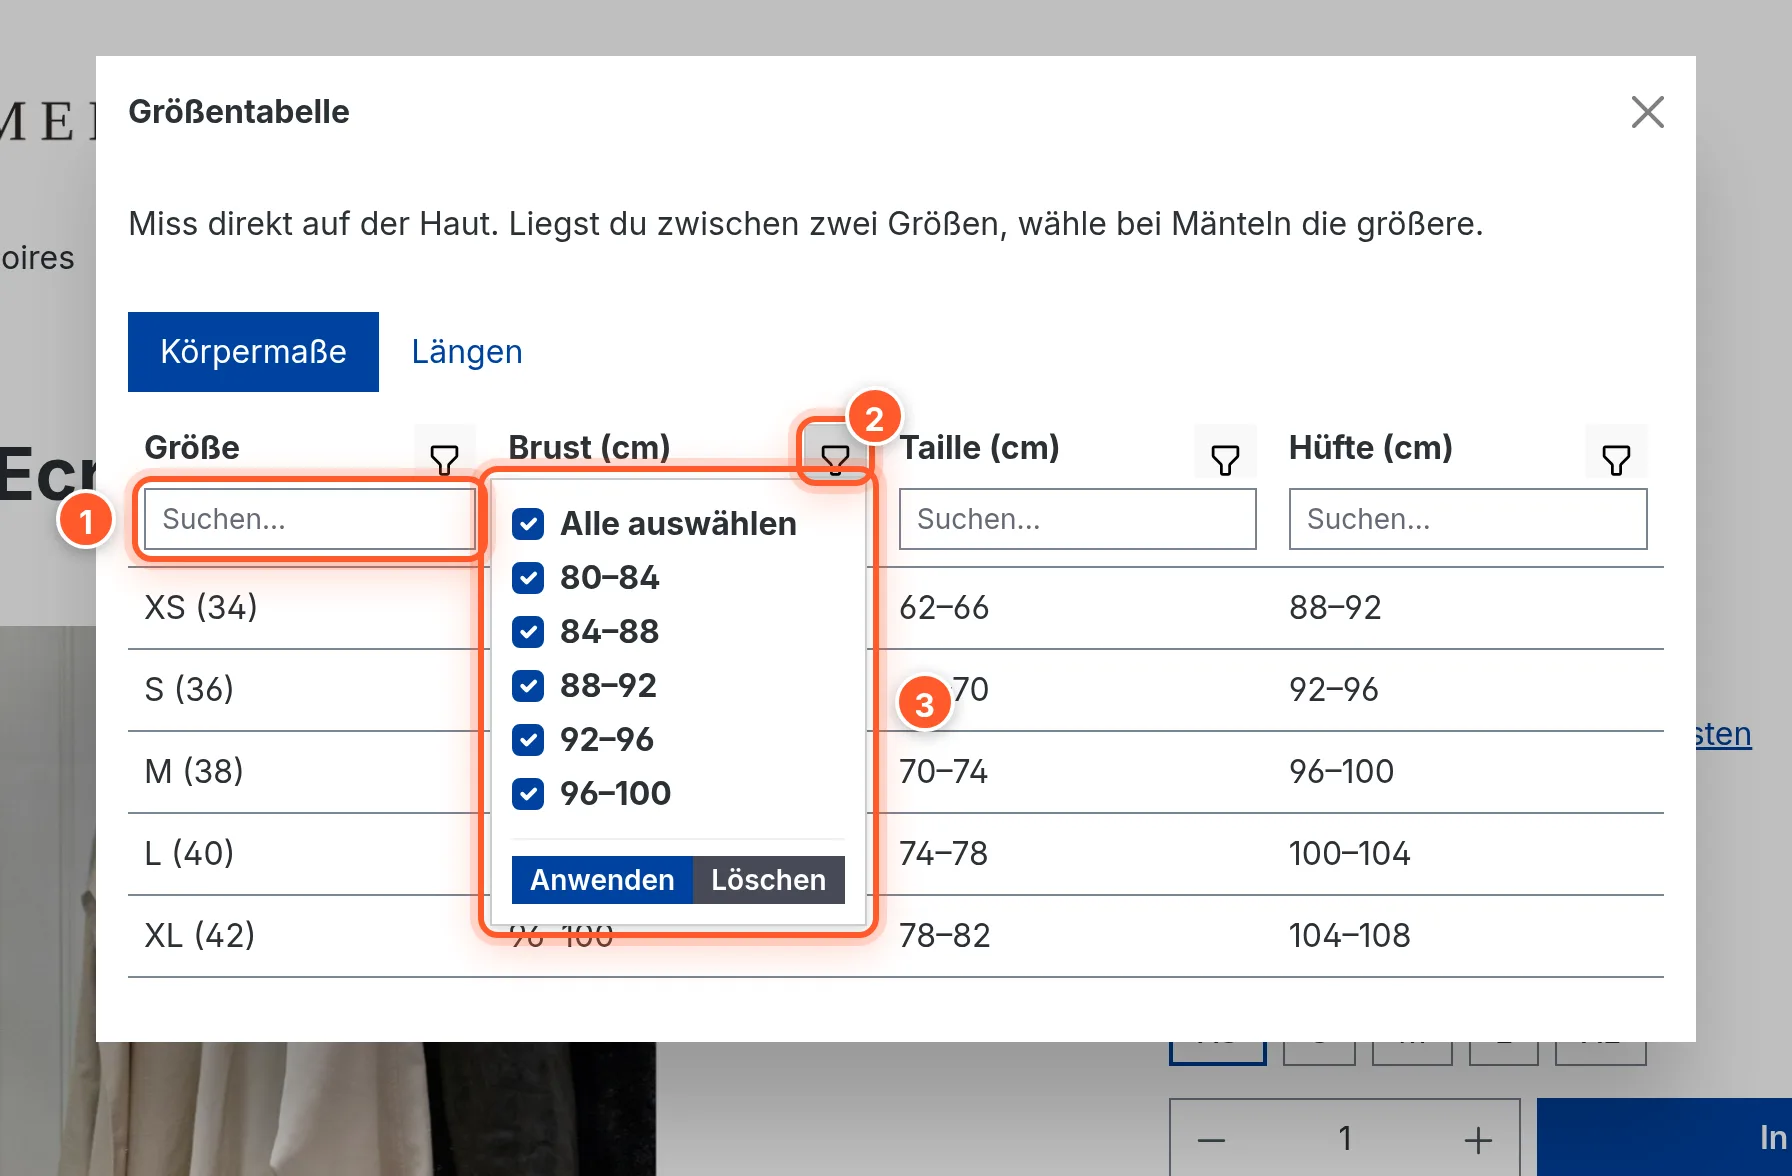
Search and filter can be combined. When switching between cm and inches they’re reset, because the values change.
Popup width
The popup is 500 px wide by default. For tables with many columns, choose “Large (800px)” or “Extra large (1140px)” under Width of the size chart popup, or let the width follow the table automatically with Make modal width change with content. If a table is still too wide, it scrolls horizontally – with Keep table column headings on one line (default: on) the headings don’t wrap.
Mobile
Shopping Experiences
In the Shopping Experience editor, you’ll find the “Size chart” block in the “Size charts” block category. Drag it into a section and choose the chart you want in the element settings. It appears right on the page, without a popup – ideal for a central size guide page with all charts stacked. The cm/inch switch, row highlighting, search and filter work just the same there; product-specific customizations aren’t available in the element.
CSV import
Importing one chart
In the Size Chart card, “CSV import” imports a file into the open chart. Structure:
- Each tab starts with its name in the first cell,
- then a row with the column headings,
- then the value rows.
- An empty row separates two tabs.
Tops – Chest/Waist
Size;Chest (cm);Waist (cm)
XS;80;62
S;85;66
M;90;70

Sleeve length
Size;Length (cm)
XS;56
S;58
M;60
Semicolons and commas are recognized as separators. Save the file as UTF-8 (in Excel: file type “CSV UTF-8”) so umlauts and other special characters come through correctly.
The import replaces all existing tabs of the chart. It only takes effect with Save – if you discard the change, the old chart is kept.
Several charts at once
In the overview, “Import CSV size charts” opens a dialog: “Choose CSV files” and upload one or more files; each file becomes a new chart. The structure matches the single import, except that the first row contains the size chart’s name. The file name doesn’t matter. Before the import, a list shows the detected name and a status for each file (“Ready to import”, “Name already exists”, “Duplicate in current selection”); you remove individual entries via the context menu. “Start import” creates the charts.
Importing product assignments
For many products at once, use “Import product assignments” in the overview:
- Step 1: Upload a CSV with the columns
productNumber;sizeChartId(product number or product ID, size chart ID). “Download all size chart name to ID mappings” gives you your charts’ IDs, “Download template” the format. The preview shows the resolved product, the chart and a status for each row (“Ready”, “Product not found”, “Size chart not found”, “Duplicate product”). - Step 2 (optional): Upload a CSV with an individual chart per product, structured like the single import. For a bulk upload, the file name has to match the product number (or product ID) exactly, e.g.
SW10001.csv. - “Import assignments” saves everything. The message shows how many assignments were created and updated.
Assignments imported this way are direct assignments (level 1).
Shopware Import/Export
For maintenance via Settings › Import/Export, the plugin creates the “Flink Size Charts” profile (CSV with semicolons). It contains name, display name, texts, images, layout options and the charts themselves (as JSON). You maintain direct assignments by importing the product custom field “Assigned size chart” (set “Flink Size Chart - Product”), and category assignments via the category custom field of the same name – each with the size chart’s ID.
Settings
Open the plugin configuration under Extensions › My extensions › Size Charts › ⋯ › Configure. All values can be set per sales channel.
General
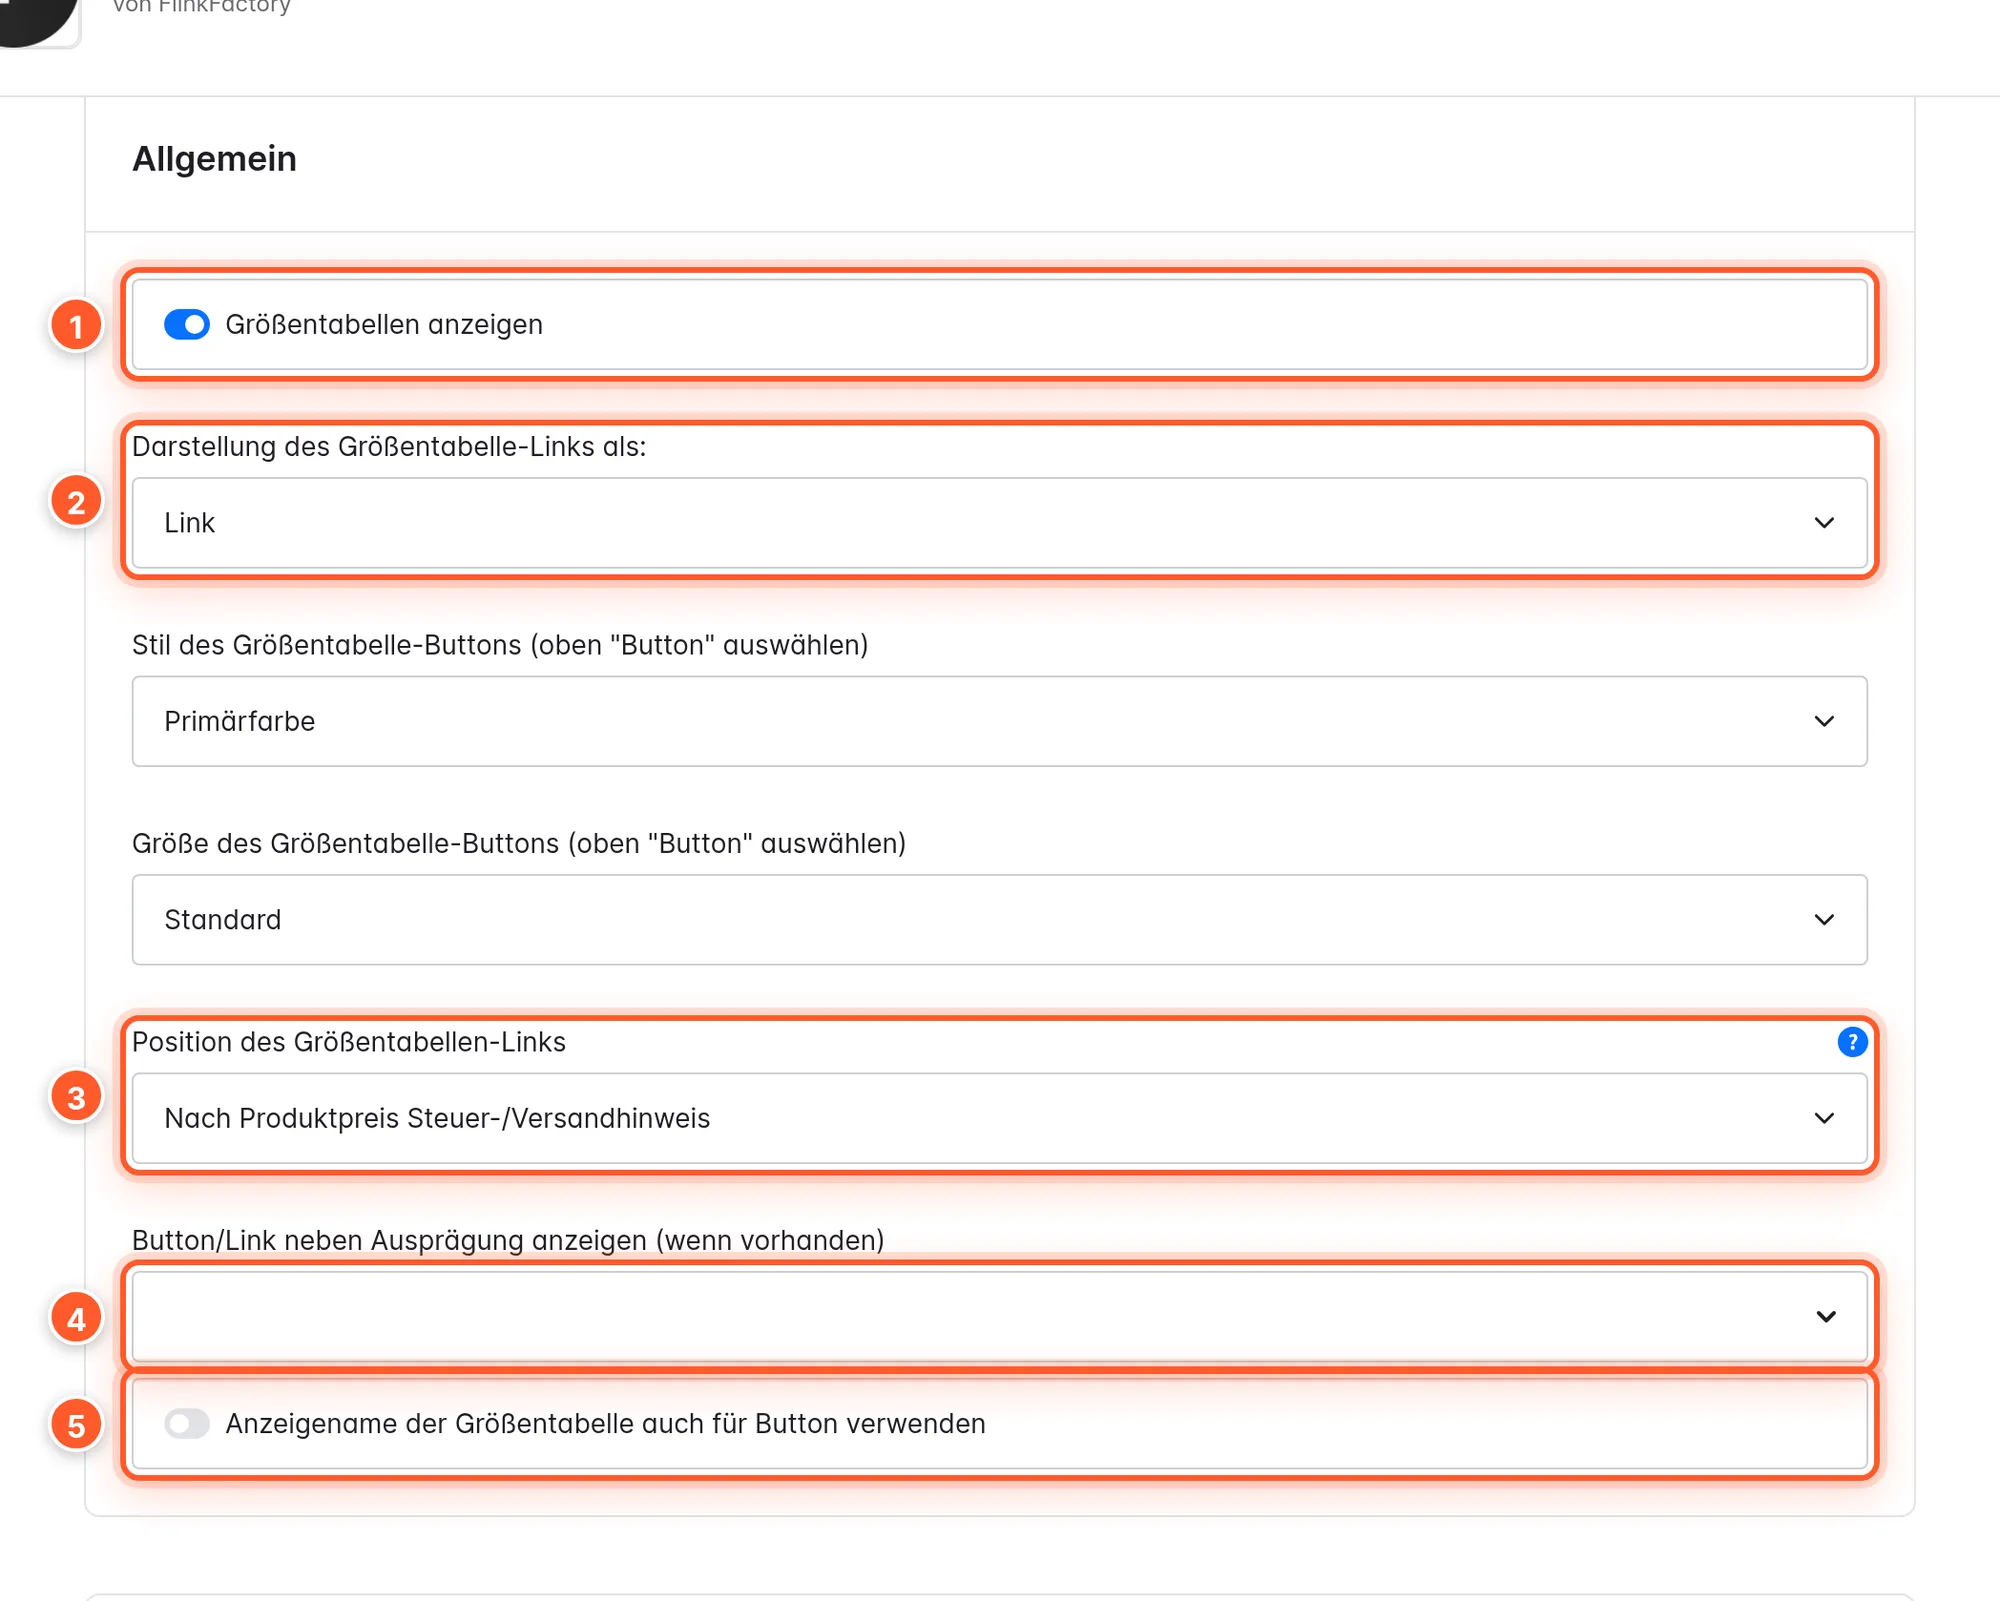
| Setting | Effect | Default |
|---|---|---|
| Show size charts | Global switch for the link/button and popup in the shop. | on |
| Display size chart modal link as: | Link or button. | Link |
| Style of the size chart button (choose “Button” above) | Primary color, Secondary color, Success, Error, Information, Notice, each also as “Outline …”. Only with “Button”. | Primary color |
| Size of the size chart button (choose “Button” above) | Small, Default, Large. Only with “Button”. | Default |
| Position of the size chart modal link | Before/After product price, Before product tax information/After product price tax information, Before/After delivery information, Before/After configurator, Before/After add to cart, Before/After order number. Depending on the theme, not all positions are available – try them one after another. | After product price tax information |
| Show button/link next to product property (if available) | Properties next to whose variant selection the link sits. Without matching variants, the position above applies. | empty |
| Use the size table’s display name for the button label | Button text = the chart’s display name instead of “Size Chart”. | off |
Size chart appearance
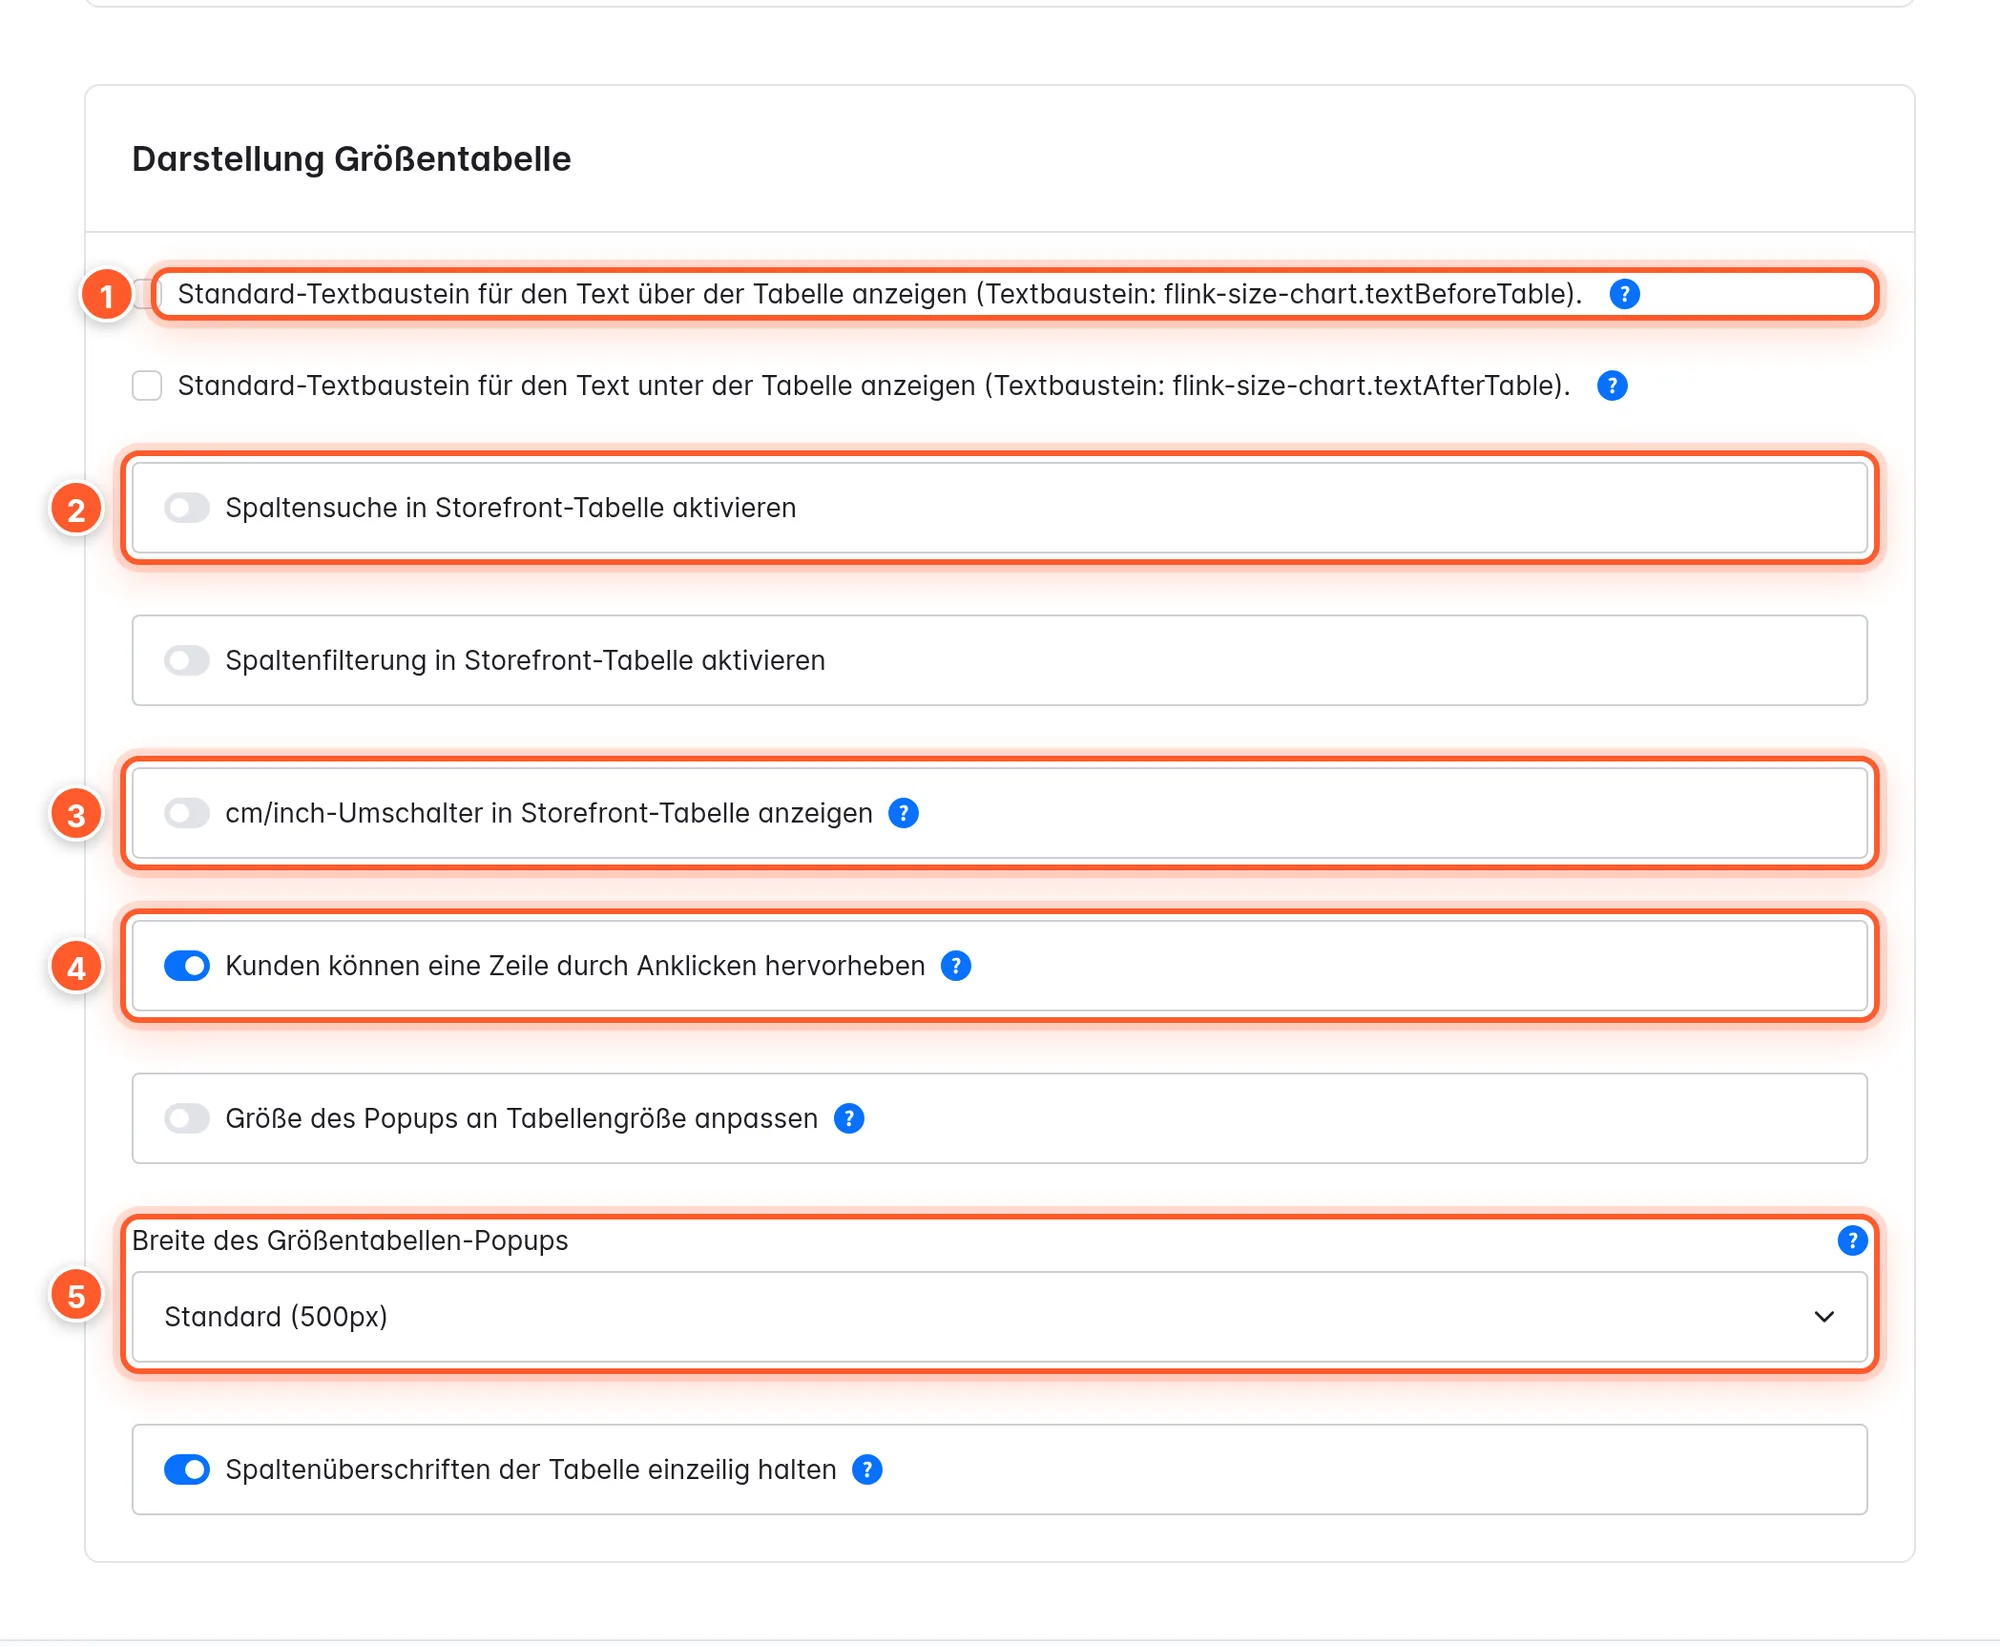
| Setting | Effect | Default |
|---|---|---|
| Show default text snippet for text above table | Shows the flink-size-chart.textBeforeTable snippet above every chart that has no “Text above chart” of its own. | off |
| Show default text snippet for text below table | The same with flink-size-chart.textAfterTable below the table. | off |
| Enable column search in storefront table | Search field below each column heading. | off |
| Enable column filtering in storefront table | Filter icon with a value list on each column heading. | off |
| Show cm/inch unit switch in storefront table | “cm”/“inch” buttons above the table. | off |
| Allow customers to highlight a row by clicking it | Highlight rows with a click. | on |
| Make modal width change with content | Popup width follows the table; can change when switching tabs. | off |
| Width of the size chart popup | Default (500px), Large (800px), Extra large (1140px). Ignored if the option above is active; Large and Extra large only take effect on wide enough screens. | Default (500px) |
| Keep table column headings on one line | Headings don’t wrap; tables that are too wide scroll horizontally. | on |
Snippets
Under Settings › Snippets you change the texts in the shop per language:
| Key | Text (English) |
|---|---|
flink-size-chart.modalButtonText | Size Chart (link/button) |
flink-size-chart.modal.title | Size Chart (popup title without display name) |
flink-size-chart.unit.cm / flink-size-chart.unit.inch | cm / inch |
flink-size-chart.search.placeholder | Search… |
flink-size-chart.textBeforeTable / flink-size-chart.textAfterTable | empty (default text above/below every chart) |
Tips & hidden features
- One category assignment is often enough: Categories apply including subcategories. Attach the general chart to “Women” and only the exceptions (e.g. shoes) to deeper categories or directly to products.
- One brand runs small? A manufacturer-only rule without a category beats any category assignment – without you having to touch individual products.
- Global note for all charts: Enter e.g. “Between two sizes? Pick the larger one.” in the
flink-size-chart.textBeforeTablesnippet and activate Show default text snippet for text above table. HTML is allowed. Charts with their own text keep showing their own. - Links in cells: Via the gear on a cell you can link a size to a matching category or a measuring guide, for example.
- Switch doesn’t work? Check the column headings: only columns with “cm” in the heading or with “cm” on the values are converted. “Chest (cm)” works, “Chest circumference” doesn’t.
- Wide tables on smartphones: “First table column sticky on scroll” in the chart layout keeps the size column visible.
- Size guide page: Several “Size chart” blocks stacked in a Shopping Experience make a complete size overview for your navigation or footer.
- Quick View: If you use our Quick View, the size chart link deliberately only appears on the product page, not in the popup.
Frequently asked questions
No size chart link appears on the product page.
Check in this order: Is Show size charts active (in the right sales channel too)? Is a chart assigned to the product – directly, via a product group, a manufacturer or a category? Does the chart have a property filter that the product doesn’t meet? Then clear the cache under Settings › System › Caches & indexes.
The product shows the wrong chart.
The chart from the highest level applies (direct › product group › category + manufacturer › manufacturer › category › category custom field). A forgotten direct assignment is often the reason: check the “Size chart” card on the product’s Specifications tab.
The assignment via a dynamic product group doesn’t work.
Shopware assigns products to their dynamic product groups via an index. After creating or changing a product group, update the indexes under Settings › System › Caches & indexes and clear the cache.
The button doesn’t appear at the chosen position.
Some positions don’t exist in every theme. Choose a different position. If you’ve set Show button/link next to product property, the button always sits next to the variant selection for products with this variant.
The switch, search or filter don’t respond.
These features need the plugin’s JavaScript in the theme. Recompile the theme (e.g. bin/console theme:compile) and clear the cache.
“Customize size chart” is grayed out.
The button is only active if a chart is assigned to the product directly in the same card. Select it, save the product and then click “Customize size chart”.