
Documentation
AI Virtual Fitting Room
Version 1.0.0 · updated November 18, 2026
Overview
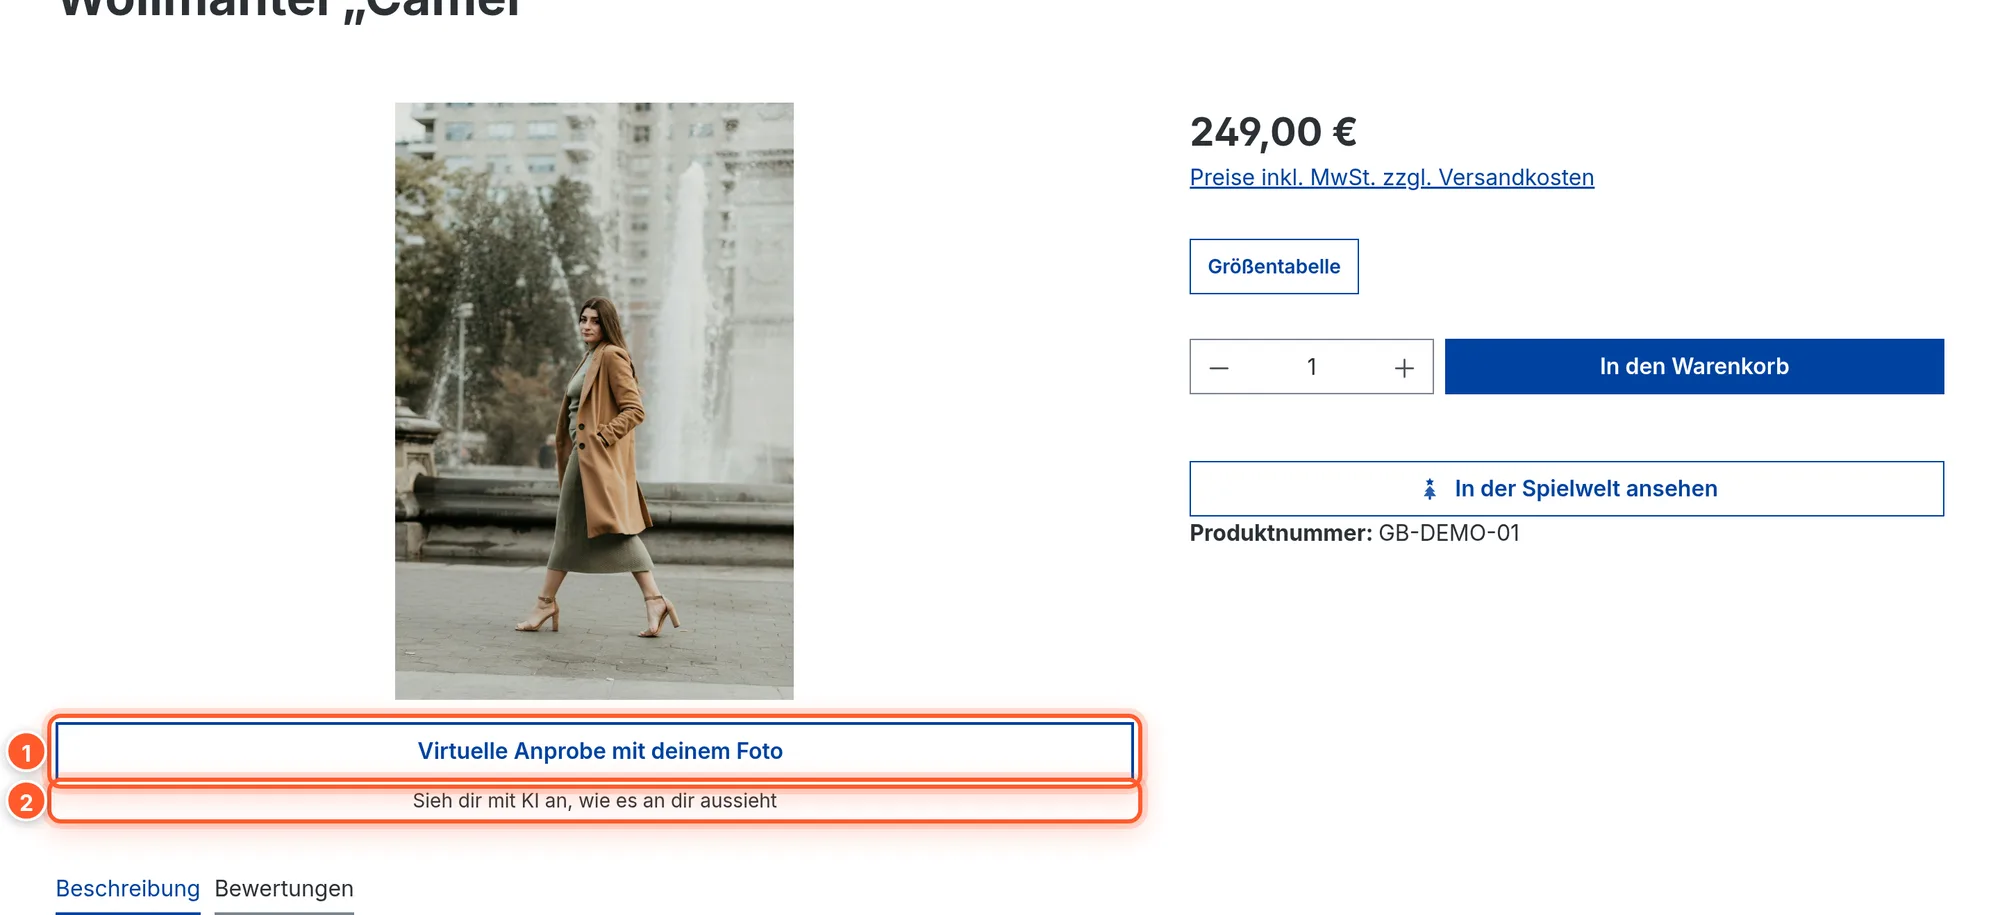
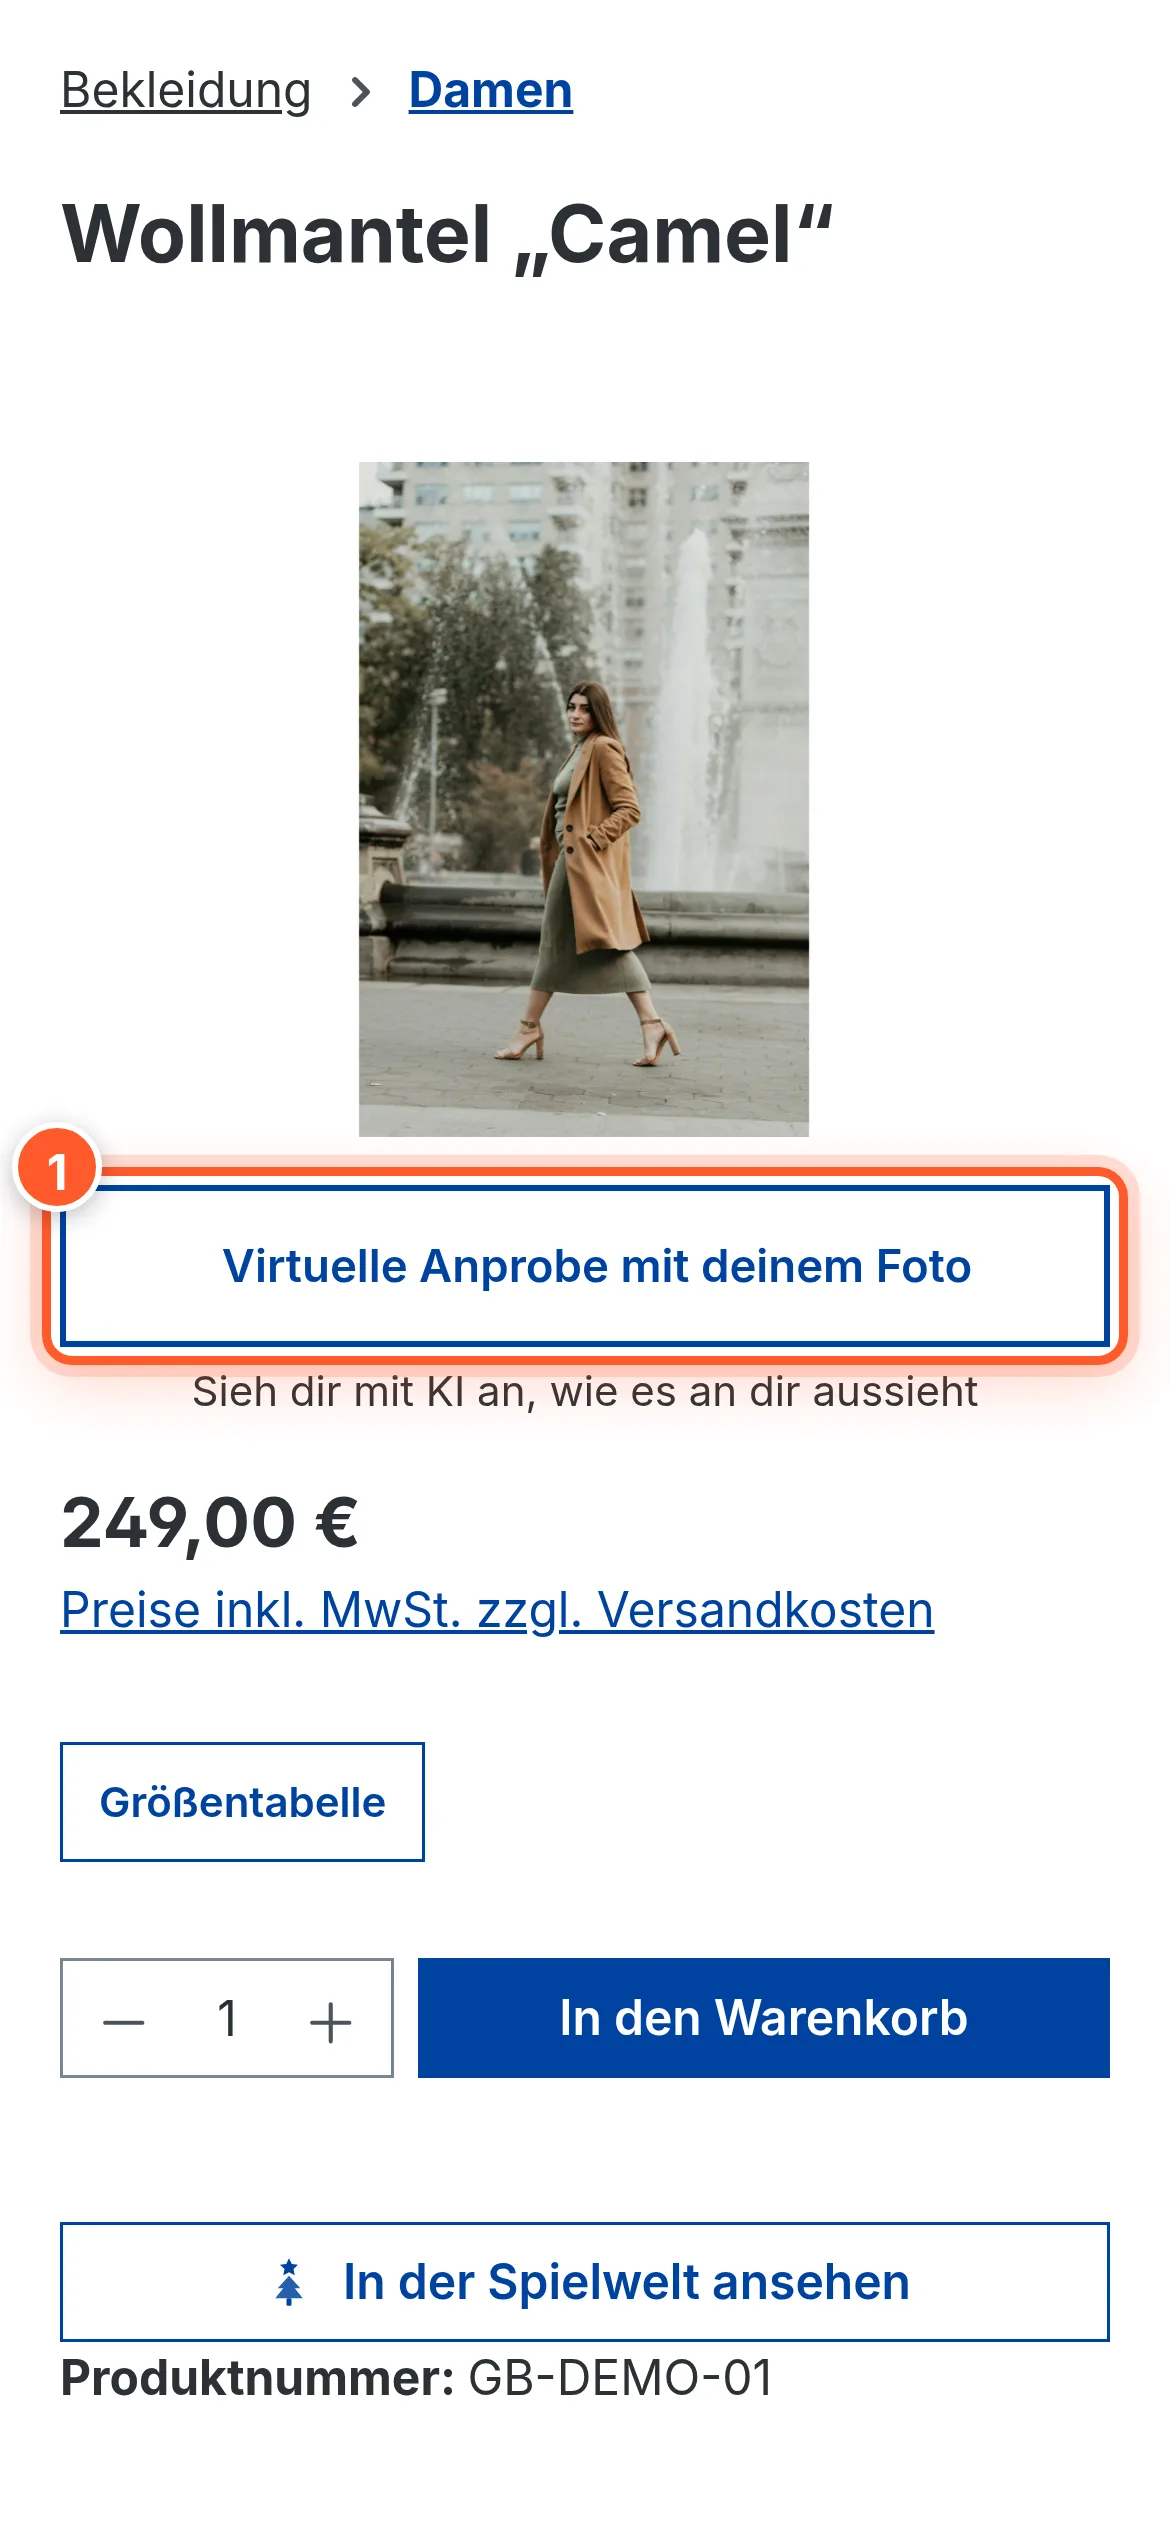
With the AI Virtual Fitting Room, your customers try on clothes before they buy: on the product page, the “Virtual try-on with your photo” button 1 appears below the image gallery. In the AI fitting room they upload a photo of themselves, and the AI creates an image showing them wearing the garment – with matching pose, light and perspective.
The extension is a Shopware app. Image generation is handled by the flink service at apps.flinkfactory.com; your shop connects to it automatically when you activate the app. You don’t need your own AI keys or servers. The interface is available in German and English and is optimized for smartphones.
Try it live: Demo shop – camel wool coat (log in with the demo customer account shown in the demo shop).
Setup
- Book, install and activate the app (Extensions › My extensions). On activation, the shop registers with the flink service.
- Enable products – either all at once via Activate AI Try-On for all products in the app configuration, or individually per product via the Enable AI try-on custom field (see Product settings).
- Optional, but recommended: add a cut-out Garment image for try-on and a short Garment type description (e.g. “coat”) for each product.
- Update your privacy policy (see Privacy).
- Test it in the storefront: open the product page, accept the Comfort features in the cookie banner, log in with a customer account, upload a photo, Try On.
The button only appears if the product is enabled and has an image (try-on image or the product’s cover image). It’s shown below the gallery of the “Gallery & buy box” block (default product page layout in Shopware 6.7) or below the buy box on the classic product page.
How a try-on works
1. Log in
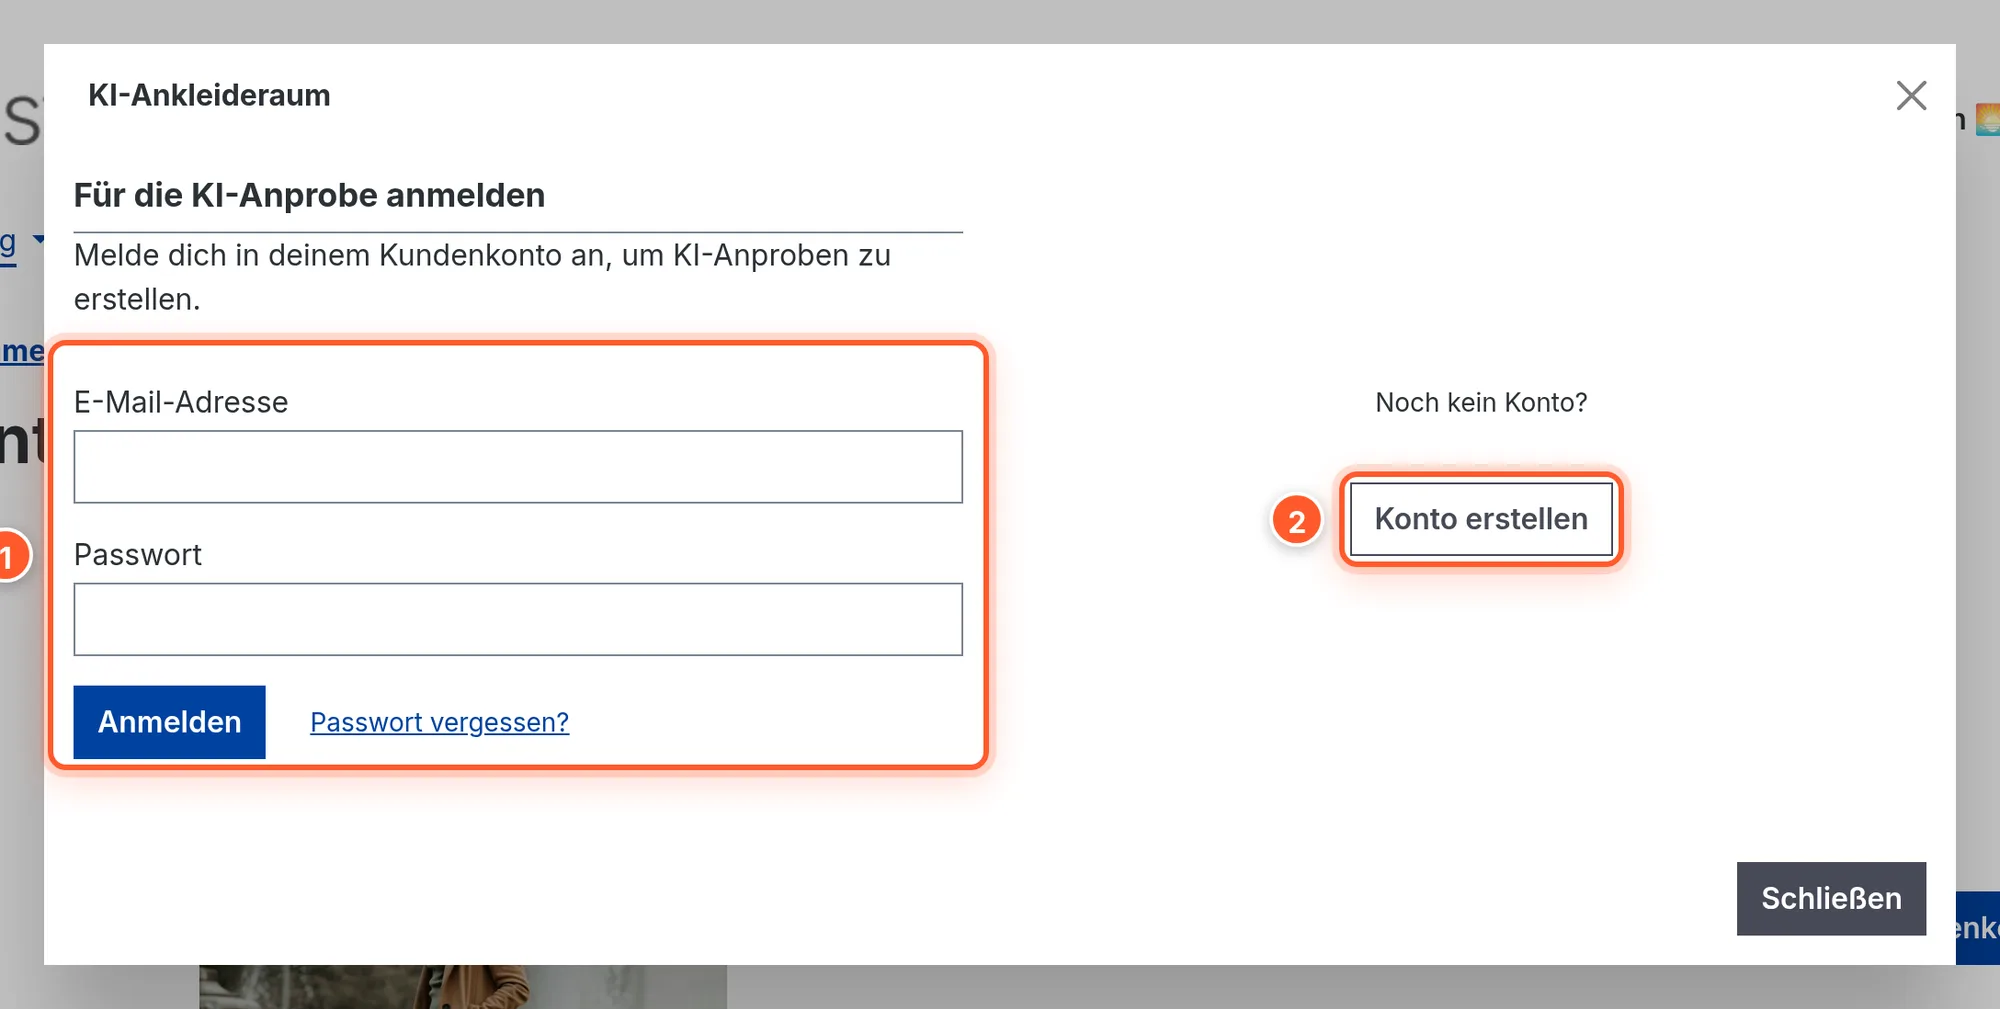
The try-on is reserved for logged-in customers. Anyone who isn’t logged in first sees the login form 1 and a Create an account button 2 in the window. After logging in (or registering), the customer lands back on the same product page, and the AI fitting room opens again automatically.
2. Upload a photo
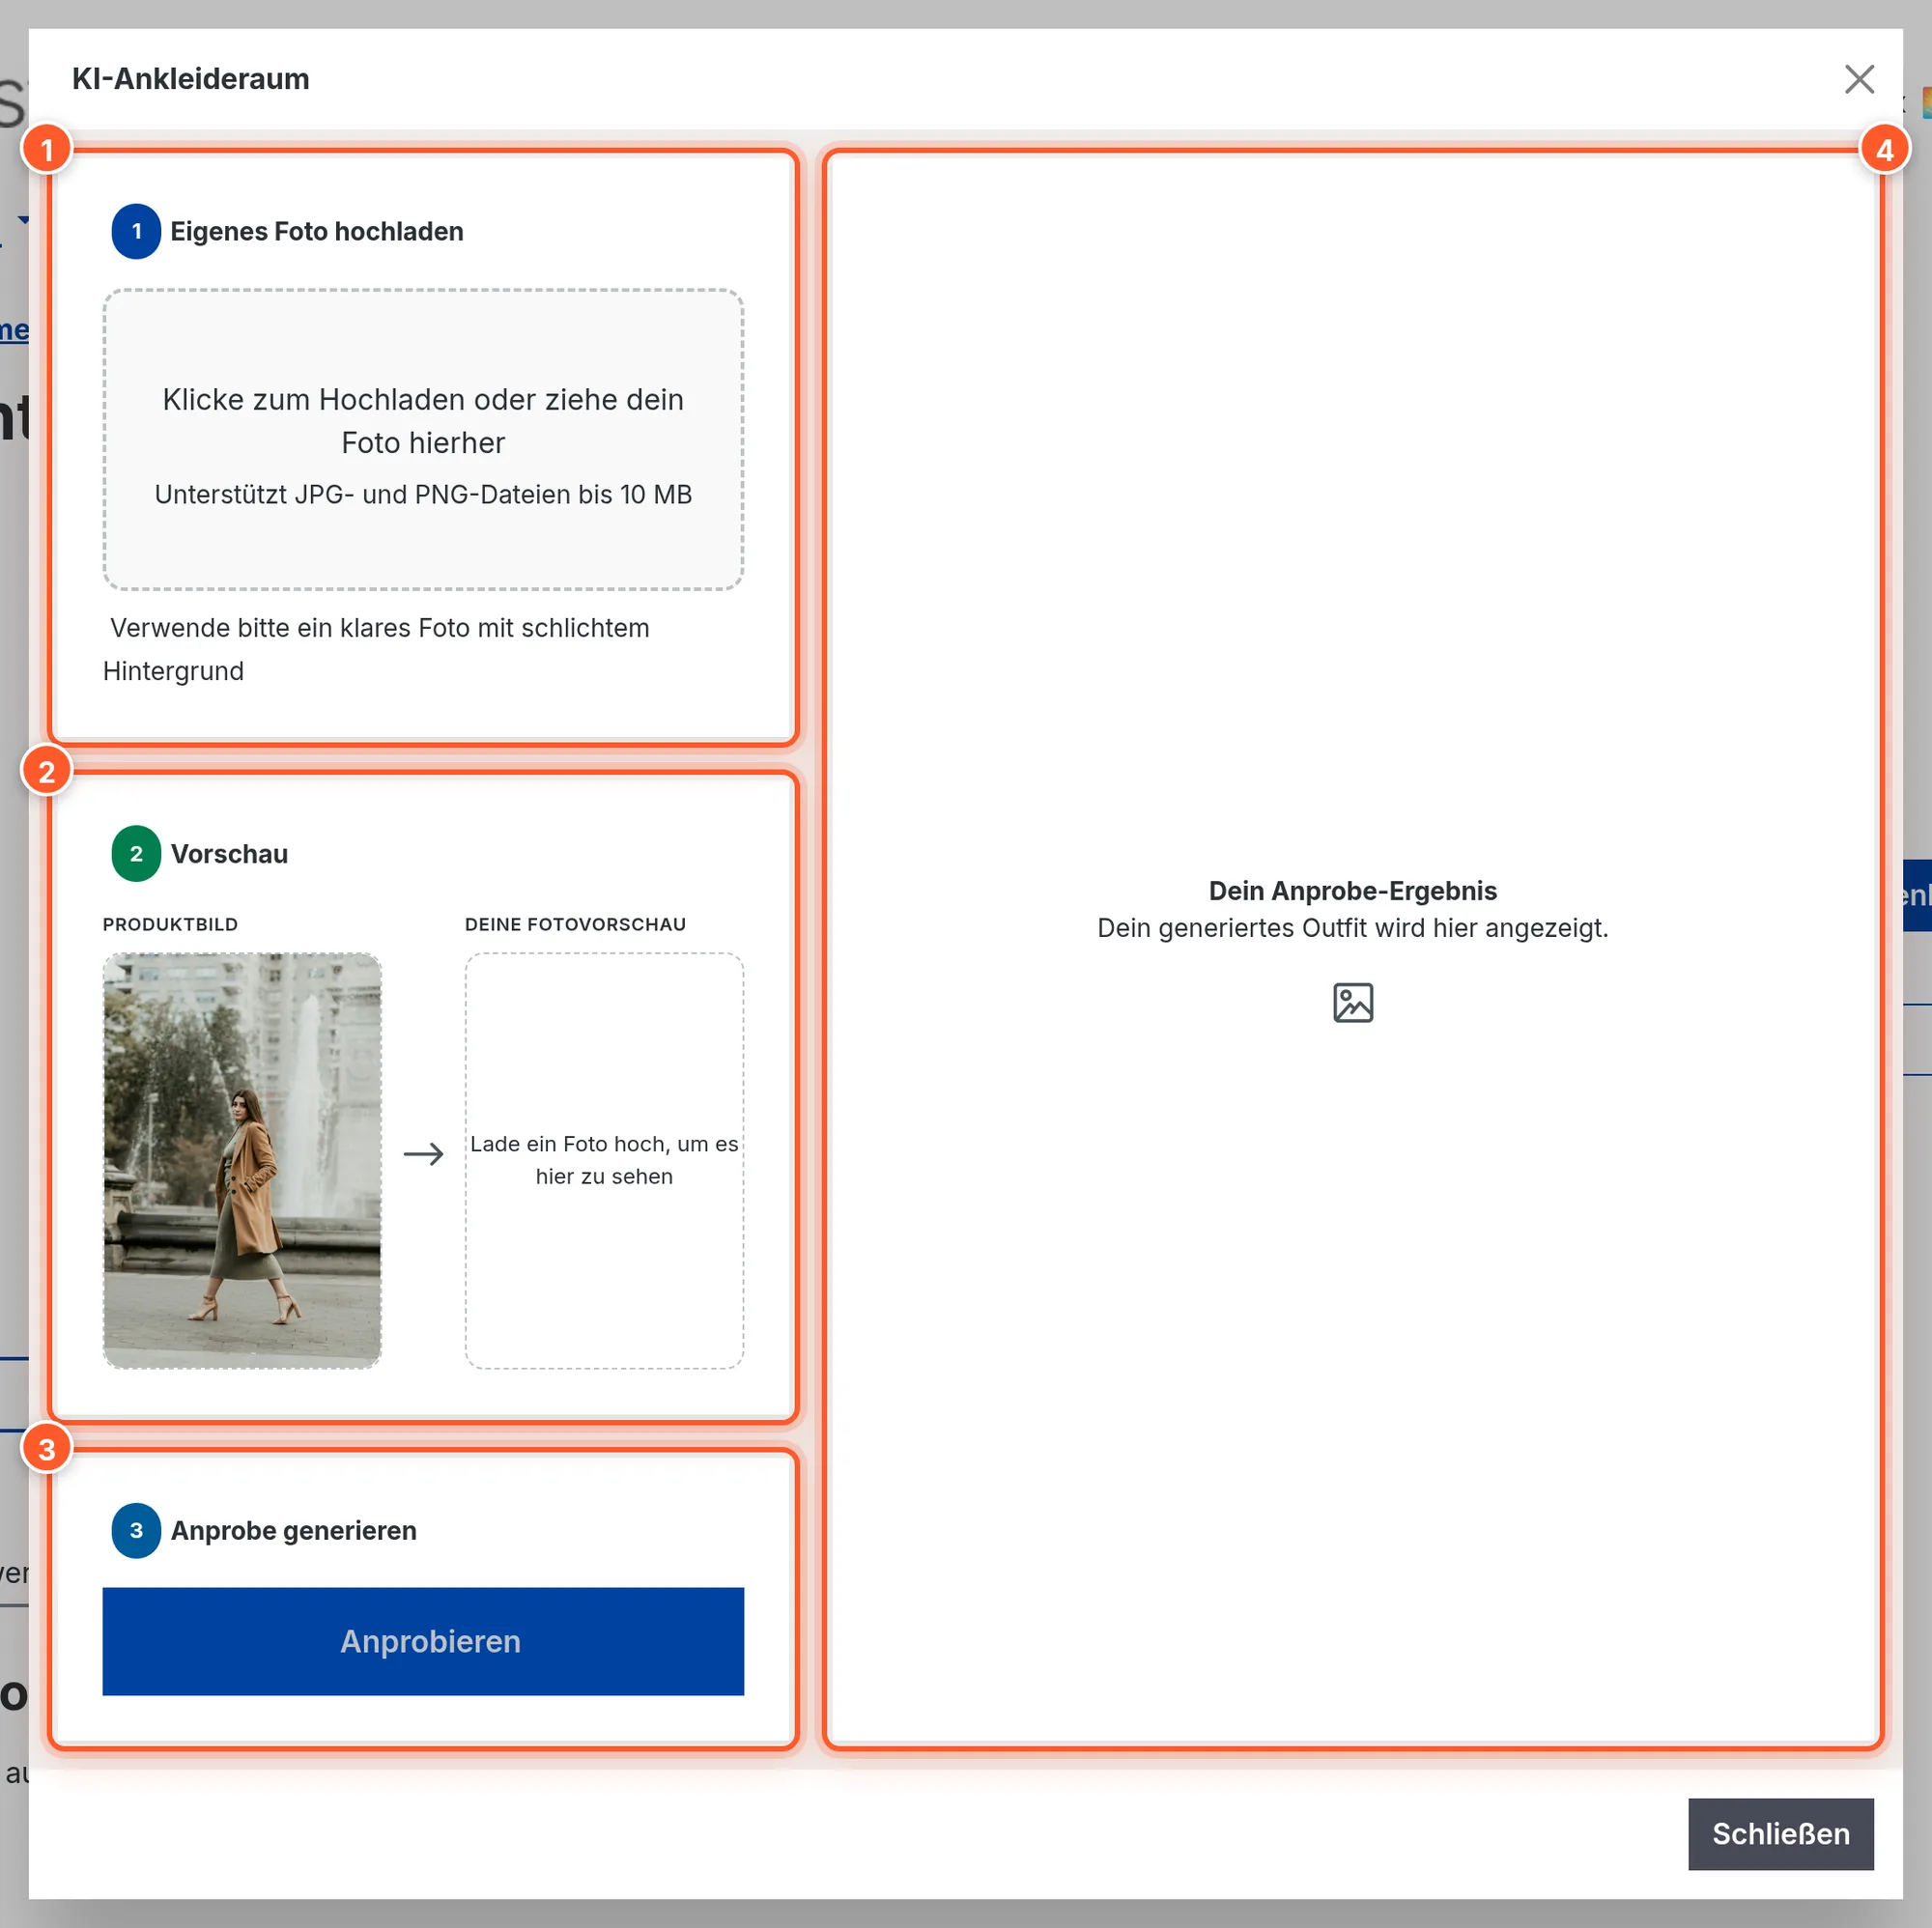
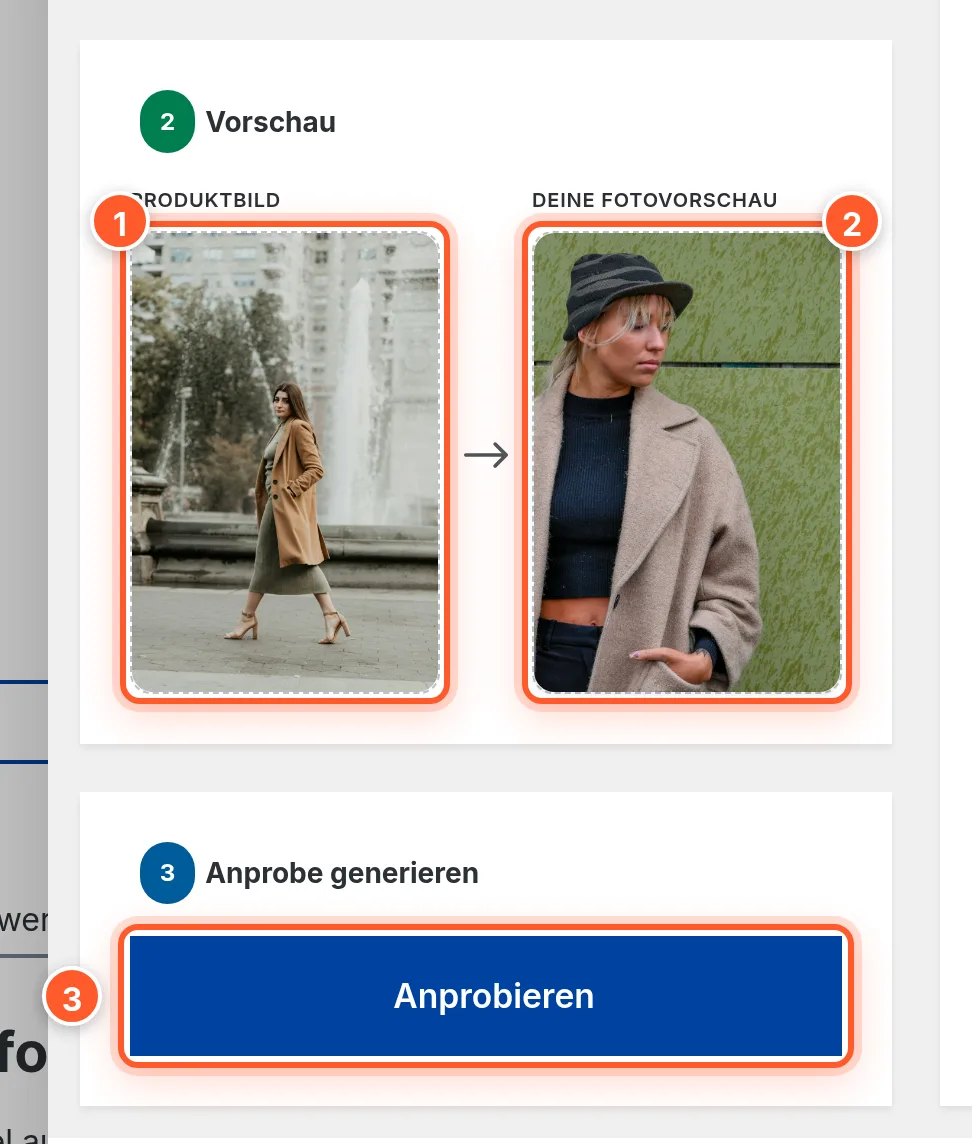
The AI fitting room guides customers through the try-on in three steps: 1 Upload Your Photo (click, or drag and drop a photo into the field), 2 Preview with the product image and their own photo, 3 Generate Try-On. The result appears on the right 4.
JPG and PNG up to 10 MB are allowed (or up to the size the flink service reports for your shop). The browser automatically scales very large photos down to a maximum of 2048 px on the longest side before sending. A well-lit photo against a plain background that clearly shows the relevant part of the body works best.
3. Try it on and use the result
A click on Try On starts the generation; according to the interface, it usually takes 10–30 seconds. The result appears on the right in the Your Try-On Result area and can be viewed full size and downloaded as an image (try-on-result.jpg).
When the quota is running low, the window shows the note “Only X try-ons left in this session.”; once it’s used up, the button is locked (“No try-ons remaining for this session. Please try again later.”).
On smartphones, the button 1 also sits right below the product images; customers can pick a photo from their gallery or, depending on the device, take one directly.
Product settings
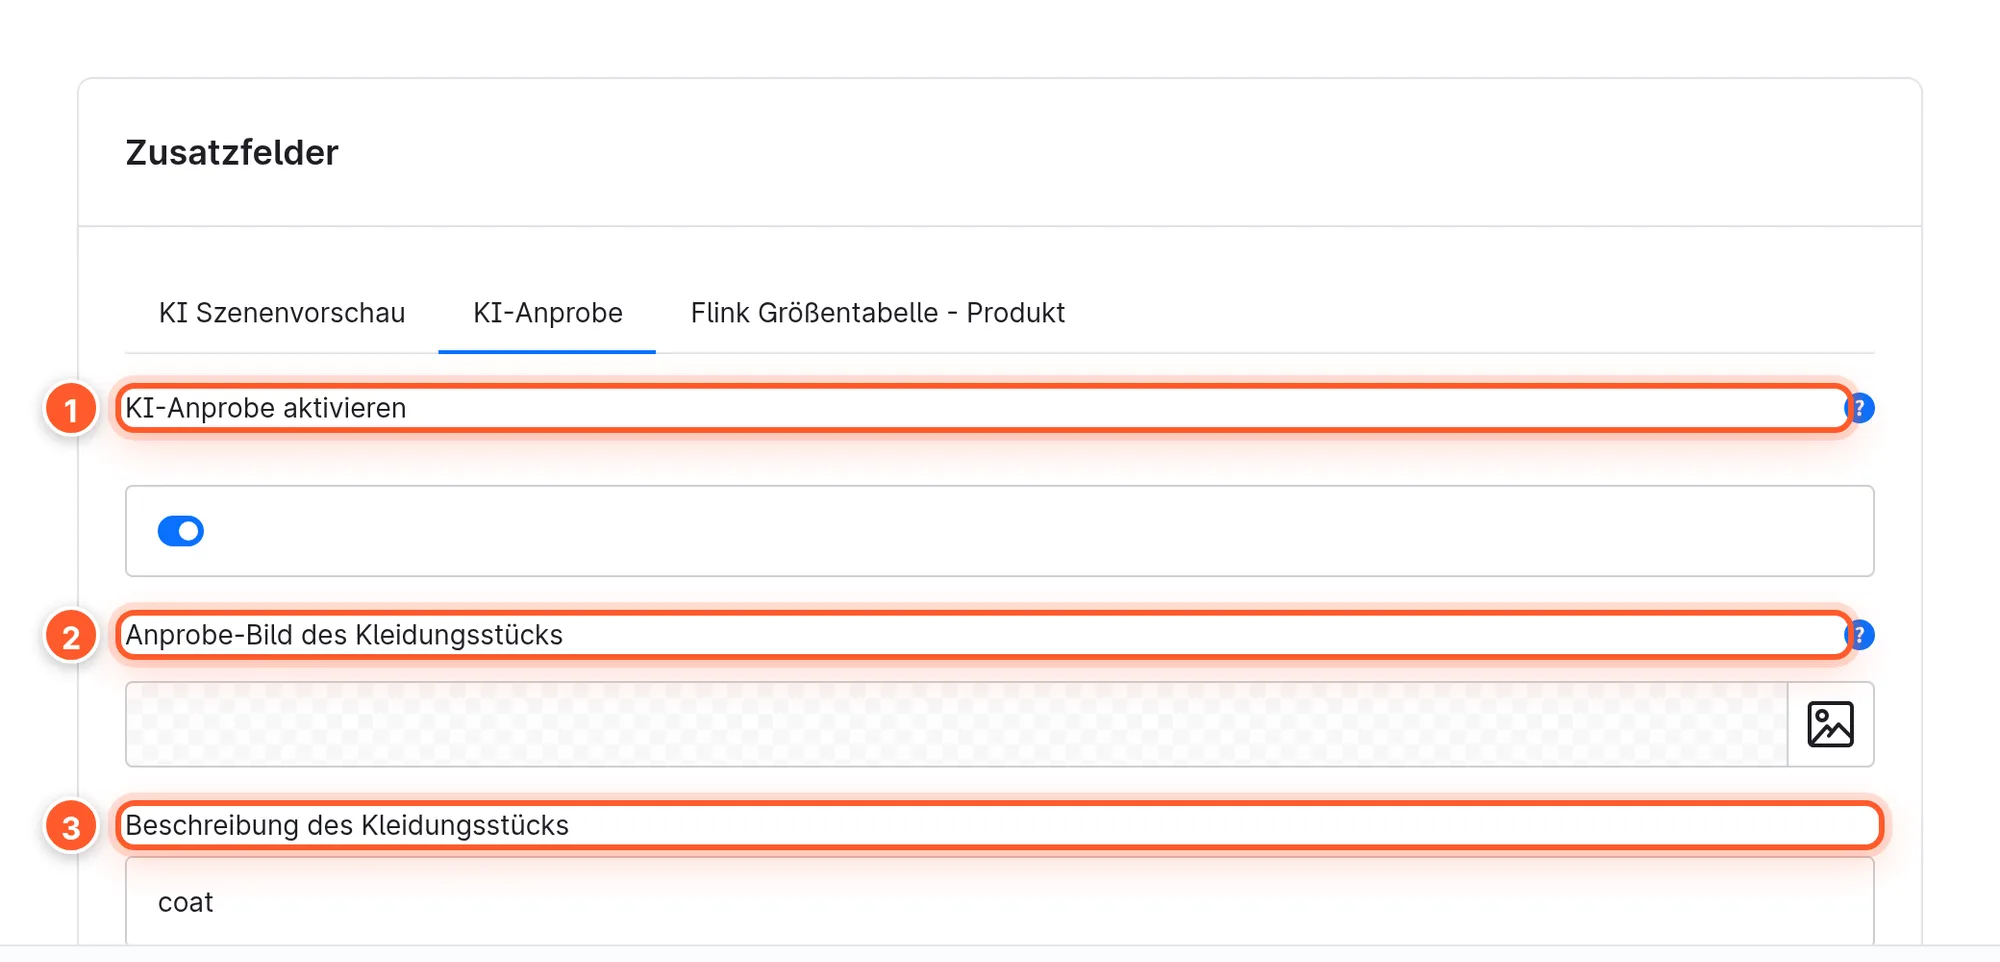
Every product has the AI Try-On custom field set (product › Specifications tab › Custom fields section):
| Field | Effect |
|---|---|
| Enable AI try-on 1 | Enables the try-on for this product. Not needed if it’s active globally for all products. |
| Garment image for try-on 2 | Image the AI uses as the template for the garment. Without its own image, the product’s cover image is used. Ideal: only the garment, cut out or against a plain background, without a model. |
| Garment type description 3 | Short type like “jacket”, “trousers” or “hat”. It’s passed to the AI so it puts the item in the right place. |
Settings
Extensions › My extensions › AI Virtual Fitting Room › ⋯ › Configure. All values can be set per sales channel.
General Settings
| Setting | Effect | Default |
|---|---|---|
| Activate AI Try-On for all products | On: every product with an image gets the try-on button. Off: only products with the custom field enabled. | off |
| Max generations per session | How many try-ons a customer may create per session – your most important lever for AI costs. The quota is counted by the flink service. (1–50) | 5 |
| Image processing dimension (px) | Target size for width and height when the service processes images. Larger = more detail, but slower. (512–2048) | 1024 |
Advanced Settings
| Setting | Effect | Default |
|---|---|---|
| Debug mode | Extra information during generation – for troubleshooting only, keep it off in production. | off |
| Max upload size (MB) | Maximum file size of customer photos. (1–50) | 10 |
Privacy – what goes to the service
The try-on processes a photo of a person – that’s personal data. Here’s what you should know:
- Consent: The app registers the entry “AI Try-On” in the Comfort features cookie group (cookie
flink-ai-try-on, 365 days) with the note “Uses external AI services to render try-on images based on your uploaded photo.” Without this consent, nothing can be generated; the window then shows “Please accept the AI try-on cookie in the consent banner”. - What is sent when clicking “Try On” (directly from the customer’s browser to
apps.flinkfactory.com):- the uploaded customer photo (scaled down to 2048 px if needed),
- the garment image (try-on image or product image),
- product ID, product name, product number and the garment type description,
- the visitor’s Shopware context token.
- Authentication: Requests go through Shopware’s app token for logged-in customers. This token, signed by your shop, identifies your shop, the sales channel and the customer account, among other things – hence the login requirement.
- Result: The generated image is returned to the browser and shown there; the app doesn’t store it in your shop.
- When the window opens, the browser only asks the service for the product configuration and the remaining quota – no photo yet.
Processing takes place on flink’s server and at the AI providers used there. Whether and for how long photos are stored there and which AI provider is used isn’t part of the app code – clarify this with flink before going live (data processing agreement) and mention the processing in your privacy policy.
Costs & limits
- The app is billed as a subscription in the Shopware Store (see the store page); every generation causes AI costs at the service.
- Max generations per session limits the try-ons per customer and session. The counter is kept on the server and reset after a certain time (“reset”); the exact duration is set by the service.
- The login requirement also prevents anonymous visitors or bots from triggering generations.
Tips & hidden features
- Better results with your own try-on image: Lifestyle photos with a model, several items or a busy background confuse the AI. A packshot of just the garment works wonders – without you having to change your product’s cover image.
- Keep the type clear: “coat” or “knit beanie” instead of “fall highlight”. For accessories, a location like “beanie on the head” helps.
- Drag and drop: Customers can drag a photo straight from their file explorer into the upload field.
- Direct link to the open try-on: The product page opens the window automatically when the URL contains the parameter
openTryOnModalId=aiTryOnModal-<product ID>– that’s how the return after login works, and you can use it to link directly to the try-on, e.g. in a newsletter (the customer has to be logged in). - Show the quota honestly: The note about remaining try-ons only appears when fewer than 5 are left – so with a limit of 5, from the first generation on.
- Test individual products first: Leave for all products off at first and enable a few typical items (top, trousers, beanie) via the custom field to check the result quality.
Frequently asked questions
The try-on button doesn’t appear.
Check: Is the product enabled (custom field or global option for the right sales channel)? Does it have an image? Does the product page use the “Gallery & buy box” block or the default buy box (custom theme templates can push the spot out)? Then clear the cache.
“Please accept the AI try-on cookie …”
The customer hasn’t accepted the comfort features. Via Cookie settings (link in the footer) they can enable “AI Try-On” later; the try-on then works without reloading.
The generation fails.
“Try-on generation failed …” usually means the AI couldn’t recognize a suitable person or body part in the photo. What helps: a different photo (whole person, from the front, good light), a clearer try-on image or a more specific garment type description.
Customers without an account should be able to try on too.
That’s not supported in version 1.0.0: the request to the service requires a Shopware app token, which only exists for logged-in customers. But registration is just one click away via Create an account in the window, and the try-on opens again automatically afterwards.
Error 500 on the product page in Shopware 6.7
The try-on window template in version 1.0.0 accesses a context property that no longer exists in Shopware 6.7. If an error 500 occurs after enabling a product, contact flink support.